Xer Mixa Manual#
An all-analog digitally controlled mixer with a whopping 10 stereo inputs, three stereo output busses, clickless mutes, state save and recall, MIDI I/O, and CV over dozens of parameters via configurable input expanders.
Screen reader accessible documentation
- Overview
- Etymology
- Power
- Interface
- Workflow
- Meter screen
- Channel 1-8 editing
- Channel 1-8 configuration
- Channel A/B editing
- Bus A/B configuration
- Global configuration
- Quad
- Hex
- Expando Expandi
- Etymology
- Expando Expandi installation
- Expando Expandi Interface
- Configuring CV inputs with Expando Expandi
- Patch Tutorial
- Input and output voltages
- MIDI specification
- Design Notes
- Special thanks
Overview#
Xer Mixa is a fully stereo mixer with eight stereo inputs plus two stereo returns, three stereo output busses, and an all-analog signal path for true analog summing. Digital control allows for state save and recall, accurate metering of all outputs, adjustment of pan law and routing per channel, and easy configuration for MIDI integration and CV input expanders. Channels can be routed to busses as pre or post-fader sends, and individual channel faders and clickless mutes make performance a fun, tactile experience.
Xer Mixa is a mixing powerhouse by itself, but if you are looking to add CV control, we have the Expando Expandi for you. Expando Expandi adds 8 configurable CV inputs. Up to 2 Expando Expandi can be connected to a single Xer Mixa, making it possible to CV virtually any parameter your patch may need. CV over level allows the mixer to behave as a final VCA for your voices or create dynamic automation, or use pan and bus CV to move your sounds in the mix.
- Type: Stereo Mixer
- Size: 32 HP; supports up to 2 expanders at 4 HP each
- Depth: 1 inch
- Power: 2x5 Eurorack
- +12 V:
500 mA - -12 V:
250 mA
Etymology#
Xer -- from Greek: "here is"
Mixa -- from Latin: "mix"
"Here is a lota mixer"
Power#
To power your Noise Engineering module, turn off your case. Plug one end of your ribbon cable into your power board so that the red stripe on the ribbon cable is aligned to the side that says -12 V and each pin on the power header is plugged into the connector on the ribbon. Make sure no pins are overhanging the connector! If they are, unplug it and realign.
Line up the red stripe on the ribbon cable so that it matches the white stripe and/or -12 V indication on the board and plug in the connector.
Screw your module into your case before powering on the module. You risk bumping the module's PCB against something metallic and damaging it if it's not properly secured when powered on.
You should be good to go if you followed these instructions. Now go make some noise!
Note
Both Xer Mixa and Expando Expandi have separate power cables, and need to be connected to each other, too. Check out the Expando Expandi section if you want to connect some expanders!
Interface#
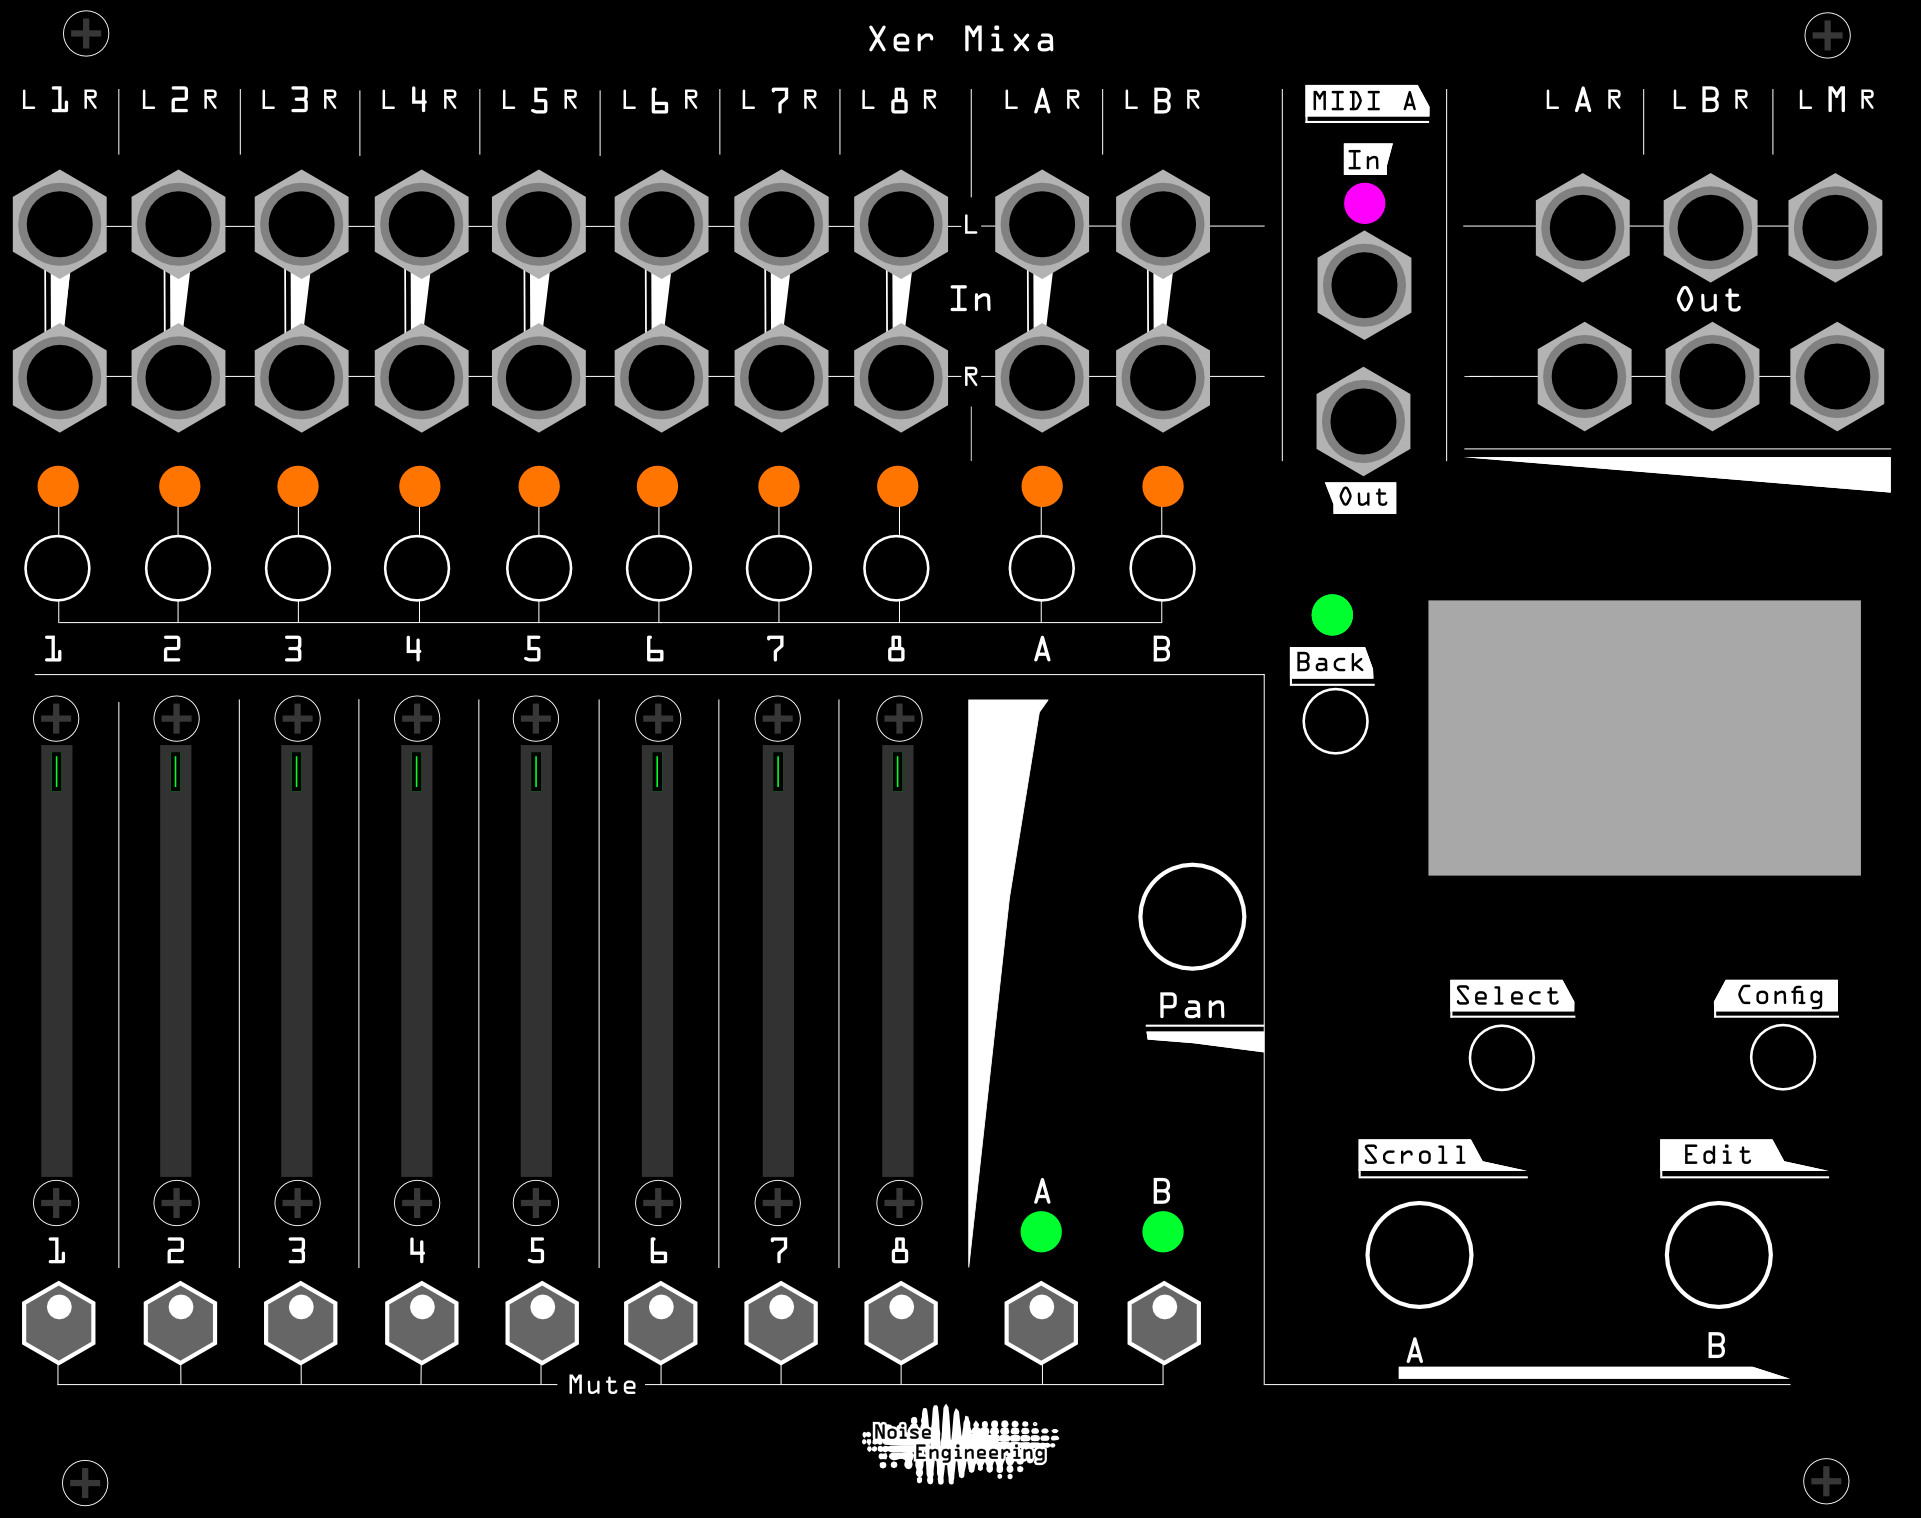
- Inputs L/R 1-8
- Stereo mix inputs. If the R jack is left unpatched, the signal from the L input will normal to R, for use with mono signals. The LEDs above the jacks show the level of the incoming signal.
- Inputs L/R A-B
- Stereo aux inputs. If the R jack is left unpatched, the signal from the L input will normal to R, for use with mono signals. The LEDs above the jacks show the level of the incoming signal.
- These inputs were designed with aux loops in mind (in conjunction with the A-B outs), but function identically to inputs 1-8. They have no dedicated level faders, but their input level can be set with the respective A or B encoder when the channel is selected. Learn more about channel editing in the Workflow section below.
- MIDI A In/Out
- TRS MIDI input and output jacks. All parameters send MIDI CCs, and can also be MIDI-controlled externally. For more details, see the MIDI specification section below.
- Outputs L/R A-B
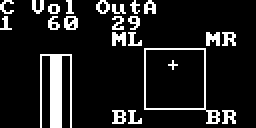
- Auxiliary outputs. The LEDs above the jacks show the output levels, and when no menus are open the output levels can be seen on the screen as well. These were designed with aux loops in mind, in conjunction with inputs A and B.
- The level of the A and B outputs can be adjusted on the main meter screen with their respective encoders.
- Output L/R
- Main Main mix output. The LEDs above the jacks show the output level, and when no menus are open the output level can be seen on the screen as well.
- The level of the main output can be adjusted on the main meter screen with the Pan encoder.
- Buttons 1-8+A-B
- Channel select buttons, used to select a channel (or channels) to adjust aux levels and panning. More information is available in the Workflow section below.
- Sliders 1-8
- Level sliders for channels 1-8.
- Mutes 1-8+A-B
- Clickless mutes for each channel.
- Back
- Used to exit the current menu/go back one page on the screen.
- Config
- Opens the global configuration menu on the meters page, or the channel configuration page when channel(s) are selected.
- Select
- Selects the currently highlighted menu item.
- Screen
- It can’t play Doom, but it might be able to play tennis.
- Pan
- If a channel is selected, this adjusts that channel's pan. Tap to reset pan to center.
- On the main meter screen, this adjusts the main output level.
- Scroll/A
- If channel other than A is selected, this adjusts the send to bus A for that channel. Tap to mute the A send. Tap again to set the send to maximum.
- If channel A is selected, this adjusts the level of A’s input. Tap to turn A’s level all the way down.
- If a menu is open, this scrolls through the items in that menu.
- On the main meter screen, this adjusts the output level of A.
- Edit/B
- If channel other than B is selected, this adjusts the send to bus B for that channel. Tap to mute the B send. Tap again to set the send to maximum.
- If channel B is selected, this adjusts the level of B’s input. Tap to turn B’s level all the way down.
- If a menu is open and an item with an adjustable value is highlighted, turning this encoder will edit that value.
- On the main meter screen, this adjusts the output level of B. If Cue is enabled, this adjusts the cue output level.
- If Cue is enabled, only the A send will show on the screen, and B’s inputs/channel screen functions the same way as channels 1-8. More information can be found in the Cue section below.
Note
Edits made with the encoders are saved between power cycles. These settings can also be saved and loaded with scenes. For more information, see the Scene section.
Workflow#
Meter screen#

This is the screen displayed on startup and when no channels are selected. This screen shows peak and RMS meters for each output.
When the meter screen is displayed, the Pan encoder adjusts the Main output level, and the A and B encoders adjust their respective output levels.
Channel 1-8 editing#

Tap a channel button 1-8 to select it for editing.
When a channel is selected, the three encoders adjust parameters for the channel. The Pan encoder adjusts pan position; tap the encoder to reset pan to the center. Encoders A and B adjust the A and B send levels respectively; tap to mute the sends. Tap again to set the send to maximum.
Note
Channel send and pan levels can quickly be edited from any screen. Hold down a channel select button, adjust the A, B, or Pan encoders, then release the channel select button to return to the previous screen.
Double tap a channel select button to solo the channel. Tap any channel select button to unsolo the channel.
Channel 1-8 configuration#

Select a channel and tap Config to open its configuration menu. Use the Scroll encoder to select a line in the menu to edit, and the Edit encoder to change the setting on that line. Tap Back to exit the configuration menu.
- Send A (or B) Pre/Post
- Sets whether the bus send level is pre or post fader. If set to Pre, adjusting the channel fader will not change the level of the signal going to bus A.
- Send M On/Off
- Sets whether the channel is sent to the main output (
On) or not (Off). - Trim
- Adjusts the amount of input attenuation from
0dBto-60dB. - Pan Law 0dB/4.5dB/6dB
- Adjusts the pan law for the channel. Pan laws adjust the level of a signal as its pan is adjusted to compensate for acoustic summing and, sometimes, better suit performance techniques. Leaving this at 0dB will work best for most applications.
- Pan A/B
- Changes how a channel’s pan setting affects the pan in the A or B output. This can be useful for compensating for send levels when using effects with mono inputs.
Track Panbehaves as set up on the channel configuration.LeftorRightSets pan hard left or hard right.MidSets the level equal in both channels.
- Multichannel editing/configuration
- To select multiple channels for editing, hold down a channel 1-8 button, then tap the other desired channel buttons. Release the first button. You can now edit the pan and send levels of all selected channels, or press
Configto change their configuration. - Tap
Backor select another channel to deselect all channels.
Channel A/B editing#

The A and B channels function similarly to channels 1-8. Tap a channel button to select it for editing. When a channel is selected, the three encoders adjust parameters for the channel. The Pan encoder adjusts pan position; tap the encoder to reset pan to the center. The A and B encoders adjust volume on the same and opposite busses.
Bus A/B configuration#

Bus channels A and B have their own configuration settings, slightly different from channels 1-8.
- Send A->A/Send B->B and Send A->B/Send B->A
- Sets the amount that the selected channel is sent to its own output.
Warning
If the input and output are configured in an effects loop, this will create feedback.
- Force Pan
- When set to
Track, the channel pan behaves as configured. Setting this toLeft,Mid, orRightforces the channel to always be set hard left, center, or hard right respectively. - Send A/Send B
- Sets whether the effects sends are pre- or post-fader.
- Send Mute
- When
On, track mutes also mute the send to this output. WhenOff, track mutes do not mute the send to this output. - Pan Law 0dB/4.5dB/6dB
- Adjusts the pan law for the channel. Pan laws adjust the level of a signal as its pan is adjusted to compensate for acoustic summing and, sometimes, better suit performance techniques. Leaving this at 0dB will work best for most applications.
Global configuration#

Tapping Config from the meter screen brings up the global configuration menu. This menu contains submenus for global behavior changes, expander and MIDI configuration, and scene saving/loading.
Scene#

Seven different scenes can be used to save and load send levels, pan positions, and expander configurations.
- Save/Load
- Select to open the save or load dialogue. Selecting one of the scene slots (
A-G) and selecting will save current settings or load that scene’s settings. - Set Defaults
- Press Select to reset all pan, aux sends, and expander configurations to default.
Note
Xer Mixa can change scene via MIDI Program Change messages 0-6.
Audio#
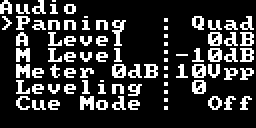
- Panning
- Configures the mixer for stereo, quad, or hex panning configurations. For standard operation, set to
Stereo. See the Hex and Quad sections below for more information about their behavior. - A/B/Main Level
- Sets the level of the bus output (0dB is the loudest setting, with up to
-40dBof attenuation available).
Note
If Cue is enabled, the B level setting adjusts the cue output level.
- Meter 0dB
- Sets the peak-to-peak voltage level that reads as `0dB`` on the output meter screen.
- Leveling
- Turning this above
0activates an all-analog leveling amplifier. Great for adding some punch to your mix! - Cue Mode
-
Enables/disables cue behavior. When set to
MuteorSelct, Out B becomes the cue output. This disables aux sends to the B output, and In B behaves the same way as an input channel.OffCue is disabled, and Out B acts as an aux send.MuteWhen a channel is muted, it is removed from the main mix and sent to the cue output at the level set by its fader.Selct (Select)When a channel is selected (by tapping buttons 1-8) it is output to the cue output at the level set by its fader. Multiple channels can be selected by pressing a channel button, holding it down, then tapping other channel buttons.
- Cue Mix
- Sets whether the cue output only outputs the cued channels (
Solo) or a mix of cued channels and the main output (Mix).
Timer#
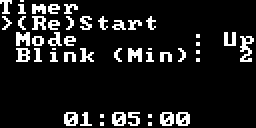
This screen enables/disables and configures performance timer.
- (Re)Start
- Selecting this item starts or restarts the timer.
- Mode
-
Configures the timer behavior.
OffDisables the timer.UpEnables a stopwatch that counts up.DwnEnables a countdown timer. The length of the timer can be set in minutes by editing the Time (Min) configuration option on the next line.
- Blink (Min)
- When enabled, the LEDs on Xer Mixa will flash each time the number of minutes set here has passed. To disable flashing, set to
0.
Expander#
This menu is used to configure any Expando Expandi that are connected to Xer Mixa. More details on the behaviors of the expander can be found in the Configuring CV inputs with Expando Expandi section below.
MIDI#
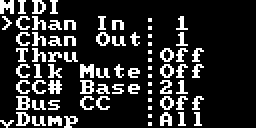
- Chan In
- Selects the MIDI channel that Xer Mixa responds to.
- Chan Out
- Selects the MIDI channel that Xer Mixa outputs to.
- Thru On/Off
- When turned to
On, Xer Mixa no longer outputs its own generated MIDI, but passes MIDI from the In to the Out jack. - Clk Mute
- Enables MIDI-clocked mute sync. When set to
off, channel switches mute/unmute channels instantaneously. When set to a division (like4/4), muting/unmuting will occur at that division (for example, each measure if set to4/4). This feature is great for creating big changes that are synced to the rest of your patch. - Mute switches behave as normal when there is no MIDI clock input present (after receiving a MIDI Stop message).
- CC# Base
- Sets the lowest CC used for MIDI control of Xer Mixa's parameters. By default, the mapping starts at
CC21, but this parameter can be used to raise or lower the starting point. Mapping information can be found in the MIDI Specification section below. - Bus CC
- Sets whether the A, B, and M outputs can have their levels adjusted with CCs. When enabled, adjusting the three encoders from the main screen will also output CC messages. Mapping information can be found in the MIDI Specification section below.
- Dump
- Turning Edit changes which configuration settings will be dumped to sysex. Tapping Select initiates the sysex dump.
- Panic
- Tapping Select resets all MIDI-adjusted parameters to their panel settings.
- Log
- Tapping Select opens the MIDI log which shows all incoming MIDI data.
Note
The full MIDI implementation can be found in the MIDI specification section below.
Visual#

- Screen
- Adjusts the brightness of the screen. The brighter the screen, the higher the power consumption.
- LEDs
- Adjusts the brightness of the LEDs.
- Off Time
- Adjusts how long it takes for the screen to turn off if no controls have been interacted with. The mixer will stay powered on and function as usual when the screen is off.
Note
To keep the screen on all the time, set Off Time to 0.
- Saver
- Changes the screensaver that is displayed after the
Off Time. - Orient Up/Down
- Changes the panel direction. If you want the jacks to be on the bottom, set this to
Down. If you want the jacks to be on the top, set this toUp. - Meters On/Off
- Turns the main meters
OnorOff. If set toOff, the main screen will be black. - Rainbow
Onplays a fun lightshow, andFrzassigns a different LED color to each channel. This can be useful for at-a-glance channel identification in low-light conditions.- Defaults
- Tap Select on this item to reset all visuals to their default settings.
Test#
Don’t worry if you see a Fail message! The test procedure requires various cables, incantations, and just a little bit of sorcery, known only to our manufacturer. If you’re holding a Xer Mixa, it has passed test.
Calibration#
This section contains two items used for factory calibration. You should never need to recalibrate your mixer or expander, so the Meters and Expanders menu items are for the manufacturing QA team to use. The Xer Tennis option, however, is fun the whole family can enjoy.
Quad#

Xer Mixa can be used with quadraphonic setups. From the main meter screen, press Config then navigate to Audio. Set Pan to Quad.
The main L and R outs are the front left and right; the B L and R outs are the back left and right. The A outputs still function as a stereo aux send.
Note
If Cue is enabled, the cue signal will be sent out of the A output pair, and no aux sends will be available.
Channel 1-8/B editing in quad#
Tap a channel button 1-8 or B to select it for editing.
When a channel is selected, the three encoders adjust parameters for the channel. The Pan encoder adjusts pan position left to right; tap the encoder to reset pan to the center. Encoder B adjusts the pan position forward or backwards. Encoder A adjusts the A send level; tap to mute the send. Tap again to set the send to maximum.
Channel configuration settings are a relevant subset of the stereo settings; see the channel configuration section for more details.
Hex#

Xer Mixa can be used with hexaphonic setups. From the main meter screen, press Config then navigate to Audio. Set Pan to Hex.
The main L and R outs are the front left and right, the B L and R outs are the center left and right, and the A L and R outs are the back left and right.
Note
Since all outputs are used for monitors in hex mode, Cue and aux sends are not available.
Channel 1-8/A/B editing in hex#
Tap a channel button 1-8, A, or B to select it for editing.
When a channel is selected, the Pan and B encoders adjust parameters for the channel. The Pan encoder rotates the pan position in a circle; tap the encoder to reset pan to the center. Encoder B adjusts the channel width; tap the encoder to reset it to a moderate width. Encoder A is unused.
Channel configuration settings are a relevant subset of the stereo settings; see the channel configuration section for more details.
Expando Expandi#
Screen reader accessible documentation
- Depth: 1 inch
- Power: 2x5 Eurorack
- +12 V:
70 mA - -12 V:
0 mA
Etymology#
Expando Expandi — from Latin ex + pandere for "to spread out"
“Spreading in a panda-like fashion (it may have fallen from a tree? Regardless, it is joyous).”
Expando Expandi installation#

To connect an Expando Expandi to your mixer, power off your system and remove both modules from your case. Your Expando Expandi comes with a three-pin expansion cable used to connect it to Xer Mixa. Looking at the back of the board, locate the expansion headers on the left of Xer Mixa and the top and bottom of Expando Expandi. Connect one end of the expansion cable to one of Xer Mixa’s expansion ports, and the other end to one of Expando Expandi’s expansion ports. It doesn’t matter which ports you use.
Up to two expanders can be used with one Xer Mixa at one time.
After the expansion cables are attached, plug both modules into Eurorack power, screw them into your case, and power it on.
Note
When you connect a new expander to your Xer Mixa, Xer Mixa needs to scan for new expanders. Navigate to the Expander menu in the main configuration menu and select Scan.
Expando Expandi Interface#

- Inputs 1-8
- CV inputs. See the Configuring CV inputs with Expando Expandi section below for more information.
- Status LED
- When connected to a Xer Mixa, this LED will illuminate a steady color.
Note
If the color is continuously changing, that means it is not connected to the Xer Mixa; perform a scan to connect.
Configuring CV inputs with Expando Expandi#

Navigate to the Expander menu on your Xer Mixa under the global configuration menu.
Select an expander (displayed as Expandi A or B). This will open that expander’s configuration menu.
- Show
- Displays incoming CV.
- New Mod
- Select this to add new modulation routings.
- When New Mod is selected, a new default modulation routing is created, and the screen will automatically navigate to the routing configuration screen.
- Jack
- Selects the input (
1to8) on Expando Expandi that this modulation routing will respond to. - Channel
- Selects the destination that this modulation routing will affect.
- When a routing's channel is set to
Channel: 1-8,A, orB, it will affect one of Xer Mixa's mixer channels. - When an input is set to
Channel: OA,OB, orOM, it will control the level of the A, B, or M outputs respectively. - When an input's channel is set to
Channel: clk, triggers sent to that input will synchronize channel mute changes to the rising edge of the trigger. Similar to the MIDI clock function, this is useful for making big clock-synced changes in your patch.
Note
When an input is set to Channel: clk, mute switches will not mute/unmute a channel until a trigger is received at that input.
- Param
- Selects which parameter on the destination mixer channel this modulation will affect. Options are
Volume,Mute,Pan,Send A, andSend B.
Note
Send A and Send B always perform the same task as adjusting the A and B encoders from a channel screen. This means that in quad mode Send A adjusts send levels as usual, but Send B adjusts pan postion forwards and backwards. In hex mode, Send A is unused and Send B adjusts panning width.
- Action
- Changes how incoming modulation will affect the destination parameter.
Addadds the CV value to the current value of the parameter. The parameter setting acts as an offset to the incoming CV.Scaleattenuates the CV value with the current value of the parameter setting the maximum. This is particularly useful when, for example, modulating volume with envelopes: the volume fader of a channel will attenuate the maximum level reached.OverCV has full control of the full range of a parameter, ignoring the value set elsewhere in the interface.
- Amount
- This is an attenuverter for incoming CV, with a range of
-200 to 200. Unity gain for CV is at 100, and negative settings invert incoming CV. - Offset
- Offsets the incoming CV, changing its 0 point.
- Clear Mod
- Removes the modulation routing from the list.
Note
Multiple routings can be created from a single CV input, and multiple modulation sources can affect a single destination. In total, 32 modulation routings can be created no matter the number of expanders connected.
Patch Tutorial#
For all patch examples, the Main L and R outs of Xer Mixa should be patched to your output module, audio interface, or other final destination for monitoring.
First patch and basic mixing#
Patch a sound to In 1; if your sound is mono, patch to only the L jack. If your sound is stereo, use both L and R. Unmute the channel by flipping the 1 switch to the upper position, and use the fader to adjust its level.
Tap the 1 button and use the Pan encoder to adjust its positioning in the stereo field, or tap the Pan encoder to reset it to center.
Repeat using channels 2-8 to mix in any other sounds in your patch!
Adding auxiliary effects#
After completing the first patch, you may want to add some effects to add space and new timbres to your mix.
Patch Out A L and R to the inputs of an effects module, like a reverb. Patch the outputs of the effects module to In A L and R. Set the Dry/Wet blend control on the effects module to 100% wet. Make sure Mute A is set to the upper unmuted position. If your effects module has a mono input, set the Force Pan channel setting to `Mid`` to compensate for level changes due to panning.
Select a channel by tapping its button. Turn the A encoder to increase the level of that channel’s input to the effect. Select other channels and increase their Send A level as desired.
By default, all channels are set to be post-fader sends. This means that a channel’s level slider also affects the effect send levels. This makes mixing on the fly straightforward, but also limits some performance techniques. By selecting a channel and pressing Config, the A and B sends can be configured to Post instead of Pre. This decouples the level fader from the effects send levels, and makes it possible to hear a channel only through an effect, useful for reverberant fade-ins and other creative uses.
Cue#
Deselect all channels by tapping Back until the meter screen is visible. Tap Config and navigate to Audio. Set the Cue Mode to Mute.
This will change the behavior of the B L and R outputs to be a cue out, instead of an effects send. Patch the B L and R outs to a headphone amplifier module, like Sono Abitus.
When a channel is muted (Mute switch in the lower position), it will be sent to the B output, but not the main out. This makes it possible in a performance to listen to a channel of the mix before your audience does.
Note
Channels with their faders in the minimum position are not heard on the cue out or the main out. When a channel’s Mute switch is in the minimum position and cue is enabled, its fader still controls the level of the channel, but it will only be heard at the cue out until the channel is unmuted.
Using a channel as a VCA#
Press Config and navigate to the Expander menu. Select a connected expander from the list, then select New Mod. Scroll to the new modulation routing and select it to open the configuration menu.
Set the Jack and Channel settings to 1. This will route the CV from Expando Expandi’s first input to Xer Mixa’s channel 1.
Set the Action to Scale.
In a compact system, Xer Mixa can act as a final VCA for any synth voices. Patch a freerunning oscillator to Channel 1’s input jack(s), and patch an envelope generator to the CV 1 jack on Expando Expandi.
Slide the channel 1 fader all the way up, and unmute the channel. This will allow the envelope to control the level of the voice, but since the fader attenuates the incoming CV, you can still use it to balance the level of the voice against the rest of your mix.
Random panning and creative CVing#
CV can also be used for creative effects like CV over panning with LFOs.
Press Config and navigate to the Expander menu. Select a connected expander from the list, then select New Mod. Scroll to the new modulation routing and select it to open the configuration menu.
Set the Jack and Channel settings to your desired Expando Expandi input and Xer Mixa channel respectively.
Set the Param to Pan.
Patch a random CV signal to the selected input on Expando Expandi.
Set the Amount and Offset controls to affect the desired amount of panning. If you’re using a unipolar CV source, turning the Offset control down will allow your modulator to affect pan in both directions. Changing Amount will change the range of modulation.
Input and output voltages#
Xer Mixa’s audio inputs have incredibly high headroom and clip around 22 V peak to peak.
Xer Mixa’s outputs have a similar dynamic range and can output full scale signals based on the levels present at its inputs.
Xer Mixa’s MIDI jacks are TRS MIDI type A.
Expando Expandi’s CV inputs have a range of -5 V to +5 V.
MIDI specification#
Xer Mixa can change scenes via MIDI Program Change messages. Program Change 0-6 correspond to scenes A-G.
Xer Mixa's volume faders and mute controls will output MIDI CCs from any screen. Send and pan CCs will be output from channel editing screens when adjusted. If Bus CC is On in the Global MIDI Config, the A, B, and M output levels can be adjusted with their respective CCs, and will output CCs when adjusted with the three encoders from the main meter screen.
By default, MIDI CCs start at CC21. The starting number can be changed in the MIDI menu by adjusting the CC# Base parameter. This control changes all of the CC assignments by the same amount. This chart shows the default CC assignment list.
| Parameter | Volume | Mute | Unmute | Pan | Send A | Send B |
| CC values | 0-127 |
0-64 |
65-127 |
0-127 |
0-127 |
0-127 |
| Channel 1 | CC21 | CC31 | CC41 | CC51 | CC61 | |
| Channel 2 | CC22 | CC32 | CC42 | CC52 | CC62 | |
| Channel 3 | CC23 | CC33 | CC43 | CC53 | CC63 | |
| Channel 4 | CC24 | CC34 | CC44 | CC54 | CC64 | |
| Channel 5 | CC25 | CC35 | CC45 | CC55 | CC65 | |
| Channel 6 | CC26 | CC36 | CC46 | CC56 | CC66 | |
| Channel 7 | CC27 | CC37 | CC47 | CC57 | CC67 | |
| Channel 8 | CC28 | CC38 | CC48 | CC58 | CC68 | |
| Channel A | CC29 | CC39 | CC49 | CC59 | CC69 | |
| Channel B | CC30 | CC40 | CC50 | CC60 | CC70 | |
| Output A | CC71 | |||||
| Output B | CC72 | |||||
| Output M | CC73 |
Design Notes#
The story of Xer Mixa is a long and twisty one. It starts way back before we even were NE. Stephen wanted to make a mixer as one of the very first things he made. Back then, it had a different name (Mictic Xerester) and a very different feature set: 4 mono inputs with mutes. We’ve released two different versions of other mixer concepts, and both really taught us a lot about what we needed to know for the analog portion of XM, but…this was a very long road that we kind of wondered if would ever end. In fact, it’s had so many design revisions that I don’t remember them all (the one you hold in your hands is version 66!).
There’s been a lot of talk the past few years about parts shortages. In recent months, the supply chain has been easing for many things, thankfully. But just when we thought we were through with the parts shortage, the parts shortage proved it was not done with us.
We found an absolutely magical part that was the sticking point that had been preventing us from being able to build the module the way we wanted to. When we found it, it was in stock in droves, and it was cheap. Which was great because we needed six of them per unit, and was part of the reason the module had languished as long as it had: we couldn’t find a way to build it in a way that it would be a good product but also not ONE MILLION DOLLARS (insert Austin Powers meme here). But this part was the solution!
Of course, we dilly dallied with prototypes for so long though that when it came time to go into production, our manufacturer sent us the dreaded message asking if we had a drop-in replacement.
We did not.
Panic ensued.
Spoiler: we got the parts (through some fine finagling by our manufacturer) and we finished up our end of things and got ready to order it. We had an August 17 release date on the calendar that we were already blowing so we were under the wire here. We handed it to Kris to do the tests she does prior to ordering.
Long-time NE fans may be aware of the lore here that Kris does the schematic capture and pcb design, and then generally doesn’t touch the module much until close to the end of development. For XM, moments before she ordered the production run, she had her moment. A head scratching moment led to her calling Stephen into her office, which led to some words we can’t use on a family-friendly blog. More power filtering would be needed.
We pushed the release date and started gluing parts to the front of the board. We had Markus drive over here and swap modules out. We tested and glued more parts on and cut away a front panel, and we tested and tested and tested.
And then we got another message from the manufacturer about the faders. The fader color we wanted with the specs we needed didn’t exist and…hey guess what, every color that did was out of stock.
More panic.
And then I said hey wait, these are the same parts we use on Lapsus Os. Don’t we have a supply of those?
And we did.
At some point in the midst of all of this, we finally got our act together and finaled the PCB and ordered our production run.
Even then our ship date was in the air while we waited on our manufacturer to slot us into the build time and while we worked like mad to get the firmware done. Funfact: it takes 17 minutes just to mill a Xer Mixa panel. Not print, not paint, just mill.
Special thanks#
- Our awesome manufacturer for not dropping us as clients after building this thing.