Opp Ned Manual#
Four-channel arpeggiator with customizable patterns and CV control
Screen reader accessible documentation
Overview#
Opp Ned is a four-channel arpeggiator designed for creating simple patterns that can be modified with CV. Use a clock or trigger sequencer to advance through arpeggios, and use the onboard CV-able playback controls to change up the pattern. Arpeggios can be edited then saved to twelve memory slots. Recall your custom arpeggio manually or with a CV input to Ptn to change between saved patterns. The quantized transpose input makes it easy to combine Opp Ned with external sequencers, too!
- Type: Quad arpeggiator
- Size: 8 HP Eurorack
- Depth: .8 inch
- Power: 2x5 Eurorack
- +12 V:
60 mA - -12 V:
10 mA
Etymology#
Opp -- from Norwegian: "Up"
Ned -- from Norwegian: "Down"
"Up and down"
Input & output voltages#
Opp Ned’s modulation inputs have a range of 0V to +5V. The Xpose input has a range of -2V to +5V.
Its CV outputs have a range of 0V to +5V.
Its trigger inputs have a threshold around +2V.
Power#
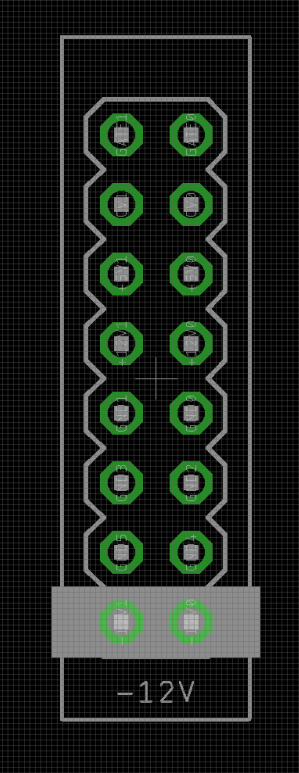
To power your Noise Engineering module, turn off your case. Plug one end of your ribbon cable into your power board so that the red stripe on the ribbon cable is aligned to the side that says -12 V and each pin on the power header is plugged into the connector on the ribbon. Make sure no pins are overhanging the connector! If they are, unplug it and realign.
Line up the red stripe on the ribbon cable so that it matches the white stripe and/or -12 V indication on the board and plug in the connector.
Screw your module into your case before powering on the module. You risk bumping the module's PCB against something metallic and damaging it if it's not properly secured when powered on.
You should be good to go if you followed these instructions. Now go make some noise!
Noise Engineering modules are reverse protected. If you accidentally installed it with the red stripe up, simply remove the power and place it correctly.
A final note. Some modules have other headers -- they may have a different number of pins or may say "not power". In general, unless a manual tells you otherwise, do not connect those to power.
Interface#
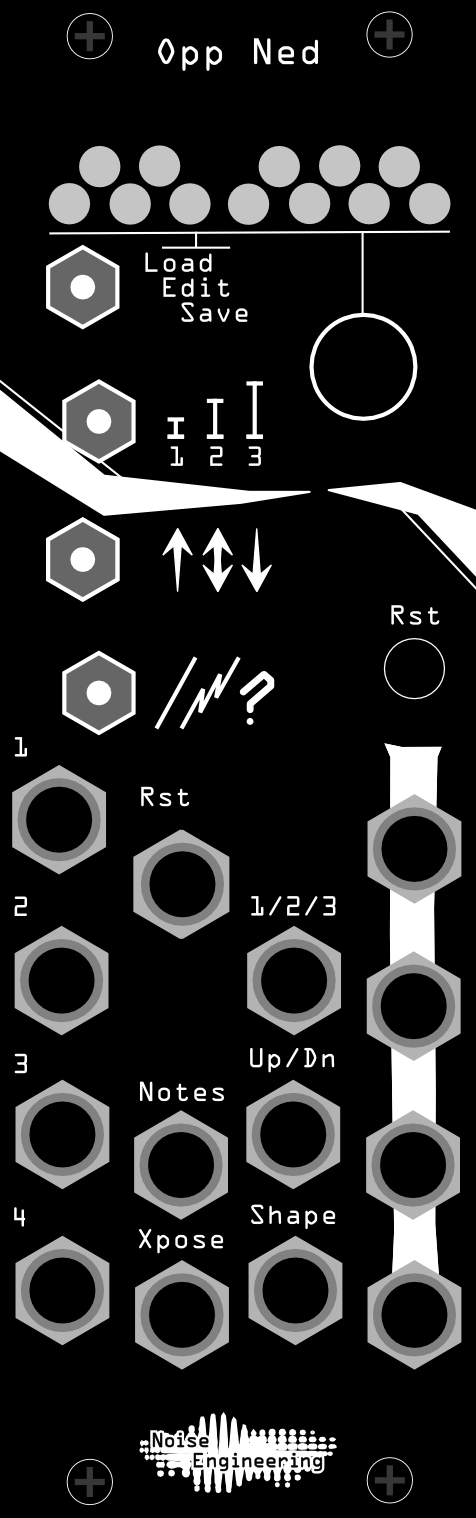
- Load/Edit/Save (and Notes CV input)
- The Load/Edit/Save switch and encoder are used to modify arpeggios. More details can be found in the section below titled Changing arpeggios. The Notes CV input can be used to switch between saved arpeggios.
- 1/2/3 (and 1/2/3 CV input)
- Changes the span of the arpeggio. Options are
1,2, or3octaves. - Direction (and Up/Dn CV input)
- Changes whether the arpeggio ascends (
Up), descends (Down), or ascends then descends (UD). - Shape (and Shape CV input)
- Changes how the arpeggio plays back.
Pln: Notes advance sequentially.Zig: Notes ascend one step, descend one step, then jump two steps.Rnd: Random playback.
- Rst
- Resets all four channels to their first step on their next advance when the button is pressed or a trigger is received at the input. When the button is held down, all four channels will freeze on the current step until released, then jump to the root note.
- Ins 1/2/3/4
- Trigger inputs that advance each channel.
Note
All four channels use the same arpeggio, but can be advanced independently.
- Xpose
- CV input that is added to the note output of all four channels. Useful for transposing your arpeggios!
- Outs 1/2/3/4
- Pitch CV outputs.
Note
To change LED brightness, hold down the Rst button and turn the encoder.
Changing arpeggios#
Loading, saving, and editing of arpeggios is done with the top switch and the encoder.
- Edit
- When the switch is in the center
Editposition, the currently loaded arpeggio can be modified. Rotating the encoder selects a note, and tapping the encoder adds or removes it from the current arpeggio. - Holding the encoder down on an active note will make it the root note of an arpeggio.
- Save
- Once the desired arpeggio has been created, flip the switch to the right
Saveposition, rotate the encoder to select one of the 12 save slots, then tap the encoder to save. - Load
- Loading works the same way as saving: flip the switch to the left
Loadposition, rotate the encoder to select the desired arpeggio, then tap to load. A preview of the arpeggio to be loaded when a save slot is highlighted.
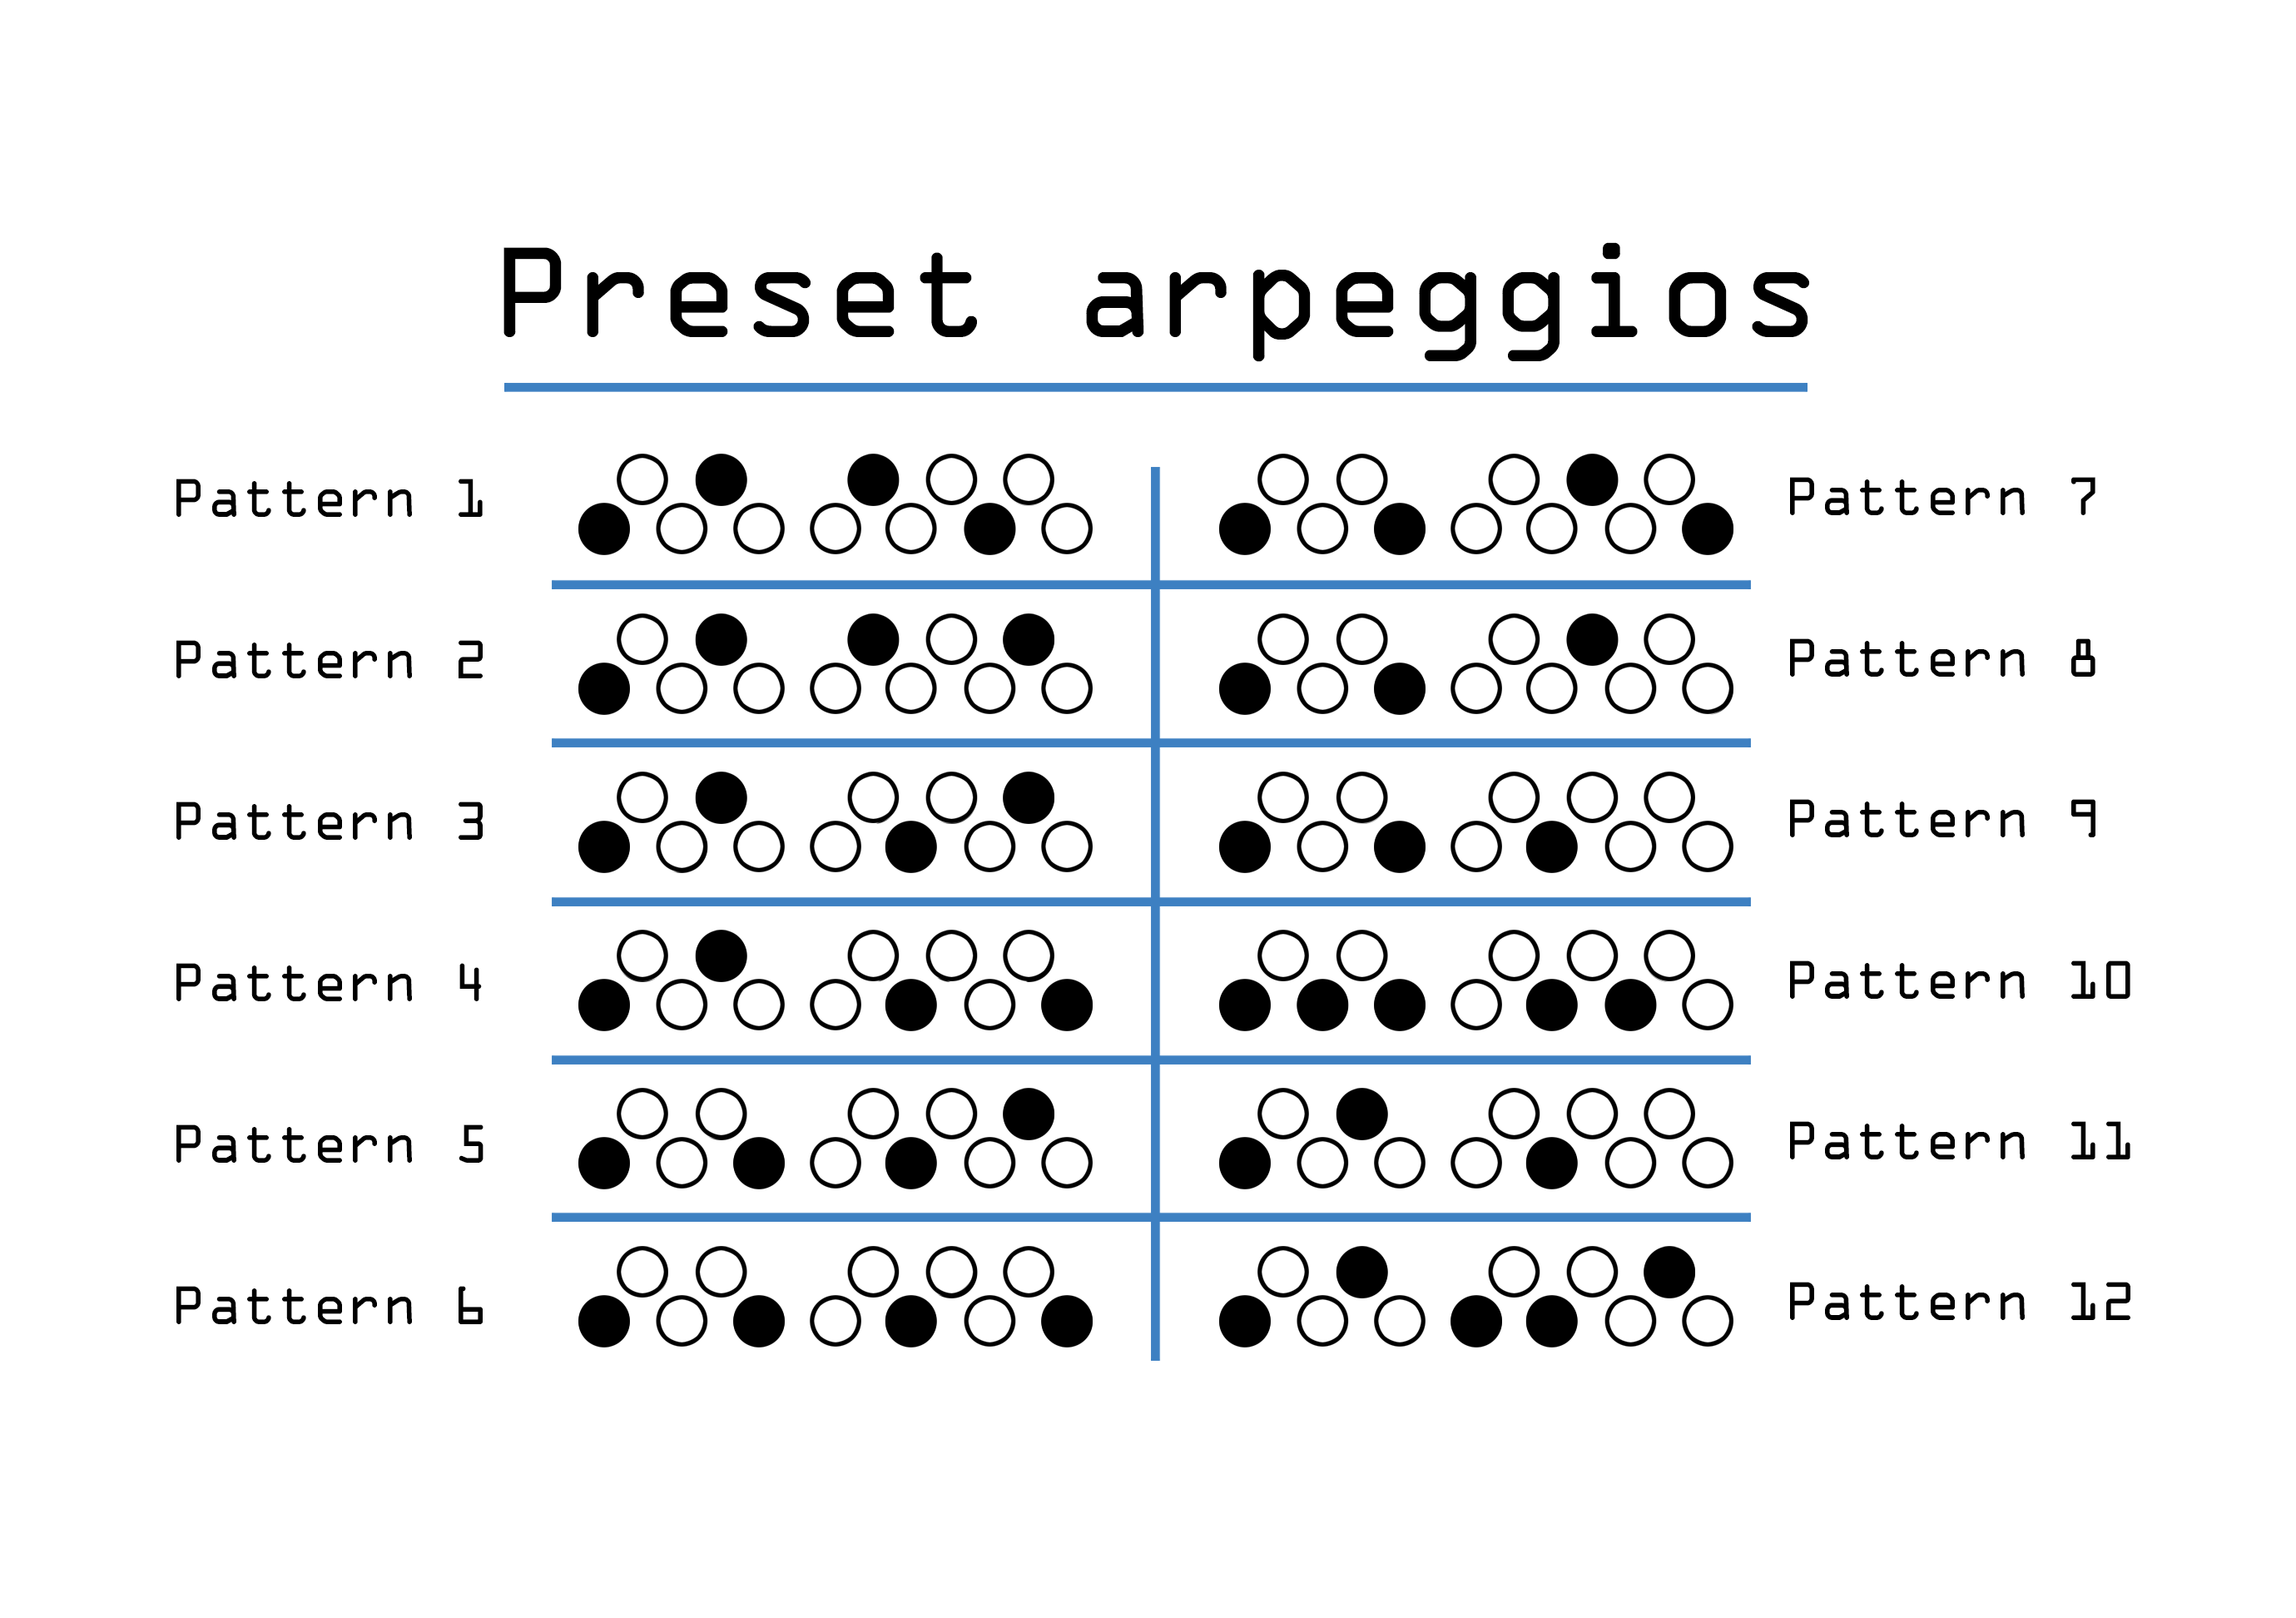
The module ships with the 12 preset slots filled with some of our favorite arps. The first 8 are the tetrads, including the degenerate tetrad composed of three major thirds. The next four are major, pentatonic major, minor third, and pentatonic minor. If you overwrite the presets but would like to revert to the factory selection, simply reinstall the firmware from the Customer Portal.
Patch tutorial#
First patch Patch a clock source or trigger pattern to the 1 input jack. Patch the 1 output to an oscillator’s 1V/8va input.
Flip the top switch to the left Load position, and use the encoder to select and load a few of the preset patterns. Adjust the other switches to explore the different playback options.
Edit a pattern by flipping the top switch to the middle Edit position and enabling or disabling notes with the encoder.
Once you've created a pattern you like, flip to the Save position and tap the encoder to save it to the current slot.
Send a CV signal to the Notes CV input to change arpeggio patterns on the fly!
Design notes#
Kris came in one day and said, “I want to make an arpeggiator.” We threw a bunch of stuff at the wall with a variety of ideas, but settled reasonably quickly on this design. The first version was similar but for some reason we only thought to put a single gate in, so the outputs all moved as one. Live and learn. We revised and added a few more gate ins so that channels could be advanced independently.
The design came together pretty fast but 2023 was a busy year for us so we sat on the prototypes for quite some time. Early in 2024, we finally dusted them off and got to work. Stephen busted out a bare-bones firmware pretty fast and then he, Markus, and Shawn set to work polishing it. It wasn’t long before they were all talking about how much fun they were having patching with it. We didn’t have enough prototypes to go around so Kris just wept waiting for one to come her way. We can only assume so did everyone else on the team. Really there was almost no disagreement on this round other than what the button should do. There were competing camps, but once we tried the final behavior, everyone agreed this was it.
We put it into production after a few more weeks of intensive work on it, and slotted it into our next available time to release a product.
Warranty#
We will repair or replace (at our discretion) any product that we manufactured for one year after initial purchase as long as we are able to get the parts to do so. This warranty does not apply to normal wear and tear, including art/panel wear, or any products that have been modified, abused, or misused. Our warranty is limited to manufacturing defects.
Warranty repairs/replacements are free. Repairs due to normal wear, user modification, or other damage are charged at an affordable rate. Customers are responsible for the cost of shipping to Noise Engineering technicians for repair.
All returns must be coordinated through Noise Engineering; returns without a Return Authorization will be refused and returned to sender.
For immediate issues with new modules, please contact your dealer for a replacement. Otherwise, please contact us if you think one of your modules needs a repair.