Cursus Iteritas Alia Manual#
Dynamically generated wavetable oscillator using orthogonal functions
Screen reader accessible documentation
Overview#
Cursus Iteritas Alia is an oscillator that works from a dynamically generated wavetable. It gives the user spectral-like controls over three different modes based on different conceptualizations of frequency: Fourier, which uses sine waves; Daubechies, using wavelets, and Walsh mode, using the Walsh transform. Cursus Iteritas parameterizes a wide variety of sounds, but because the sounds are all based off of orthogonal functions, it has a musical tone structure and can produce an extremely wide variety of harmonic sounds.
Note
The Alia functions and sounds almost identical to original Cursus Iteritas. The Alia adds a suboscillator output and Hold button to the interface. It also uses an encoder for more accurate tuning, and has a pitch CV range of -2 V to +5 V; the orignal has a range of 0V to 8V. The other interface features of the module are the same between Alia and original, and power/calibration instructions for the original Cursus Iteritas can be found in the Legacy section.
- Type: LFSR VCO
- Size: 10HP Eurorack
- Depth: 1.5 Inches
- Power: 2x5 Eurorack
- +12 V:
105 mA - -12 V:
10 mA - 5 V: `0mA
Power#
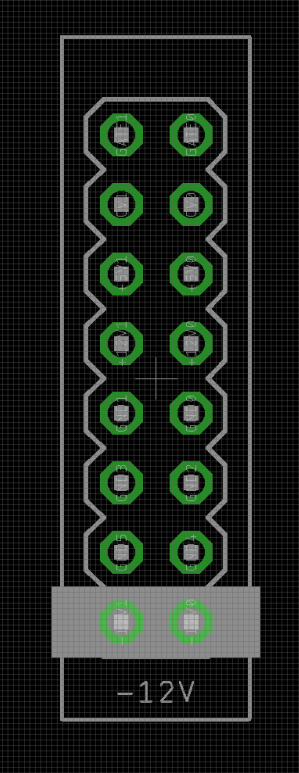
To power your Noise Engineering module, turn off your case. Plug one end of your ribbon cable into your power board so that the red stripe on the ribbon cable is aligned to the side that says -12 V and each pin on the power header is plugged into the connector on the ribbon. Make sure no pins are overhanging the connector! If they are, unplug it and realign.
Line up the red stripe on the ribbon cable so that it matches the white stripe and/or -12 V indication on the board and plug in the connector.
Screw your module into your case before powering on the module. You risk bumping the module's PCB against something metallic and damaging it if it's not properly secured when powered on.
You should be good to go if you followed these instructions. Now go make some noise!
Noise Engineering modules are reverse protected. If you accidentally installed it with the red stripe up, simply remove the power and place it correctly.
A final note. Some modules have other headers -- they may have a different number of pins or may say "not power". In general, unless a manual tells you otherwise, do not connect those to power.
Interface#

All knobs on Cursus Iteritas function as offsets for the input jacks. The controls function similar to a bandpass filter; center, width, and tilt allow the filter to be asymmetric.
- Pitch
- Encoder for adjusting pitch. Press and turn for coarse semitone adjustments, or just turn for fine tuning.
- The Pitch input is calibrated for 1v/8va tracking.
- Center
- Selects the center harmonic used to build the wavetable.
- Structure
- Allows selection of harmonics included in the output. In the center position, all harmonics are included. Fully left only even harmonics; fully right, only odd.
- Edge
- Controls the oversampling filter of the wavetable. As this is turned to the right, it will add musical overtones.
- Fold
- Wavefolder. Enough said.
- Width
- Controls how many different harmonics are used to create the wavetable.
- Tilt
- Weights the spread of harmonics. In the middle it is symmetric; at left, lower harmonics are louder while at right, higher harmonics get more volume.
- Hold
- Ignores incoming CV while the button is held down.
- Sync
- Hard sync input that triggers oscillator reset.
- Mode
- Selects which orthogonal function set is used to produce the wavetable
- Range
- Two-octave offset pitch ranges
- Out
- The main audio output.
- Sub Out
- A suboscillator saw output one octave below the pitch of the main oscillator.
Patch tutorial#
- The easiest way to get to know Cursus is to just plug the output into your mixer and play with the knobs to get a feel for the sounds it can make.
- Gates and LFO
- Cursus works very well with any LFO, gate, or envelope source -- the more the better. Patching the outputs of a gate sequencer like Numeric Repetitor directly into the parameter inputs on Cursus is a great way to generate complex rhythmic tonality variation.
Firmware swapping#
Use our firmware swap app to change your platform module's firmware at any time.
To get started:
- Turn off the power to your case and unscrew the module.
- Remove the power connector on the back of the module.
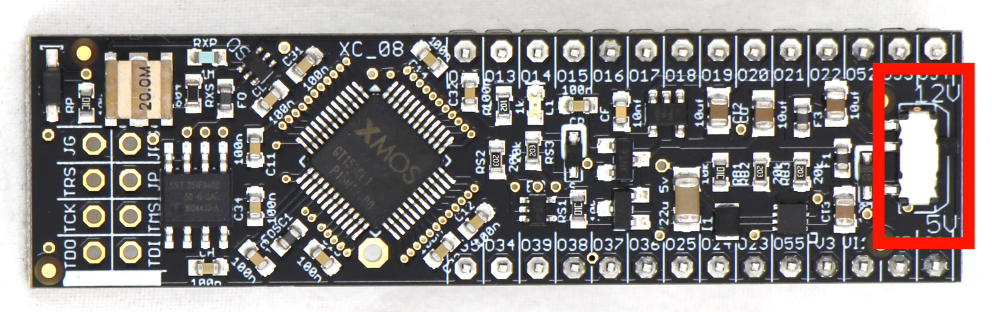
- Plug a micro USB connector into the port on the pack of the module, and the other end into your computer.
- Follow the instructions in the firmware swap app.
Tone generation#
Cursus Iteritas generates a spectral description based on knob positions. Center, Width, Tilt, Structure determine amplitudes for each harmonic. This description is fed into the inverse transform for the current function set to produce the time-domain wavetable. The wavetable is normalized to reduce amplitude variations across spectral changes.
Oversampling of the wavetable depends on pitch: lower octaves have higher oversampling since the sample rate only varies by a factor of two. The Edge control interpolates the oversampling from point sampling to a cubic-spline interpolation (NURBS). As the period of the full length of the wavetable always evenly divides the sample rate, the additional aliasing is largely harmonic in nature. Fold controls the signal wavefolding.
In many places in the signal path, there are soft clipping stages to mimic analog-style clipping to give more warmth and complexity to the sounds generated.
Input and output voltages#
Alia’s sync input has a threshold around +1.8 V.
Its modulation CV inputs have a range of 0 V to +5 V.
Its pitch CV input has a range of -2 V to +5 V.
The suboscillator output has a range of 0 V to +10 V.
The audio output varies depending on settings, and can reach a maximum of about 14 V peak to peak.
Variable sample rate#
Cursus Iteritas Alia uses a sample rate that is a multiple of the fundamental (lowest) oscillator frequency. This moves alias power that is a multiple of the fundamental to be mapped to a multiple of this tone, therefore making the aliasing align with the harmonics of the tone. This works well for settings with a strong harmonic structure (spread fully clockwise or fully counterclockwise) and adds unique aliasing character for other tones.
Genesis & design notes#
The following was written by Stephen when the original Cursus Iteritas was released.
This module started many years ago when Scott Jaeger and Yasi Perera turned me onto Walsh functions.
The big question was how to reduce the large number of variables (32 harmonic volumes for a 32 band Walsh synthesizer) into a reasonable control set. Bandpass filter-like controls seemed to be a good solution and there already exist similar controls in the various existant Harmonic Oscillators. A software prototype was written that proved that a sequency bandpass control scheme was usable. The then project went to sleep for a couple years as other modules took priority.
When I started working on it again I wanted it to have three modes much like our other current modules so I went searching for other orthogonal function sets that could fit in the same control scheme.
The Fourier Series was an obvious second set of orthogonal functions to use which perfectly mapped to the bandpass-like controls.
Modern mathematics have given us an ocean of orthogonal function sets in wavelets so that seemed another good place to look. The Daubechies 4 wavelet fit the bill being easy to compute and having an interesting—and somewhat sawtooth-like—waveform. The controls were a little less natural since this wavelet has more time precision and more frequency redundancy. With some work however it worked out quite naturally.
Enter Alia#
In 2023, we had to discontinue the original Cursus Iteritas when the manufacturer of its processor announced that it would no longer be available. We worked to find a solution, and redesigned a new platform that could accomadate the four core Iteritas oscillators. We released the Alia platform with the Basimilus, Manis, and Debel firmwares, and now Cursus, Ataraxic, and the new Incus have joined the party, too! Fourier is here to stay.
Warranty#
We will repair or replace (at our discretion) any product that we manufactured for one year after initial purchase as long as we are in business and are able to get the parts to do so. This warranty does not apply to normal wear and tear, including art/panel wear, or any products that have been modified, abused, or misused. Our warranty is limited to manufacturing defects.
Warranty repairs/replacements are free. Repairs due to normal wear, user modification, or other damage are charged at an affordable rate. Customers are responsible for the cost of shipping to Noise Engineering technicians for repair.
All returns must be coordinated through Noise Engineering; returns without a Return Authorization will be refused and returned to sender.
For immediate issues with new modules, please contact your dealer for a replacement. Otherwise, please contact us if you think one of your modules needs a repair.
Special thanks#
- Kris Kaiser
- Scott Jaeger
- Yasi Perera
- Shawn Jimmerson
- Eric Cheslak
- Bana Haffar
- William Mathewson
- Mickey Bakas
- Tyler Thompson
- Alex Anderson
References#
- Hutchins Jr, Bernard A. "Experimental electronic music devices employing Walsh functions." Journal of the Audio Engineering Society 21.8 (1973): 640-645.
- Brown, Owen. A Digital Waveform Synthesizer Using Walsh Functions. Diss. 1971.
- Rozenberg, Maurice. "Microcomputer-controlled sound processing using Walsh Functions." Computer Music Journal (1979): 42-47.
Legacy#
The information in this section only applies to the original Cursus Iteritas hardware, not the Alia.
Tuning calibration#
Cursus comes pre-calibrated and should not need adjustment. If the trim pot gets bumped and needs a tuneup, follow this procedure to calibrate your module.
Pitch calibration is controlled by an linear resistor-divider network. To calibrate the tuning, attach a volt meter (preferably 4 or more digit) to the test points CAL and GND on the rear panel and adjust the trim pot.
The voltage measured should be 5/16 (.3125) times the input voltage applied to the CV input. A reasonable way to tune the scale is to use an adjustable voltage source to generate 4 V then adjust the tuning trim until the test points read 1.2500 V.
Cursus Iteritas can also be tuned using a reference supply capable of generating a 1 V difference and using a stroboscope such as the Peterson 490 to tune to an octave interval. This is method is preferred to the meter-only method.
Voltage supply#
Cursus Iteritas
can run its processor on the 5 volt eurorack power rail to reduce noise and load on the 12 volt bus. Gently push the switch tab in the direction of the desired rail to use.
Power consumption in +12v setting:
- +12 V:
150 mA - -12 V:
5 mA - 5 V:
0mA
Power consumption in +5v setting:
- +12 V:
80 mA - -12 V:
5 mA - 5 V:
90mA