Yester Versio Manual#
A simple three-tap delay with wavefolding and pitch shifting
Screen reader accessible documentation
Overview#
Yester Versio is the long-awaited answer to the request for a simple delay on the Versio platform. Yester is designed to be straightforward to control and easy to use. It’s the perfect background for the other instruments in your patch, with just enough character to stand out if you want it to. With clock sync, tap tempo, and adjustable divisions – plus settings for triplets and dotted timing – it’s easy to make Yester sync to the rest of your patch and create interesting rhythms. If simple echoes aren’t your style, use old to add some grit, or change their pitch and stereo position with the Chorus and Pan controls!
- Type: Simple delay
- Size: 10HP
- Depth: 1.5 Inches
Etymology#
Yester -- from old English: “Of former, earlier, or previous times”
Versio -- from Latin: "versatile"
"Versatile Vampire"
Color code#
On boot, the Versio's LEDs will shine with this color pattern to indicate that it is running the current Yester Versio firmware:

Power#
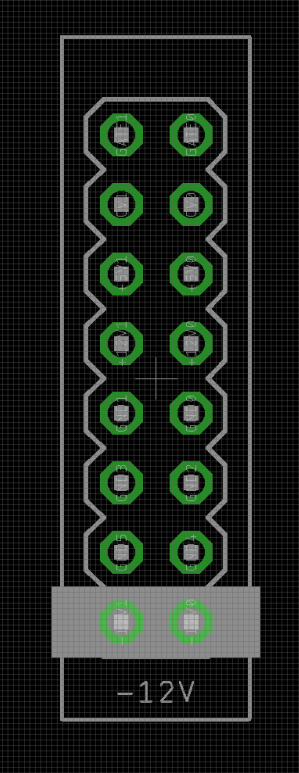
To power your Versio, turn off your case. Plug one end of your ribbon cable into your power board so that the red stripe on the ribbon cable is aligned to the side that says -12 V and each pin on the power header is plugged into the connector on the ribbon. Make sure no pins are overhanging the connector! If they are, unplug it and realign.
Line up the red stripe on the ribbon cable so that it matches the white stripe and/or -12 V indication on the board and plug in the connector.
Screw your module into your case before powering on the module. You risk bumping the module's PCB against something metallic and damaging it if it's not properly secured when powered on.
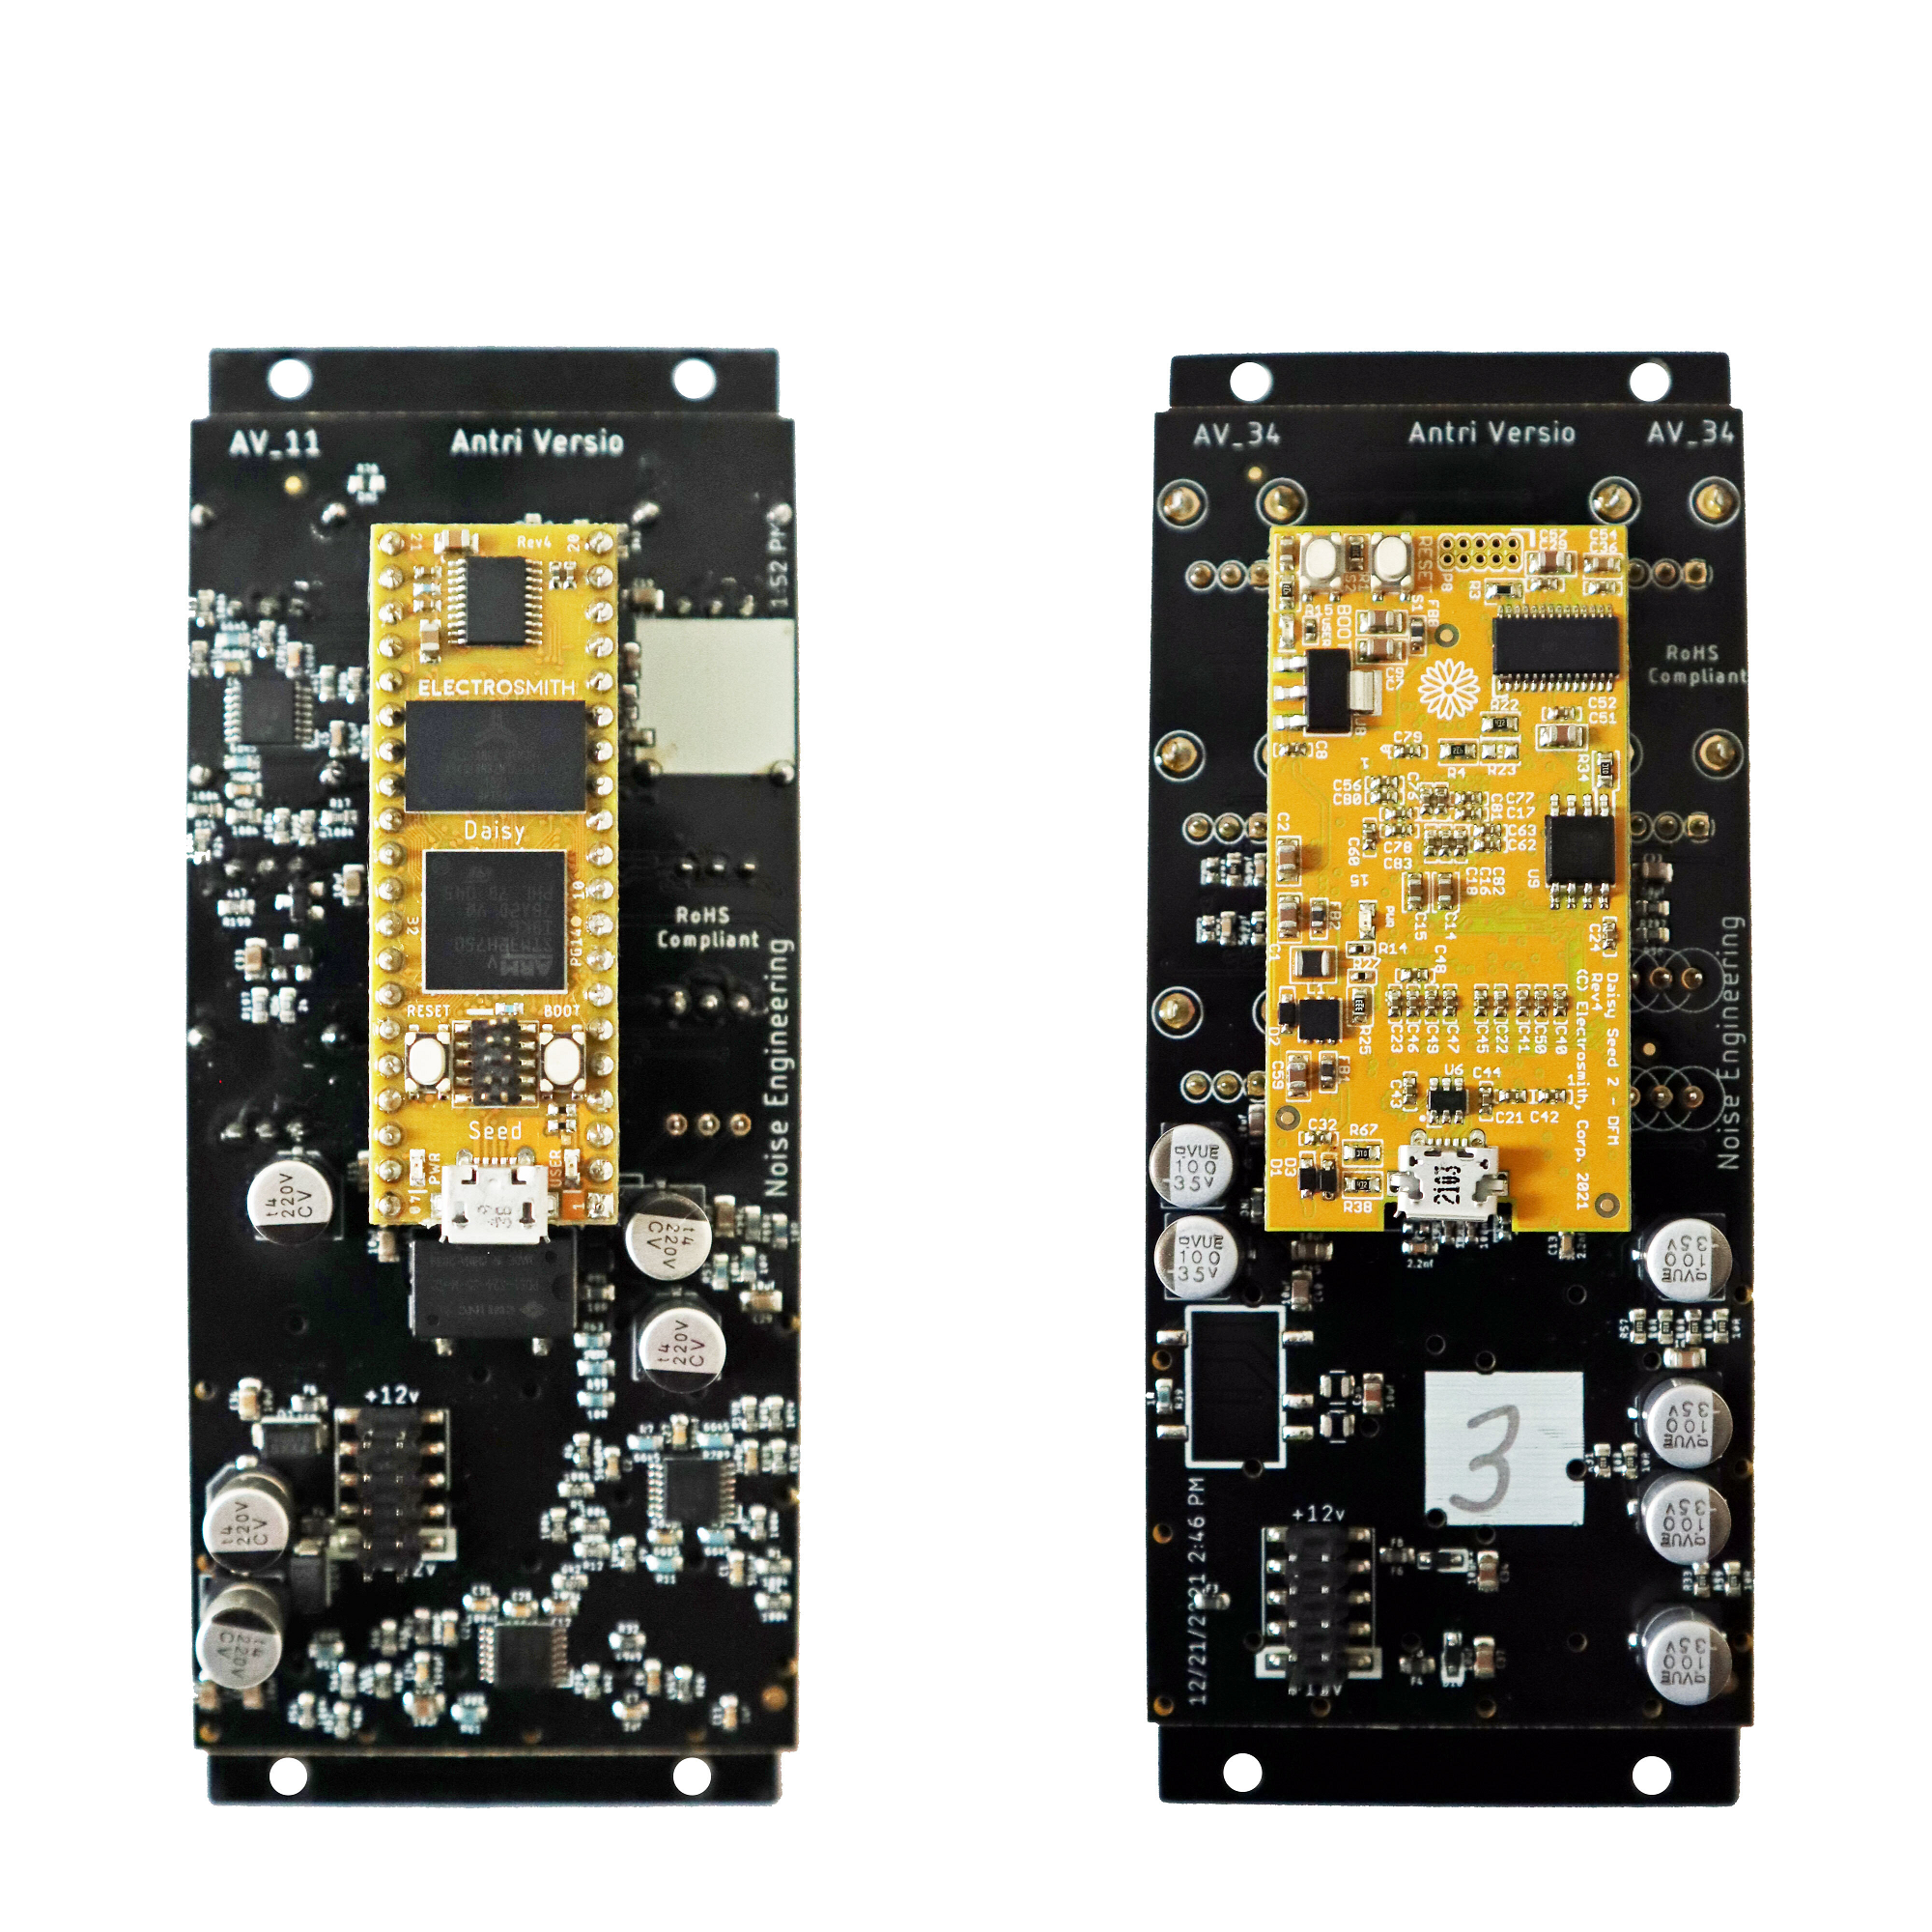
If your Versio looks like the left picture, it requires 70mA +12v and 70mA -12v. If it looks
like the right picture, it requires 125mA +12v and 10mA -12v. Versio does not use the
+5v rail.
You should be good to go if you followed these instructions. Now go make some noise!
Input & output voltages#
All CV inputs expect 0 V to 5 V. All pots act as offsets and sum with the input CV. The gate input responds to signals above +2 V. The audio inputs clip around 16 V peak to peak.
Interface#

Note: Yester is a 3-tap delay, meaning that the minimum number of repeats you will hear is 3.
- Blend
- Dry/wet balance control. When turned fully left, the unmodified input signal is passed through. Fully right, only the processed signal is heard. Points in the middle give you a mix of both.
- Pan
- Changes the panning of the three taps. The graph below shows the pan position of the three taps as the knob is turned from fully counterclockwise to fully clockwise:

- Tone (bipolar)
- To the left of 12:00, Tone acts as a lowpass filter. To the right of 12:00, Tone acts as a highpass filter.
- Chorus (bipolar)
- Changes the pitches of the echoes. To the left of 12:00, a constant pitch shift is applied, creating clean harmonies. To the right of 12:00, an LFO is applied to the pitch shift, creating a chorus effect.
- Regen
- Controls the amount of delay feedback from 0% to about 95%. Yester was designed to not oscillate on most settings, making it easy to control… but if you work for it, you can get it to do it!
- Time
- When there’s no clock input at the Tap jack and a tap tempo hasn’t been entered, this controls the rate of the internal delay clock. If a tap tempo has been entered, this acts as a clock divider/multiplier, in conjunction with the Even/Triplet/Dotted switch. Divisions are to the left of 12:00 and multiplications to the right.
- Fold
- A distortion parameter of many flavors, applied to the delay output. Roughly the first ¼ of the knob adds saturation. In the next 1/2 of the parameter, a wavefolder is applied. Finally, the top 1/4 of the knob adds in slightly chaotic suboctaves (aka Doom).
- Even/Triplet/Dotted
- This changes the delay timing to be even, multiplied for triplet timing, or divided for dotted timing. Works in conjunction with the Time knob.
- Fade/Octave/Jump
- Changes how the delay responds to timing changes (either from external clock, tap tempo, or by changing the Time or Even/Triplet/Dotted settings)
- Fade: Interpolates as smoothly as possible with no repitching or artifacts.
- Octave: Rate-limits time changes to create octave harmonies.
- Jump: Changes delay time as quickly as possible, creating lots of artifacts.
- Tap
- Tap a tempo here to overwrite the internal delay clock. Even/Triplet/Dotted switch and Time parameters both affect delay times when tap tempo is present. Holding down the button for a few seconds clears the tap tempo/external clock timing, and the module goes back to using its internal clock. The LEDs will flash blue when the clock has been cleared. Holding the button even longer will entirely clear the delay feedback and the LEDs will flash white.
- Tap (input)
- Patch a clock here for synced delays! Even/Triplet/Dotted switch and Time parameters both affect delay times when tap tempo is present. To go back to using the module’s internal clock, unpatch the clock and hold the Tap button until the LEDs flash blue.
- In L/In R
- Audio input. If R is not patched, the signal from L is normaled to both inputs.
- Out L/Out R
- Stereo output pair.
Patch tutorial#
- Basic Delay
- Patch a sound source to In L (and In R if sound is stereo). Patch Out L and Out R to your mixer. Set knobs as shown, and flip the switches to Even and Fade. These settings will create a simple echo that repeats three times. Turning Regen up will create more repeats, and changing Time will change the delay period. Try patching a clock to the Tap input to sync the delay to the rest of your patch. Changing the Time parameter will adjust the clock multiplication/division, and changing the Even/Triplet/Dotted switch will adjust the clock sync type.

- Tape echo
- Patch a sound source to In L (and In R if sound is stereo). Patch Out L and Out R to your mixer. Set knobs as shown, and flip the switches to Even and Octave. With the parameters set as shown, this patch creates slow, characterful echoes, reminiscent of classic tape delays. The lowpass filtering added by Tone removes some of the high end for a darker character, and the slight increase of the Fold parameter adds warm saturation to the echoes. Increase the Chorus amount to add more warble, or set it to 12:00 to remove modulation for a cleaner echo.

- Pitch Shifter
- Patch a sound source to In L (and In R if sound is stereo). Patch Out L and Out R to your mixer. Set knobs as shown, and flip the switches to Even and Octave. This patch uses the pitch shifting side of the Chorus parameter to transpose the delays up an octave each time they repeat. Try changing the position of the Chorus parameter to create different pitch shifts.

- Doom
- Patch a sound source, preferably sustained and in the middle register, to In L (and In R if sound is stereo). Patch Out L and Out R to your mixer. Set knobs as shown, and flip the switches to Even and Jump. By turning the Fold parameter all the way up, intense distortion and chaotic suboctaves (affectionately known as DOOM in Noise Engineering nomenclature) are added to the feedback path, creating an intense atmosphere perfect for the more industrial patch.

- Record Scratch
- Patch a sound source to In L (and In R if sound is stereo). Patch Out L and Out R to your mixer. Set knobs as shown, and flip the switches to Triplet and Jump. Play a few notes into the delay, and then quickly adjust the Time parameter back and forth. The Jump mode adjusts the delay timing as quickly as possible, creating some fun and glitchy artifacts somewhat reminiscient of record scratching. For instant IDM fun, turn Time to minimum and patch a step sequencer or LFO to the Time CV input.

- All Character
- Patch a sound source, preferably sparse and at a slow tempo, to In L (and In R if sound is stereo). Patch Out L and Out R to your mixer. Set knobs as shown, and flip the switches to Triplet and Jump. Yester was designed to be easily tamable, but we added in some options for more wild timbres, too. This patch removes low end end with the Tone filter, and adds saturation and extreme wavefolding with Fold.

Firmware swapping#
Use our firmware swap app to change your platform module's firmware at any time.
To get started:
- Turn off the power to your case and unscrew the module.
- Remove the power connector on the back of the module.
- Plug a micro USB connector into the port on the pack of the module, and the other end into your computer.
- Follow the instructions in the firmware swap app.
Design notes#
Near the end of 2020, we released the Imitor Versio, a 12-tap delay designed for experimentation. Its controls were designed for easy control over the relative dynamics, panning, and timbre of all 12 taps. It also featured a Regen algorithm similar to the one on Desmodus, going well beyond 100%. It’s a beautiful delay that invites exploration and rewards experimentation, but it always wants to be the center of attention in a patch.
After its release, we received quite a few requests for a simple Versio delay that was easy to tame and could be used for more straightforward atmospheric uses. We agreed that this would be a wonderful addition to the Versio ecosystem, and added it to the firmware ideas list. Once development on Yester began, we discussed what exactly it should be: a simple echo is easy to make, but doesn’t fit the style of module that we like to create. The challenge became one of designing features that left lots of space for simple echoes and could be pushed to an extreme, but were still easy to control.
Initially, we had a modulation section similar to the one on Desmodus, but we quickly realized that we could tailor something for Yester that was more interesting for a delay and could live happily on just one knob. A discussion around controlled pitch shifting led to further experimentation, and the Chorus knob evolved as a way to accommodate a few different styles of delay-line modification. Adding on a few different delay-line interpolation modes rounded out all of the modulation features we wanted, and we were well on our way to a fully-fledged firmware.
In the middle of all of this, we got really stuck on a name for Yester. Names are normally quite a fight here and this was no different. We have already allotted firmwares for Versios for most letters of the alphabet so we were hoping to keep this one named as a Y, but the original name was not going to fly. This started a flurry of naming over Slack, Zoom calls, and randomly sitting at our desks for several days. At one point we were almost ready to just name it Y. Stephen recommended a symbol, like Prince. Things went off the rails. Brandon started throwing out names that were not Y. It rained cats and dogs and frogs. And then the clouds parted and we came up with Yester, which connotes time and is easy to say, and we breathed a collective sigh of relief.
After a few rounds of testing, and furiously dropping firmwares into slack so everyone could grab it and try it, we realized that we needed more control of the stereo field. The Pan knob was the final addition to the firmware, and after some final tweaks we were ready to ship
Warranty#
We will repair or replace (at our discretion) any product that we manufactured for one year after initial purchase as long as we are able to get the parts to do so. This warranty does not apply to normal wear and tear, including art/panel wear, or any products that have been modified, abused, or misused. Our warranty is limited to manufacturing defects.
Warranty repairs/replacements are free. Repairs due to normal wear, user modification, or other damage are charged at an affordable rate. Customers are responsible for the cost of shipping to Noise Engineering technicians for repair.
All returns must be coordinated through Noise Engineering; returns without a Return Authorization will be refused and returned to sender.
For immediate issues with new modules, please contact your dealer for a replacement. Otherwise, please contact us if you think one of your modules needs a repair.
Special thanks#
- All of you who’ve asked for more delays on the Versio!