Virt Vereor Manual#
Esoteric synthesizer with multimode gate/filter and vintage-inspired chorus, plus a powerful modulation system.
Overview#
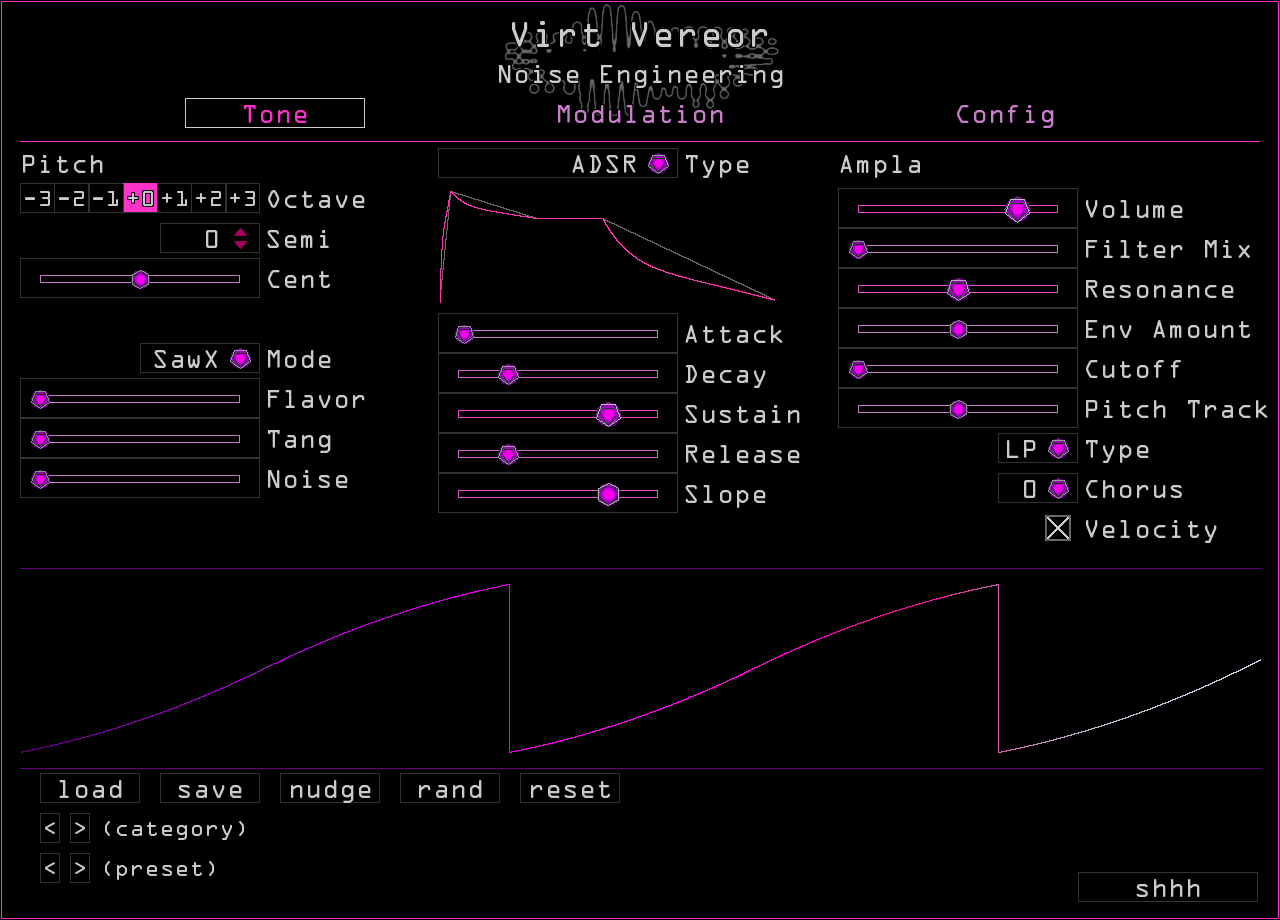
Virt Vereor is a powerful synthesizer based on a unique set of synthesis algorithms. Bass is a quadrature algorithm described in Bernie Hutchins’ seminal series Electronotes. Sawx is a supersaw-inspired beast. Harm is an additive algorithm with spectral control and distortion of partials. Virt Vereor makes a tremendous amount of unique sounds with an immediate and usable interface.
Astute users will recognize these algorithms from Noise Engineering’s contribution to Arturia’s Microfreak V3 firmware and our upcoming Virt Iter module.
We’ve paired the Virt oscillator section with Vereor, our easily manipulated dynamics section using an ADSR envelope controlling a variable slope and analog-inspired multimode gate/filter. Add to that a vintage-inspired chorus and a load of presets, and Virt Vereor has something for anyone looking for basses, leads, or just new and innovative sounds.
Virt Vereor also features four internal LFOs with a wide range of capabilities and four internal macros for extensive modulation options. Parameters can be MIDI mapped to your favorite controller and any parameter can respond to MIDI velocity, aftertouch, and pitch for maximal performability.
Installation#
Windows#
Log into portal.noiseengineering.us Navigate to the “Plugins” tab, and click the link that says “Download for Windows” Double-click the downloaded file to run it. NE Products will use your web browser to authenticate your plugins. Log into your Portal account on the webpage that opens if prompted, then return to NE Products. Click on “Install/Update Plugins”. Close NE Products, run your DAW, and your plugins will appear!
Mac#
Log into portal.noiseengineering.us Navigate to the “Plugins” tab, and click the link that says “Download for Mac” When the download completes, open the installer file and follow the instructions. Open NE Products. On Mac, it can be found with Finder in Applications or with Spotlight. NE Products will use your web browser to authenticate your plugins when you run it. Log into your Portal account on the webpage that opens if prompted, then return to NE Products. Click on “Install/Update Plugins”. Once plugins are installed, the message at the top of the screen will display “Your plugins are up to date.” Close NE Products, run your DAW, and your plugins will appear!
- Ableton Live troubleshooting
- If you've installed your plugins but they aren't showing up in Ableton Live, please open Live, navigate to the
Pluginstab inPreferences, and make sure thatUse VST3 Plug-In System Foldersis turned toOn.
Uninstallation#
Run NE Products again, and click “Uninstall Plugins.” If you’d like to also remove their preset files, click “Uninstall Plugins and Presets.” Doing this removes all presets in the factory directories, including user-created presets, so please copy any files you’d like to save to a different location before performing this action.
Shortcuts#
- Cmd/Ctrl+Click or Cmd/Ctrl+Mouse wheel
- For finer control, hold Cmd (Mac) or Ctrl (PC) while moving a parameter.
- Double click
- Resets any parameter to its default state.
- Scroll
- Hover over any parameter and scroll to adjust. Scroll+Cmd (Mac) or Scroll+Ctrl (PC) give finer control.
All of these work to edit step levels in LFO Step shape as well.
Tone Generation#
Virt Vereor contains three different algorithms for sound creation: Bass, Sawx, and Harm. These algorithms were originally developed as oscillators for the Arturia Microfreak, and now we’ve fleshed them out and turned them into a full synthesizer plugin.
- Bass
- There exists an extremely esoteric and cool series of writings called Electronotes by the amazing Bernie Hutchins, retired professor of Electrical Engineering at Cornell University.
- Electronotes #73 includes reference to an algorithm called Bass. It's a simple algorithm that uses nonlinearities combined with quadrature modulation to produce a variety of tones. The Bass oscillator is based off of this algorithm, with a few Noise Engineering touches (fold anyone?) for more edgy sounds.
- Flavor
- Controls the saturation of the cos oscillator.
- Tang
- Controls a two-stage asymmetric wavefolder.
- Noise
- Phase modulates both oscillators (opposite phase) and adds them between fold stages; the slider controls the level of noise added.
- Sawx
- The SawX algorithm in Virt Vereor starts with a simple super-saw oscillator, and adds some saw-mod, and end with something that can be ethereal or metal. SawX surprised us with its versatility.
- Flavor
- Controls the gain into a modulus stage.
- Tang
- Determines the amount of chorus added to the oscillator.
- Noise
- Sets the amount of phase modulation by subsampled white noise.
- Harm
- The basic Harm oscillator is a sinusoidal additive synth with a slight distortion stage: this time, a digital implementation of something similar to our analog distortion module Pura Ruina.
- Flavor
- Adjusts the relationship between the partials. At zero it is unison, at max it is octaves. The middle interpolates linearly in frequency.
- Tang
- Controls an adjustable rectification of the individual partials. Think of this as sort of like a half fold.
- Noise
- Controls the amount of phase-modulated noise and master clip level.
Tone page#
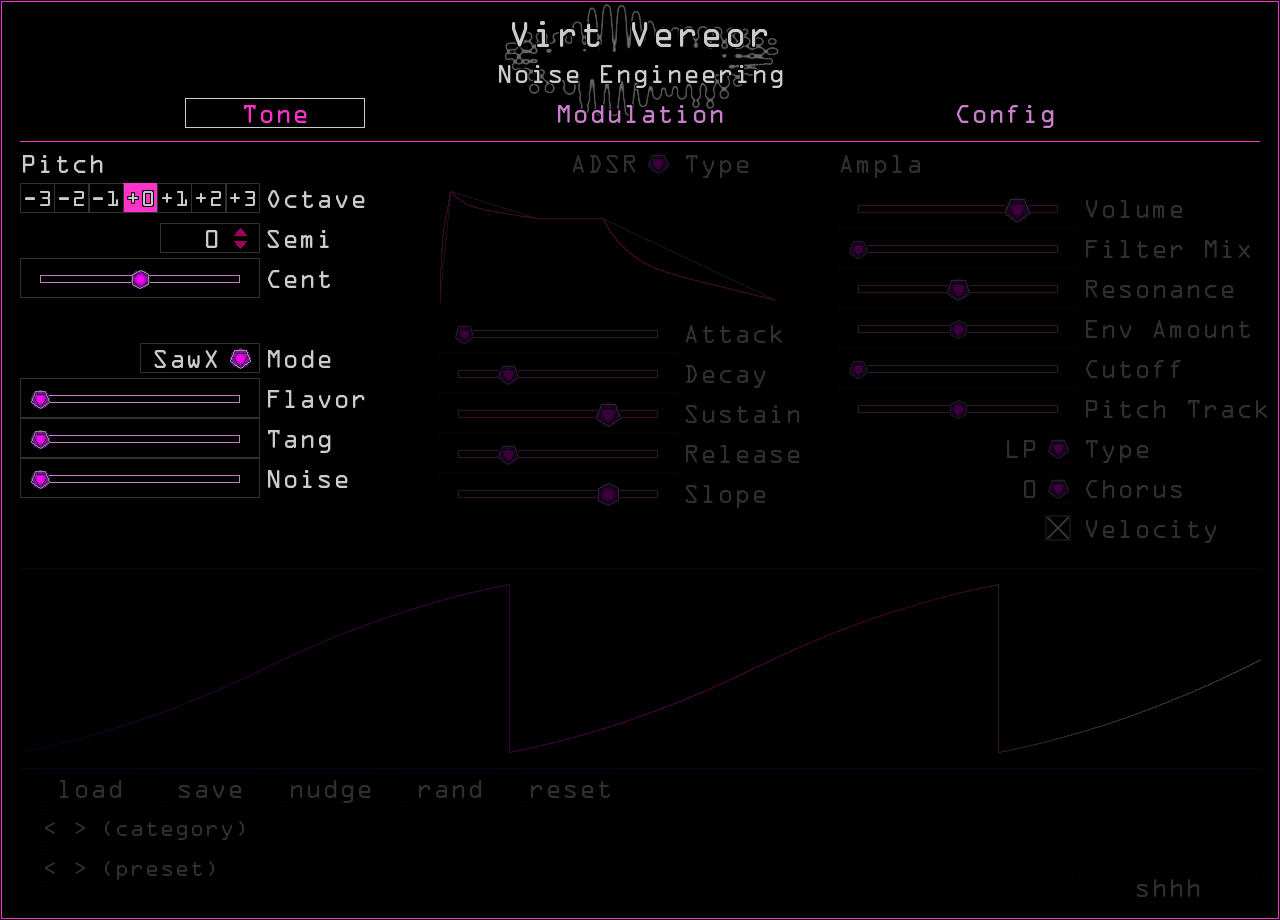
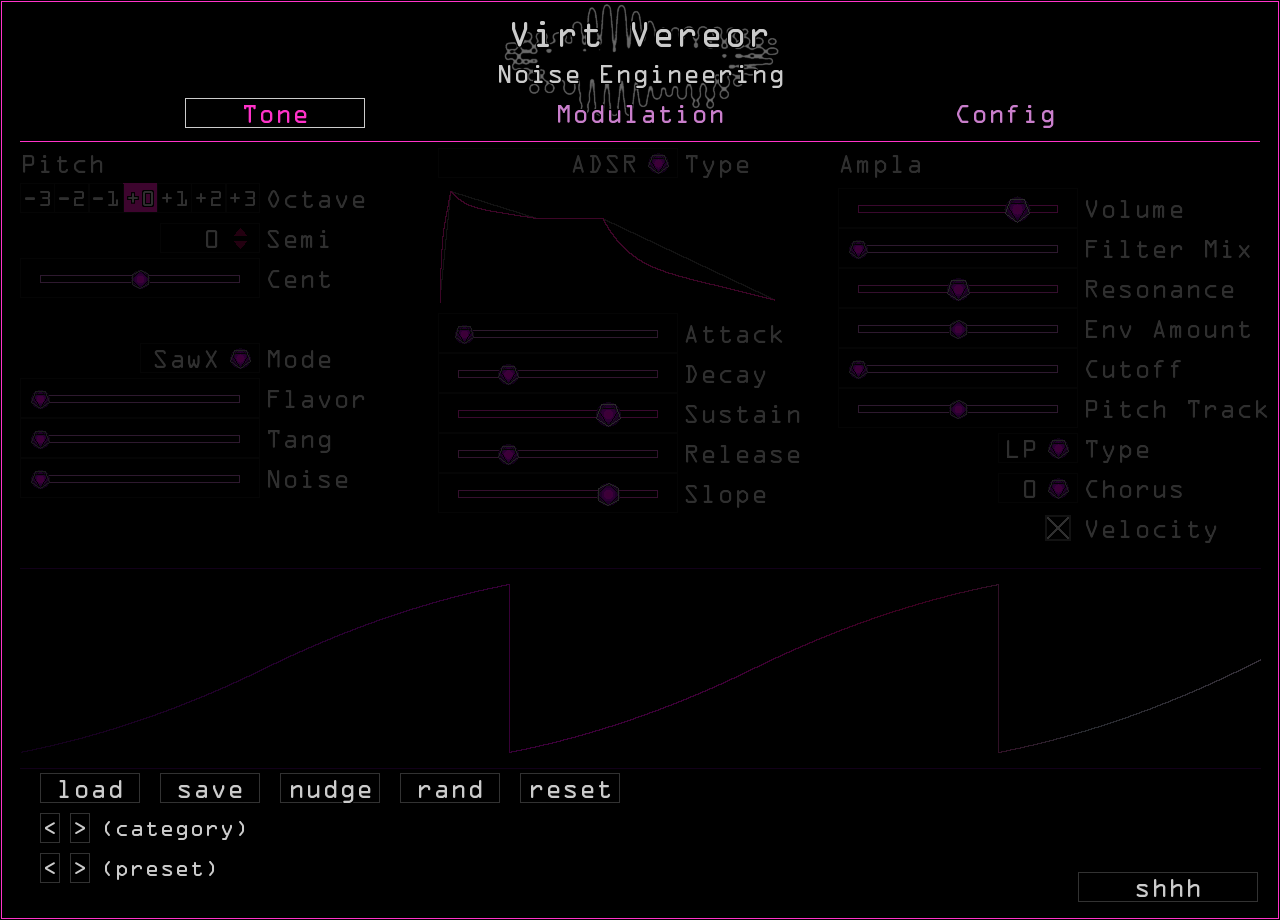
- Pitch
- Right-click to bring up the modulation window for broad-range pitch modulation.
- Octave
- Transposes the synth up or down by octaves.
- Semi
- Transposes the synth up or down by semitones.
- Cent
- Transposes the synth up or down by cents.
- Flavor/Tang/Noise
- The Flavor, Tang, and Noise parameters affect the timbre of the sound and change function depending on the mode. Learn more about these parameters and the different synthesis algorithms in the section titled Tone Generation above.
- Tone
- Changes the density of noise in Noise mode, or the waveform in Plain and Super modes.
- Type
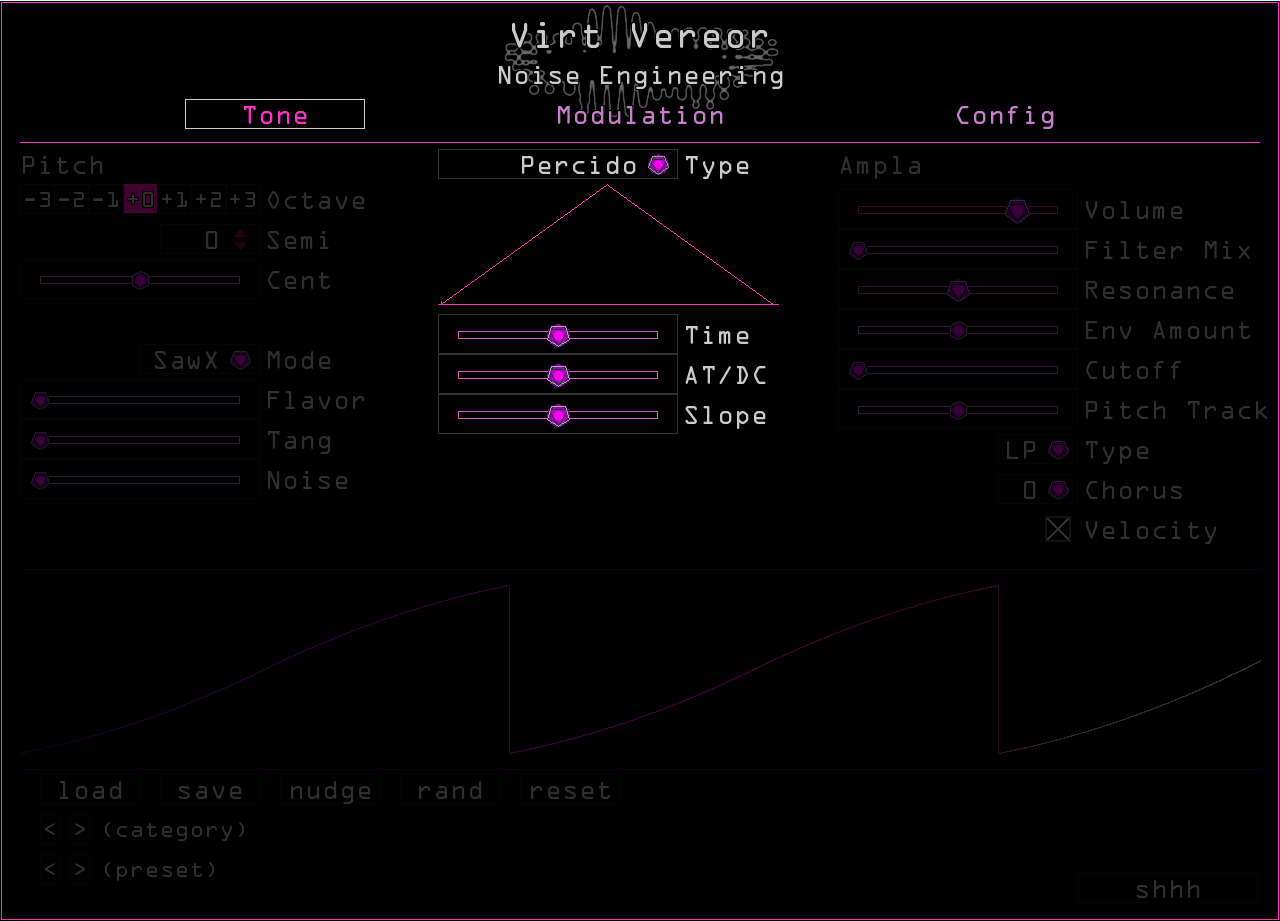
- Selects the envelope type used to control the dynamics of the synthesizer: Percido or ADSR.
Percido#
A simple attack/decay envelope with three parameters:
- Time
- Sets the overall length of the envelope.
- AT/DC
- Sets the ratio of attack to decay within the period set by
Time. - Slope
- Sets the curve of the envelope.
ADSR#
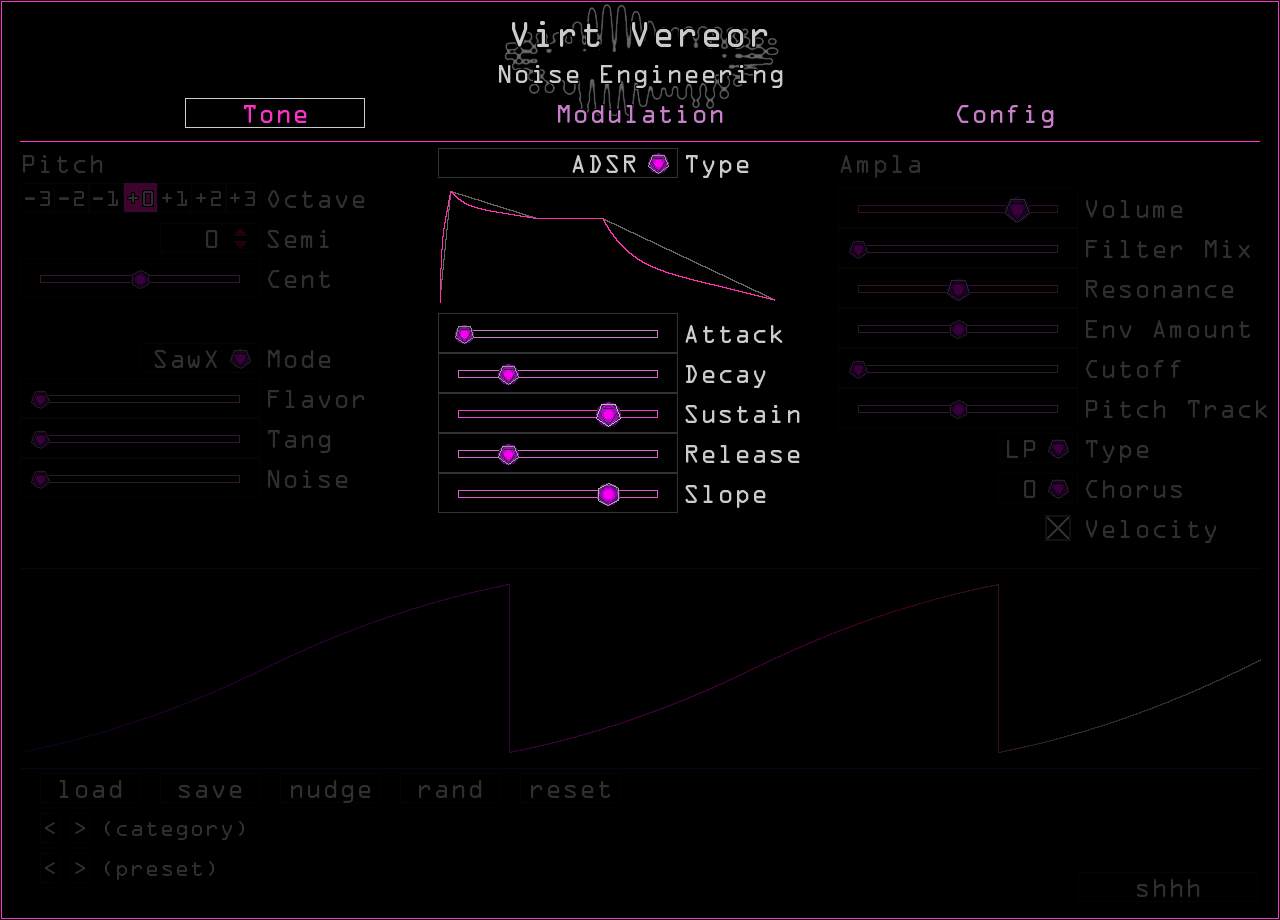
An ADSR envelope, common in many synthesizers.
- Attack
- Controls the attack time for the envelope: this sets the amount of time it takes the envelope to go from minimum to maximum.
- Decay
- Controls the decay time for the envelope: this sets the amount of time it takes the envelope to go from the peak reached in the
Attackstage to the level set in theSustainstage. - Sustain
- Sets the sustain level of the envelope: this is the level the envelope holds at after the
AttackandDecaystages while a note is held down. - Release
- Sets the release time for the envelope: this is the amount of time it takes the envelope to go from the `Sustain level to minimum.
Slope
Changes the curve of the Attack, Decay, and Release stages of the envelope.
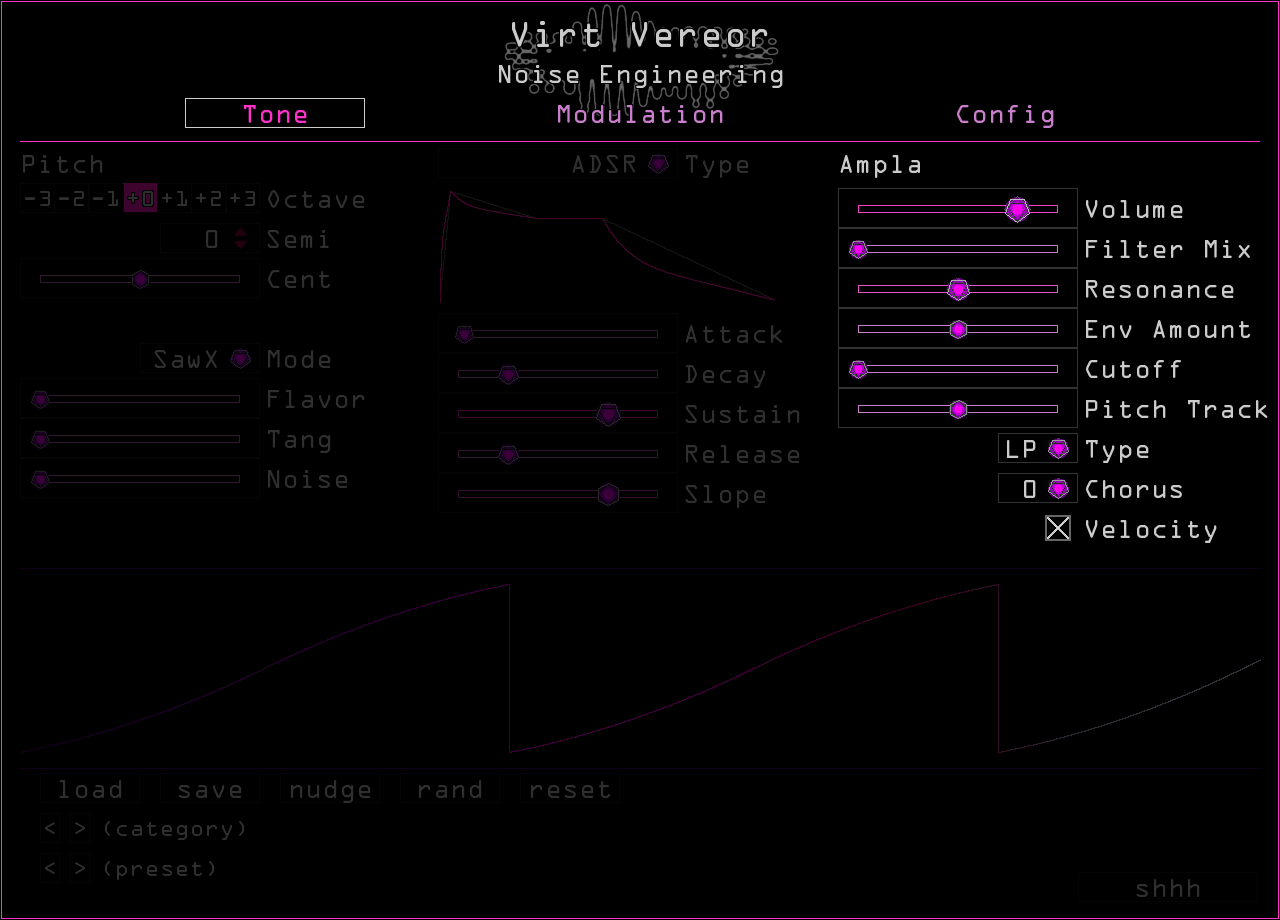
- Volume
- Sets the output level of the plugin.
- Filter Mix
- Controls the mix between a VCA and a VCA+filter.
- Resonance
- Resonance control for the filter. At high values, the Resonance modulates the filter cutoff frequency for added harmonic content. This parameter will only be audible if the Blend parameter is set higher than minimum.
- Env Amount
- Controls how much the envelope opens the filter.
- Cutoff
- Sets the minimum frequency for the filter.
- Pitch Track
- Controls how much the filter’s frequency tracks the notes being played.
- Type
- Sets the filter type:
LP(lowpass),BP(bandpass), orHP(highpass). The filter will only be audible if theFilter Mixparameter is set higher than minimum.
Chorus
Enables a vintage-inspired chorus. 0 is off, I is some, and II is a lot.
Velocity Toggles whether or not the synth’s dynamics change based on MIDI velocity.
Presets#
Presets are stored in the computer’s file system, and the controls below allow for modification and navigation through the files and folders of presets. You can create a new preset “Category” by creating a subfolder in the preset directory, and saving new presets within it.
- load
- Load a preset.
- save
- Save a new preset.
- < > (category)
- Loads the next/previous folder of presets in the preset directory.
- < > (preset)
- Loads the next/previous preset.
- nudge
- Applies a small amount of randomization to all tonal parameters and modes. Randomization can be bypassed per control in individual parameter modulation menus. Useful for creating slight variations of sounds.
- rand
- Completely randomizes all tonal parameters and modes. Randomization can be bypassed per control in individual parameter modulation menus. Use this to create inspiring new sounds and ideas.
- reset
- Resets all parameters to their default settings.
Modulation#
All Noise Engineering plugins feature a comprehensive routing system making use of a variety of modulation types and sources. When modulation is enabled on a parameter, a box showing the range of enabled modulation will appear, and a small indicator will move within the range box showing the exact position of the modulation.

Types of modulation#
Parameters can be modulated from a variety of sources:
- LFOs
- Four onboard LFOs that offer a variety of modes, from simple waveforms to envelopes to step sequencers. More detail on LFO modes can be found in the section below titled Modulation Page.
- Mac 1-4
- Macros. Four macro sliders can be assigned to any number of parameters. The macros can in turn be mapped to MIDI controllers, automated, or modulated with other LFOs.
- Note
- Changes value based on what note is currently played; the note range can be changed in Modulation > Other.
- Env
- Envelope. The onboard dynamics envelope of the synth. The modulation range of the envelope can be adjusted with the Envelope Index control on Modulation > Other.
- Pressure
- MIDI pressure. The modulation range of pressure can be adjusted with the Pressure Index control on Modulation > Other
- Vel
- MIDI note velocity.
- Off Vel
- Release velocity/off velocity; the velocity value when the note is released.
- Slide
- MIDI MPE slide.
- Random
- A random value that is generated for each note.
- Learn CC
- Parameters can be assigned to MIDI CC.
MIDI Learnmust be enabled on Config > MIDI.
Modulation Assignment#
When a parameter is right-clicked (Control+click on Mac), a context menu appears with modulation routing options:
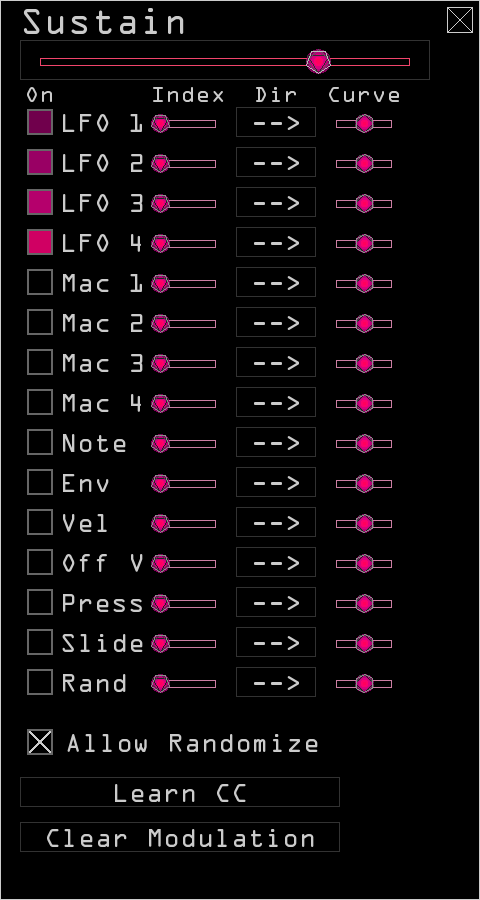
- Parameter slider
- A copy of the parameter being modulated, for easy adjustment.
- QT (Pitch only)
- Quantizes the incoming modulation to semitone values when checked. Only appears when modulating the
Pitchparameter. - On
- Each modulation source has a checkbox; when checked, modulation from that source is enabled.
- Index
- Sets the amount of modulation from a particular source. Fully left, modulation is bypassed.
- Dir
- Direction. Sets the polarity and inversion of incoming modulation.
- --> (unipolar): modulates from the point selected on the parameter up to the level indicated by the Index setting
- <-> (bipolar): modulates around the center point set by the parameter
- <-- (inverted unipolar): opposite modulation from unipolar
- >-< (inverted bipolar): opposite modulation from bipolar
- Curve
- Each modulation source has a Curve slider that changes how modulation affects the parameter. In the center, modulation is linear, and the parameter movement matches incoming modulation exactly. To the right modulation is more logarithmic, and to the left more exponential.
- Allow Randomize
- When checked, this parameter can be randomized when “rand” (Tone page) is clicked.
- Learn CC
- Click this to enable MIDI CC learn on a parameter. Move a parameter on your MIDI controller and the plugin will exit learn mode and the parameter will now respond to that CC. If clicked by mistake, click
Waiting on CCto exit learn mode. ClickForget CCto remove an assignment. - For this button to be visible,
MIDI Learnmust be enabled on Config > MIDI. - Clear modulation
- Resets modulation checkboxes, amounts, direction, and curve. Does not affect CC assignments.
Modulation Page#
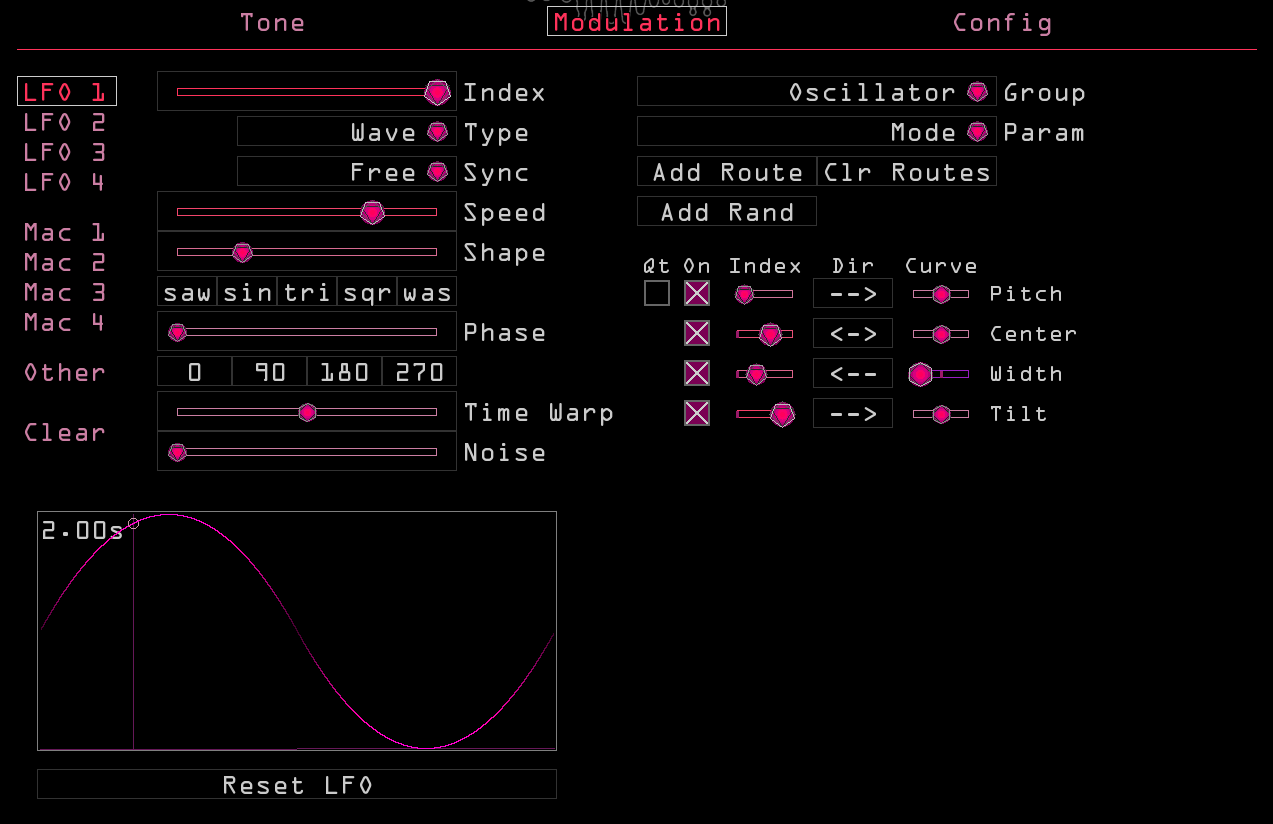
Click the modulator names in the left column to navigate to that modulator's page and edit settings. The left half of the page shows modulator settings, and the right half shows modulator routings.
LFO 1-4#
- Index
- Sets the modulation range of the LFO.
- Type
- Sets the type of LFO. Options include
Wave,Step, andADR, described in detail in the sections below. - Sync
- Sets the source of timing for the modulator. * Free: A single completely freerunning LFO; never resets. * Transport: Speed is set in seconds, but the LFO follows the transport of the DAW. * Tempo: A single LFO that is synced to the DAW’s tempo and transport. * Poly Free: Each note played gets its own LFO; LFOs are reset at the start of each note. * Poly Tempo: A tempo-synced LFO is created per note; LFOs reset at the start of each note.
- Reset LFO
- Resets the LFO back to its default state, respecting Type.
Type: Wave#
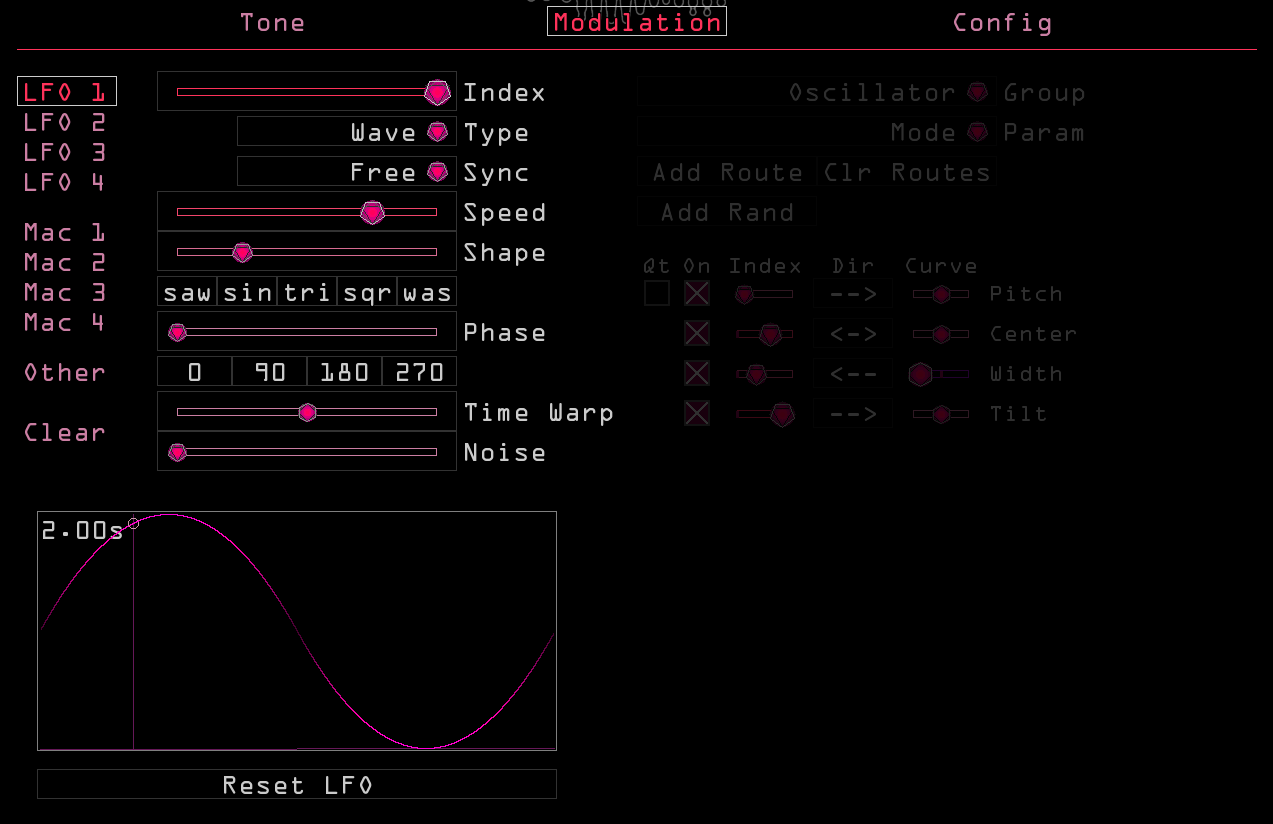
- Speed/Beats
- Sets the rate of the LFO. In unsynced modes, this is a slider that sets the rate in seconds. In synced modes (Tempo and Poly Tempo), this is a fraction that sets the rate in beats (for example,
4/1would be equal to 1 bar in 4/4 meter). If a synced mode is selected, the rate can be doubled or halved with the*2and/2buttons respectively. - Shape
- Morphs between different waveforms.
- saw/sin/tri/sqr/was
- Selects a shape preset for the waveform. Choose saw, sine, triangle, square, or inverted saw.
- Phase
- Changes the starting point of the wave.
- 0/90/180/270
- Selects a preset for the phase of the waveform.
- Time Warp
- Skews the timing of the waveform.
- Noise
- Adds randomness to the waveform.
- Color
- Only visible when
Noiseis above minimum. Changes the intensity of randomness added to the waveform.
Type: Step#
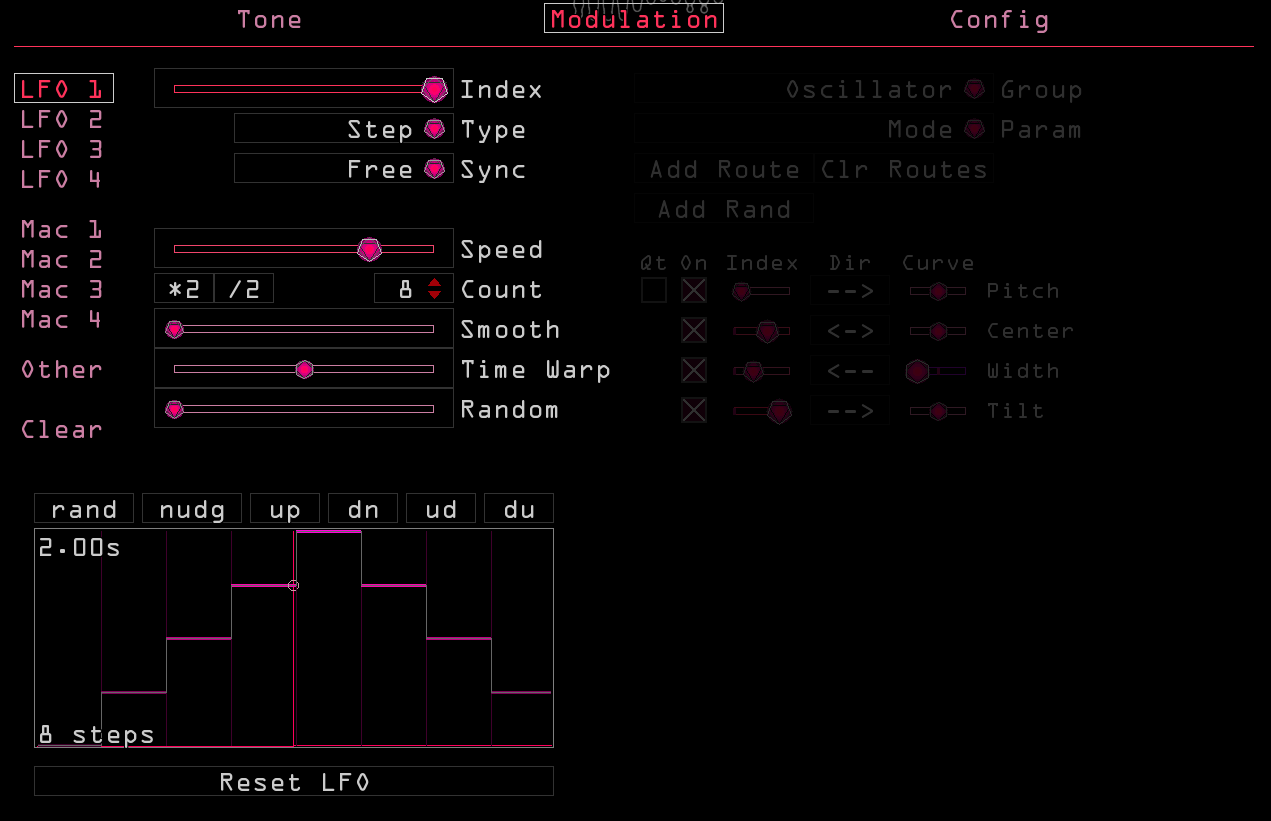
- Speed/Beats
- Sets the rate of the sequencer. In unsynced modes, this is a slider that sets the rate in seconds. In synced modes, this is a fraction that sets the rate in beats (for example, 4/1 would be equal to 1 bar in 4/4 meter). If a synced mode is selected, the rate can be doubled or halved with the *2 and /2 buttons respectively.
- Count
- Sets the steps in the sequencer; the up and down arrows change the count by one, and the *2 and /2 buttons respectively double or halve the count.
- Smooth
- Adjusts how smooth the transition between steps is.
- Time Warp
- Skews the timing of the sequencer.
- Random
- Adds per-step randomization to the sequence.
- Graph
- Edit your sequence here by clicking and dragging or use the preset buttons:
- rand: Randomizes the sequence entirely.
- nudge: Slightly changes the values of each step.
- up: Generates an ascending pattern across the steps.
- dn: Generates a descending pattern across the steps.
- ud: Creates a triangle pattern across the steps.
- du: Creates an inverted triangle pattern across the steps.
Type: ADSR#
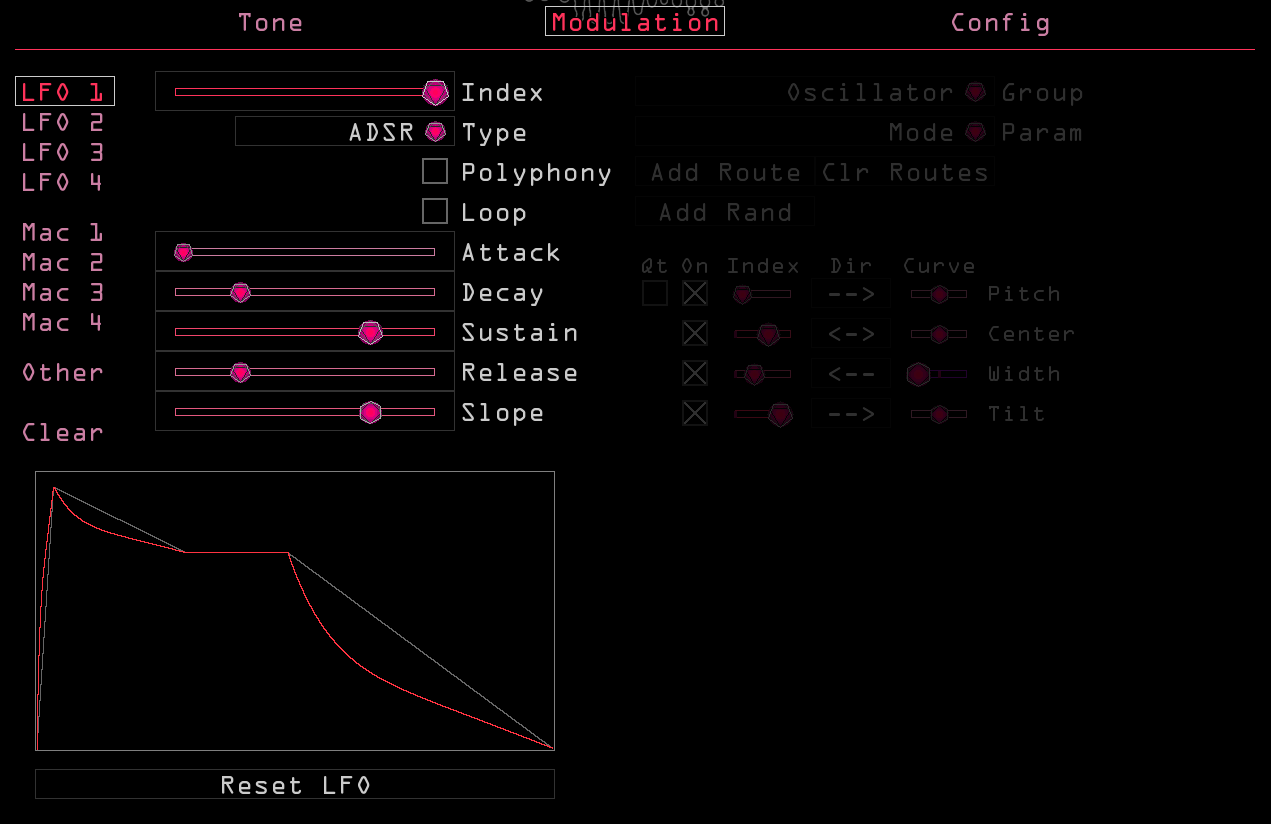
- Polyphony
- When checked, a new envelope is created for each voice. When unchecked, a single envelope is generated for all voices.
- Loop
- When set to once, the envelope goes through a single cycle per note press. When set to loop, the envelope will loop as long as a note is playing.
- Attack
- Controls the attack time for the envelope; this sets the amount of time it takes the envelope to go from minimum to maximum.
- Decay
- Controls the decay time for the envelope; this sets the amount of time it takes the envelope to go from the peak reached in the
Attackstage to the level set in theSustainstage. - Sustain
- Sets the sustain level of the envelope: this is the level the envelope holds at after the
AttackandDecaystages while a note is held down. - Release
- Sets the release time for the envelope; this is the amount of time it takes the envelope to go from the
Sustainlevel to minimum. - Slope
- Sets the curve of the envelope with linear in the center.
Macro#
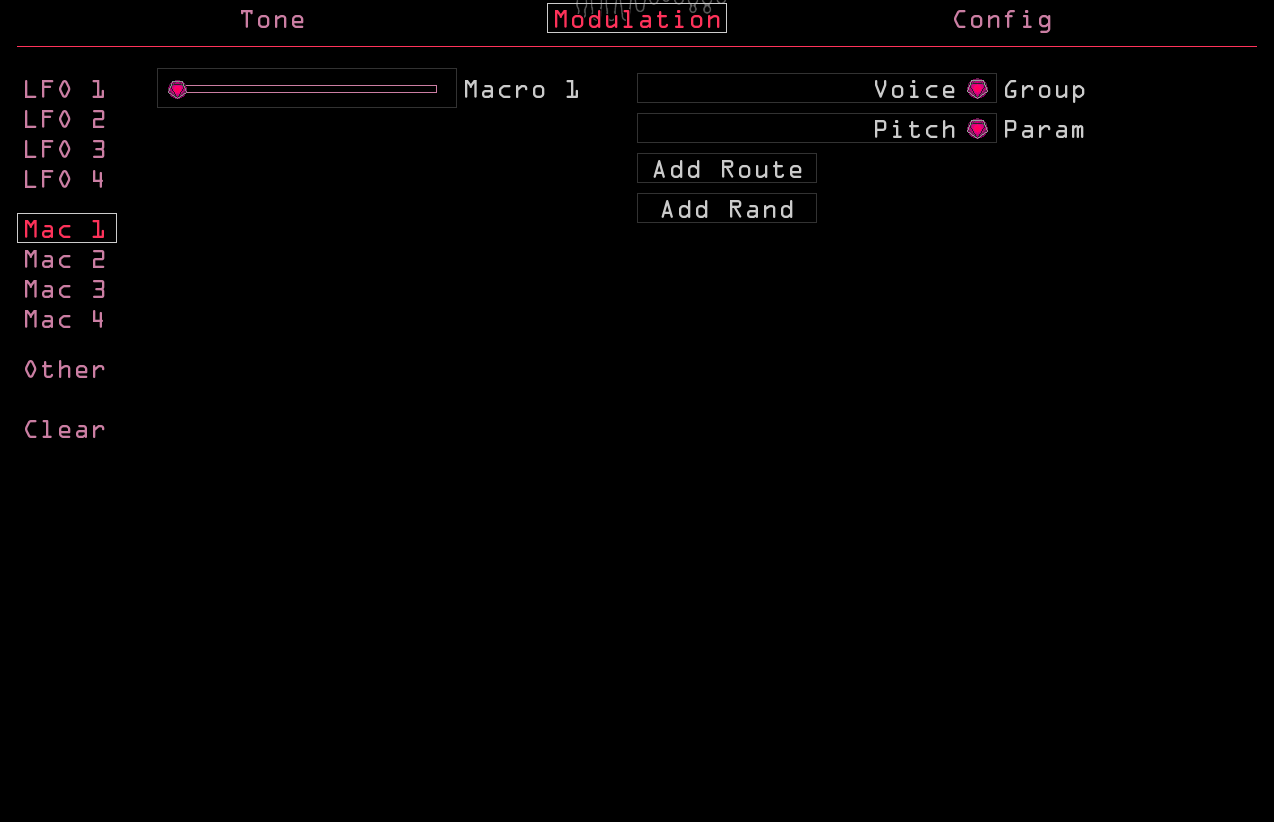
- Mac 1-4
- Four sliders that can be assigned to any number of other parameters, and modulated by LFOs or MIDI CCs.
Other#
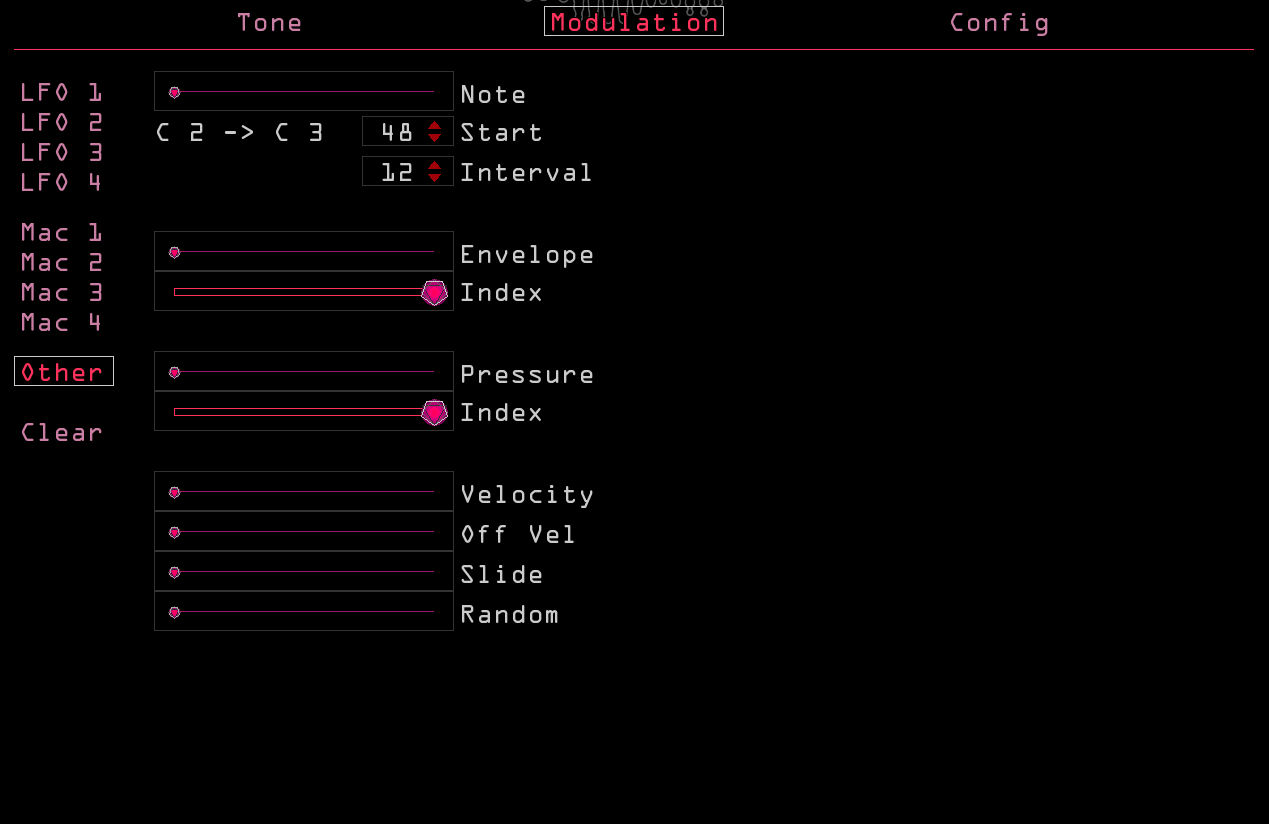
- Note
- An indicator of the current
Notemodulator value. - Start
- Sets the lowest note in the
Notemodulator range. Notes below this give the minimum value. - Interval
- Sets the highest note in the
Notemodulator range. Notes above this give the maximum value. - Envelope
- An indicator of the current
Envelopemodulator value. - Index
- Sets the range of the
Envelopemodulator. - Pressure
- An indicator of the current
Pressuremodulator value. - Index
- Sets the range of the
Pressuremodulator. - Velocity
- An indicator of the current
Velocitymodulator value. - Off Vel
- An indicator of the current
Off Velocitymodulator value. - Slide
- An indicator of the current
Slidemodulator value. - Random
- An indicator of the current
Randommodulator value.
Clear#
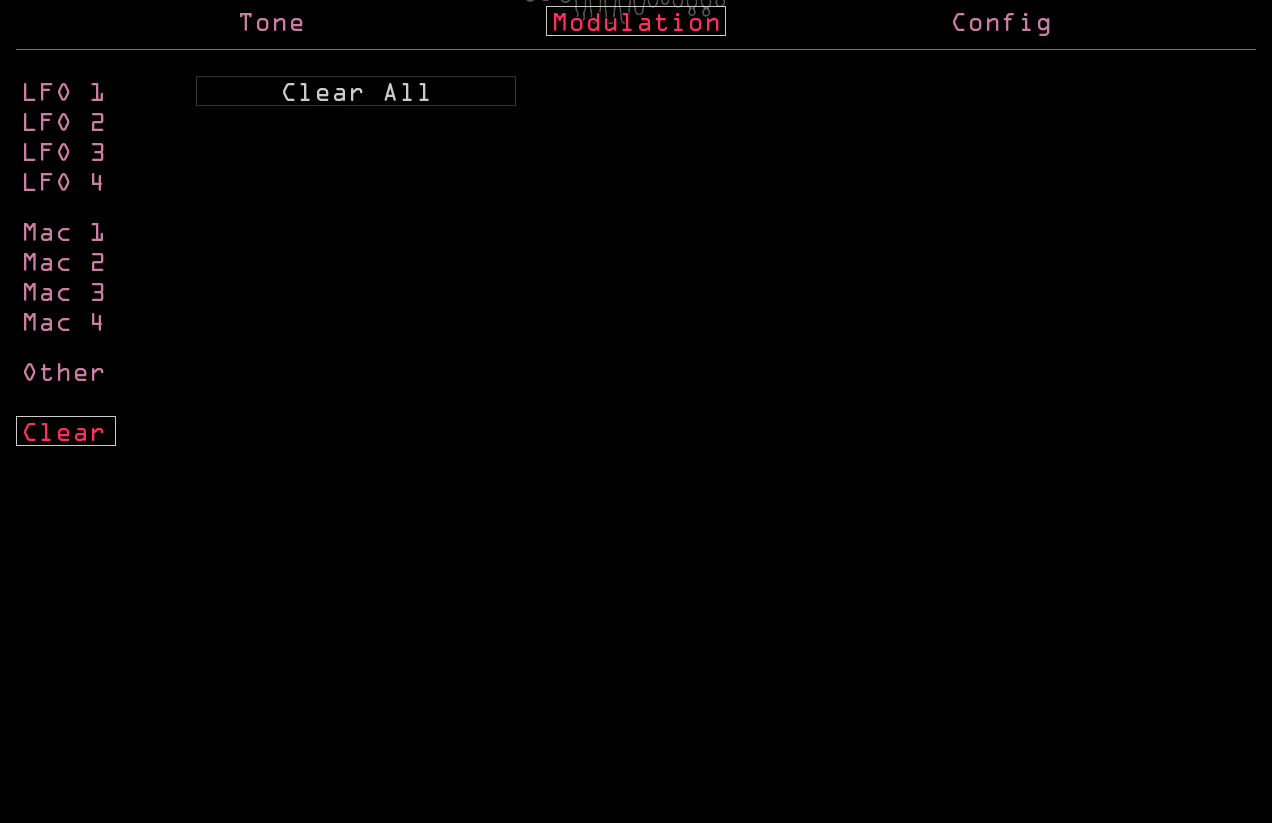
- Clear All Modulation
- Clicking this removes all modulation routings from the patch. Use it wisely.
Modulated parameters tab#
When a modulator (LFO, Macro, or Other) is assigned to a parameter, the parameter will appear in this list when on that modulator’s page. For instance, if LFO 1 is modulating Attack, click LFO 1 on the left side to view the modulation amount, curve, and checkbox for Attack (and any other LFO 1 modulated parameters) on the right.
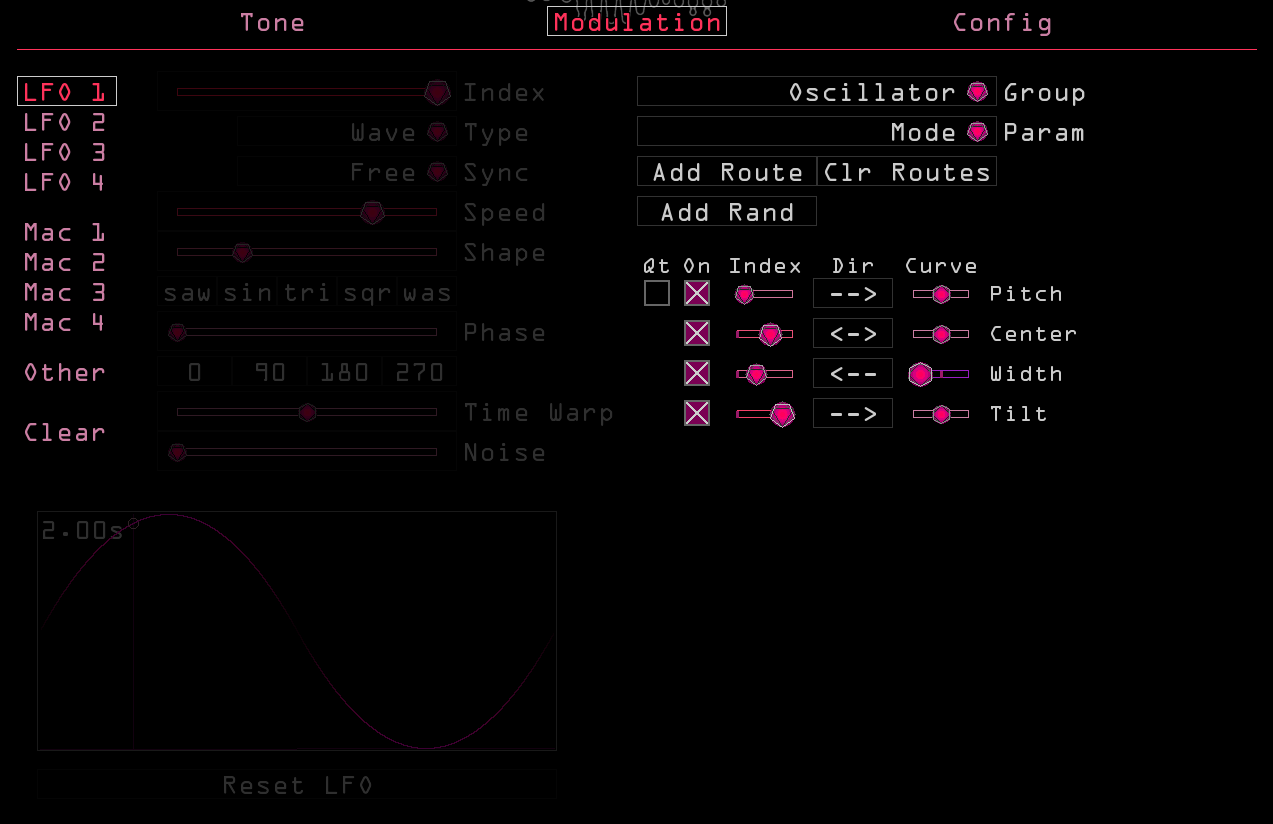
- Group
- Selects a category of parameters, grouped by location in the interface. For example, the Fold parameter is in the Oscillator group.
- Param
- Selects a parameter from the current Group category.
- Add Route
- Adds modulation routing for the selected parameter from the selected modulator.
- Clr Routes
- Click twice to remove all modulation assignments for the current modulator. To remove a single assignment simply uncheck the On box.
- Add Rand
- Adds a random modulation destination.
- QT (Pitch only)
- Quantizes the incoming modulation to semitone values when checked. Only appears when modulating the
Pitchparameter. - On
- Each modulation source has a checkbox; when checked, modulation from that source is enabled. When unchecked on this page, it is removed.
- Index
- Sets the amount of modulation from a particular source. Fully left, modulation is bypassed.
- Dir
- Direction. Sets the polarity and inversion of incoming modulation:
- --> (unipolar): modulates from the point selected on the parameter up to the level indicated by the Index setting
- <-> (bipolar): modulates around the center point set by the parameter
- <-- (inverted unipolar): opposite modulation from unipolar
- >-< (inverted bipolar): opposite modulation from bipolar
- Curve
- Each modulation source has a Curve slider that changes how modulation affects the parameter. In the center, modulation is linear, and the parameter movement matches incoming modulation exactly. To the right modulation is more logarithmic, and to the left more exponential.
Config Page#
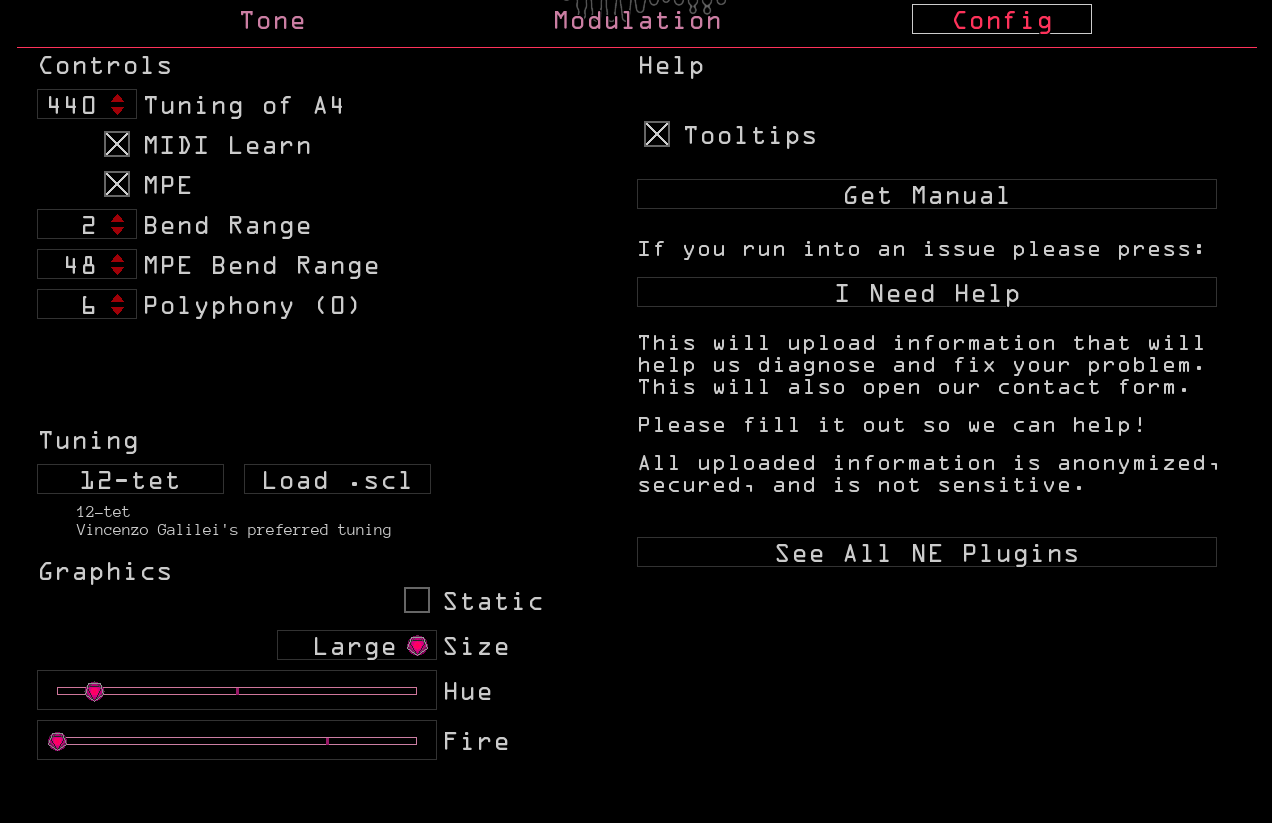
Controls#
- Tuning of A4
- Offsets the base pitch of the synthesizer; defaults to contemporary “concert pitch” (A=440hz).
- MIDI Learn
- Enables MIDI mapping (right-click/cmd-click a parameter to bring up the modulation menu and click Learn CC).
- MPE
- Enables MPE control within the plugin.
- Bend Range
- Sets the pitch bend range in semitones.
- MPE Bend Range
- Sets the range of MPE pitch bend in semitones. Most controllers and DAWs expect the default value of 48 semitones.
- Polyphony
- Sets the maximum number of simultaneous voices the plugin can play.
Tuning#
- 12-tet
- Sets the pitch scaling of the plugin to the default twelve-tone equal temperament tuning.
- Load .scl
- Allows the user to load Scala files for different tuning systems.
Graphics#
- Static
- Adds some retro flare to the plugin GUI.
- Size
- Sets the size of the plugin window.
- Hue
- Sets the color scheme of the plugin.
- Fire
- Adds some attitude to the plugin GUI.
Help#
- Tooltips
- Enables helpful tooltips when you mouse over parameters.
- Get Manual
- Opens the plugin product page.
- I Need Help
- Uploads anonymized system information used for troubleshooting and opens the support form. If you’re having an issue please press this button and fill out the form to tell us what the problem is! You can also always reach us at noiseengineering.us/pages/contact. Drop us a line and we’ll get back to you within two business days.
- See All NE Plugins
- Opens the plugin shop. Check out all the Noise!
Plugin Locations#
Plugin presets install to the following locations:
- Windows
- C:\Users\Public\Documents\Noise Engineering\
- Mac
- /Users/[name]/Library/Audio/Presets/Noise Engineering/
Noise Engineering plugins are installed to the default locations for the specified plugin formats. In a majority of cases, plugins will not need to be moved. In the rare instance that you need to move your VST plugins, find them in the following locations:
- Windows
- C:/Program Files/Common Files/VST3/Noise Engineering/
- Mac
- /Library/Audio/Plug-Ins/VST3/
Note that AU and AAX plugins cannot be moved. For reference, they are installed here:
- Mac AU
- /Library/Audio/Plug-Ins/Components/
- Mac AAX
- /Library/Application Support/Avid/Audio/Plug-Ins/Noise Engineering/
- Windows AAX
- C:/Program Files/Common Files/Avid/Audio/Plug-Ins/Noise Engineering/
About NE#
Noise Engineering is located in Los Angeles, California. We started around 2014 when Chief Noisemaker Stephen McCaul wanted a hobby for his off time from his day job and started making Eurorack modules in a spare bedroom at home. One thing led to another and a couple of years later, he and wife Kris Kaiser quit their day jobs and took the company full time. Noise Engineering has since grown in size and has established itself as a well-regarded and innovative synthesizer brand, with products in Eurorack, 5U, and multiple software platforms.
Special thanks#
- Starthief
- René G. Boscio
- Daniel Awbry
- Pino Grzybowsky
- Christian Gibson
- Jake Patel
- iVardensphere
- Stephan Eibel
- Drem Bruinsma
- Øivind Idsø
- Matt Lange
- Greg Chin
- Rhys Fulber
- James Tobias
- Hans Besselink
- Douglas Hill
- Josh Sager
- Yugo Oshima
- Aldo Lamana