Roucha Legio Manual#
Stereo resonant multimode filter with wavefolding, 1v/8va tracking, and gateable Bypass
Screen reader accessible documentation
Overview#
Roucha Legio is a 12dB/octave state-variable stereo multimode filter with settings for lowpass, bandpass, or highpass operation. Its filter frequency can be adjusted manually or, thanks to its proudly digital design, with an extremely accurate 1v/8va-tracking CV input. Its CV-controllable Resonance parameter goes from clean to squelchy, perfect for acid basslines and in-your-face filter sweeps.
If that’s not enough for your patch, the Fold knob adds wavefolding to the signal chain, either before, after, or both before and after the filter.
Last of all, if you like dramatic buildups and DJ-style filter cuts, all processing can be bypassed by tapping the frequency encoder or by sending a gate signal to the module.
- Type: Stereo filter and wavefolder
- Size: 6HP
- Depth: 1.5 Inches
- Power: 2x5 Eurorack
- +12 V:
140 mA - -12 V:
22 mA
Etymology#
Roucha -- from Latin: "pants"
Legio -- from Latin: "legion"
"Lots of laundry"
Color code#
On boot, the Legios's LEDs will shine with this color pattern to indicate that it is running the current Roucha Legio firmware:

Power#
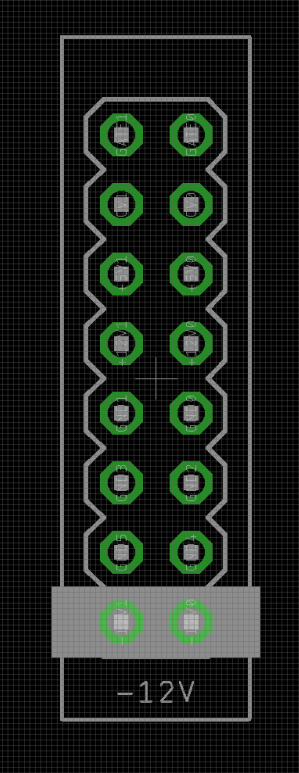
To power your Noise Engineering module, turn off your case. Plug one end of your ribbon cable into your power board so that the red stripe on the ribbon cable is aligned to the side that says -12 V and each pin on the power header is plugged into the connector on the ribbon. Make sure no pins are overhanging the connector! If they are, unplug it and realign.
Line up the red stripe on the ribbon cable so that it matches the white stripe and/or -12 V indication on the board and plug in the connector.
Screw your module into your case before powering on the module. You risk bumping the module's PCB against something metallic and damaging it if it's not properly secured when powered on.
You should be good to go if you followed these instructions. Now go make some noise!
Noise Engineering modules are reverse protected. If you accidentally installed it with the red stripe up, simply remove the power and place it correctly.
A final note. Some modules have other headers -- they may have a different number of pins or may say "not power". In general, unless a manual tells you otherwise, do not connect those to power.
Input & output voltages#
Roucha Legio’s CV-modulation inputs expect signals from 0 V to +5 V, except the Freq input, which has a range of -2 V to +5 V.
The Bypass input responds to a rising edge around +1.6 V.
The the audio inputs are AC coupled and respond to any Eurorack audio signals. When used for pinged filter patches, a very short trigger will work best.
The audio output can reach up to 16 V peak-to-peak.
Calibration#
Roucha Legio features an autocalibration system. The modules are autocalibrated and tested at the factory, but should you feel you need to recalibrate, just power the unit on with nothing patched to the Freq CV input. The module will calibrate itself during startup.
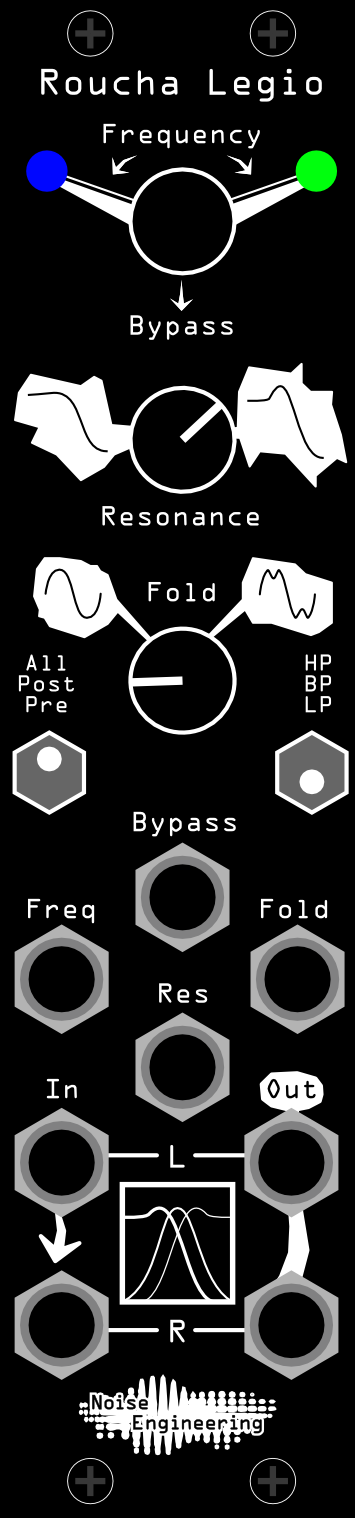
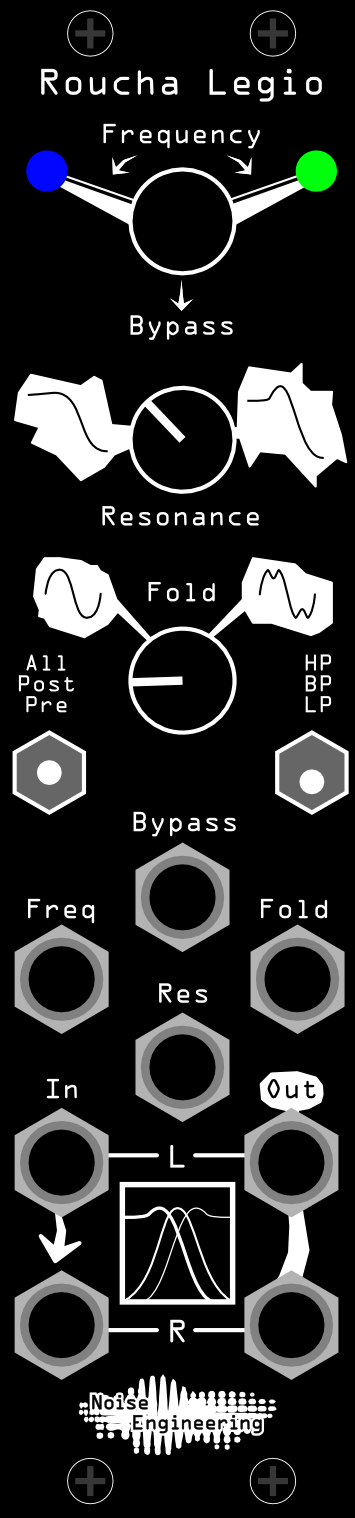
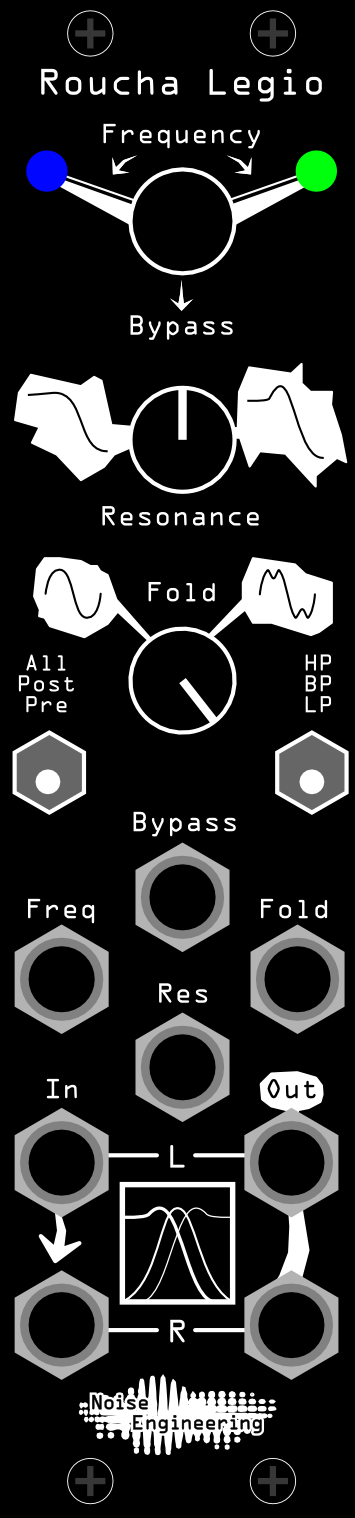
Interface#

- Frequency
- Turning the encoder adjusts the frequency of the filter. The encoder features acceleration: the faster the encoder is turned, the greater the change in frequency.
- Tapping the encoder will bypass all processing until the encoder is tapped again.
- Resonance
- Emphasizes sound around the cutoff frequency. Roucha won’t self-oscillate until it is excited by external input.
- Fold
- A wavefolder that can be placed at different points in the signal chain with the left switch.
- All/Post/Pre
- Changes the position of the wavefolder in the signal chain.
- All: The wavefolder is both before and after the filter
- Post: The wavefolder is after the filter
- Pre: The wavefolder is before the filter
- HP/BP/LP
- Set the filter frequency with the encoder and use this switch to change the filter type.
- HP: Sound above the cutoff frequency is let through; sound below the cutoff is suppressed
- BP: A narrow band of frequencies around the cutoff frequency are allowed through; sound above and below the band are suppressed
- LP: Sound below the cutoff frequency is let through; sound above the cutoff frequency is suppressed
- Bypass (gate input)
- When a high gate is sent to this input, all processing is bypassed and the dry signal is passed through. When a low gate is present at the input, the filter functions as usual.
- In L/In R
- Audio inputs. If R is unpatched, L will normal to R.
- Out L/Out R
- Audio outputs.
Patch tutorial#
- Getting started
- Patch a sound source like an oscillator, a sample, or a mix of elements to the L In jack (and the R In jack if the sound is stereo). Patch Out L (and Out R for stereo operation) to your mixer.
- Set Fold and Resonance fully counterclockwise to start. Adjust the frequency of the filter with the encoder and try out the different filter modes (LP, BP, and HP).
- Turn up Resonance to make the filter more characterful, and turn up Fold to add some distortion to your signal.
- Try modulating the filter frequency with an envelope, LFO, or step sequencer.
- Try bypassing the filter by tapping the encoder, or send a gate sequence to the Bypass jack to create glitchy filter cuts.
- The module can also be used as a simple voice: patch a trigger sequence to L In and turn the Resonance up to change how long the voice rings out when it’s triggered. A pitch CV sequence can be patched to the Freq input to play melodies, and the switches and Fold parameter will change the timbre of the voice.
For the following patches, set the filter frequency to taste. We generally began patching with the filter between 500hz-1khz."
- Rhythmic Filter
- Patch a rhythmic sound source (like a sequenced drum loop) to In L (and In R if sound is stereo). Patch Out L and Out R to your mixer. Set knobs as shown, and flip the switches to All and LP. Patch gate sequence to the Bypass input to add filtered layers to your drum pattern.
- Tremolo
- A variation on the previous patch, tuned to melodic applications. Patch a melodic sound source to In L (and In R if sound is stereo). Patch Out L and Out R to your mixer. Set knobs as shown, and flip the switches to Post and BP. Patch fast gate sequence to the Bypass input to create a tremolo effect.

- Filter wobble
- Patch an agessive sound source (like a saw wave or square wave) to In L (and In R if sound is stereo). Patch Out L and Out R to your mixer. Set knobs as shown, and flip the switches to Post and LP. Patch an LFO to the Freq CV input to create a wobble.
- For even more fun, try running the LFO at audio rates to create entirely new timbres!
- Random frequencies
- Patch a sound source to In L (and In R if sound is stereo). Patch Out L and Out R to your mixer. Set knobs as shown, and flip the switches to Pre and LP. Patch an stepped random voltage or a CV sequencer to the Freq CV input to create randomized filter frequencies.
- This patch is perfect for bringing almost any sound to life -- try it on samples or the lead of your patch.
- Screechy filter
- Patch a sound source to In L (and In R if sound is stereo). Patch Out L and Out R to your mixer. Set knobs as shown, and flip the switches to Post and LP. Patch an envelope to the Freq CV input and adjust the Resonance to taste to create dramatic filter sweeps.
- To place your sound in a higher register, try using the BP setting instead of the LP setting.
- Tuned resonance
- Patch an oscillator to In L (and In R if the oscillator is stereo). Patch Out L and Out R to your mixer. Set knobs as shown, and flip the switches to Pre and LP. Mult your pitch sequence to the Freq CV input of Roucha and to your oscillator's pitch input. Tune Roucha to harmonize with with the oscillator.
- This is a great way to beef up a sound: by multing the pitch sequence to both the filter and the oscillator, the timbre will stay consistent no matter what note is played.
Firmware swapping#
Use our firmware swap app to change your platform module's firmware at any time.
To get started:
- Turn off the power to your case and unscrew the module.
- Remove the power connector on the back of the module.
- Plug a micro USB connector into the port on the pack of the module, and the other end into your computer.
- Follow the instructions in the firmware swap app.
Design notes#
Roucha came about in a flurry of firmware testing. We had been throwing around Legio concepts for a number of weeks and none of them were sticking: all of us had varying opinions on what should come next for the platform, and then we all wanted different implementations of the concepts we did agree on. At one point we had four competing firmwares all based around similar ideas that we were playing with: none of them were quite what we all wanted, and we realized we needed to take a step back and explore some alternatives.
As a complete change of pace, Stephen dropped a filter firmware into the discussion and we all fell in love with it immediately. We’ve long wanted to add more filters to our lineup, and (what is now named) Roucha seemed like a perfect addition to the NE ecosystem. We decided to add a subtle noise gate for high-distortion patches, and spent some time tweaking the Fold parameter to sound how we wanted it to. After only a few days of work and testing the whole team was happy with Roucha – a new record for development speed – and the filter you see before you was finished.
Warranty#
We will repair or replace (at our discretion) any product that we manufactured for one year after initial purchase as long as we are able to get the parts to do so. This warranty does not apply to normal wear and tear, including art/panel wear, or any products that have been modified, abused, or misused. Our warranty is limited to manufacturing defects.
Warranty repairs/replacements are free. Repairs due to normal wear, user modification, or other damage are charged at an affordable rate. Customers are responsible for the cost of shipping to Noise Engineering technicians for repair.
All returns must be coordinated through Noise Engineering; returns without a Return Authorization will be refused and returned to sender.
For immediate issues with new modules, please contact your dealer for a replacement. Otherwise, please contact us if you think one of your modules needs a repair.
Special thanks#
- Hans Besselink