Quantus Ampla Manual#
Four channels of linear DC-coupled goodness in 6 HP for all your VCA needs: ducking, mixing, CV-controlled leveling, and more!
Screen reader accessible documentation
Overview#
Quantus Ampla is a compact four-channel VCA. But it's not just any VCA: with some unique normaling, mixing, and CV options, you can use it for a plethora of tasks. Each channel has two modes: Amplify, which gives you normal VCA response, and Attenuate, which makes the VCAs close instead of open in response to positive CV. The CV inputs are circularly normalled, so you can easily create ducking effects over multiple voices, volume fades, and transitions, all with minimal patching. Plus, the outputs mix down, so it can be two two-channel mixers, a 3 channel mixer, a 4 channel mixer… Oh, and did we mention that it's DC coupled so it can process CV signals, too? The possibilities are endless.
- Type: Quad VCA
- Size: 6 HP
- Depth: 0.8 inches
- Power: 2x5 Eurorack
- +12 V:
65 mA - -12 V:
60 mA
Etymology#
Quantus -- from Latin: "how much, how many"
Ampla -- from Latin: "opportunity"
"You can never have enough opportunities"
Power#
To power your Noise Engineering module, turn off your case. Plug one end of your ribbon cable into your power board so that the red stripe on the ribbon cable is aligned to the side that says -12 V and each pin on the power header is plugged into the connector on the ribbon. Make sure no pins are overhanging the connector! If they are, unplug it and realign.
Line up the red stripe on the ribbon cable so that it matches the white stripe and/or -12 V indication on the board and plug in the connector.
Screw your module into your case before powering on the module. You risk bumping the module's PCB against something metallic and damaging it if it's not properly secured when powered on.
You should be good to go if you followed these instructions. Now go make some noise!
Noise Engineering modules are reverse protected. If you accidentally installed it with the red stripe up, simply remove the power and place it correctly.
A final note. Some modules have other headers -- they may have a different number of pins or may say "not power". In general, unless a manual tells you otherwise, do not connect those to power.
Input & output voltages#
Quantus Ampla's CV inputs expect 0 V to 5 V. Voltage above and below this range is clamped.
The VCA can handle signals up to about 20 V peak-to-peak.
Interface#
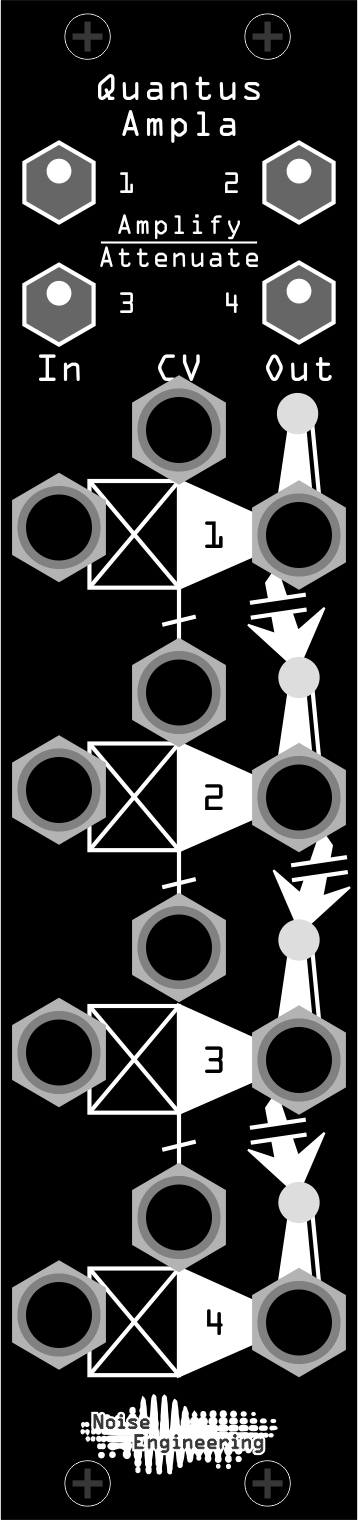
- Amplify/Attenuate 1-4
- Changes the way Quantus Ampla responds to CV. In
Amplifymode, signals passed from In to Out will be at minimum level when a signal at the CV input is at0 V(or, of course, when nothing is plugged in), and at maximum level at5 V(normal VCA behavior).
In Attenuate mode, signals passed from In to Out will be at maximum level when a signal at the CV input is at 0 V, and at minimum level at 5 V (ducking behavior).
- In 1-4
- Input for signals to be processed by the VCA. Quantus Ampla is DC coupled, and will work with audio or CV.
- CV 1-4
- Control voltage input; controls the output level of the signal at the In jack.
- Out 1-4
- VCA output.
Patch Tutorial#
- Volume control
- Requirements: oscillator and envelope generator
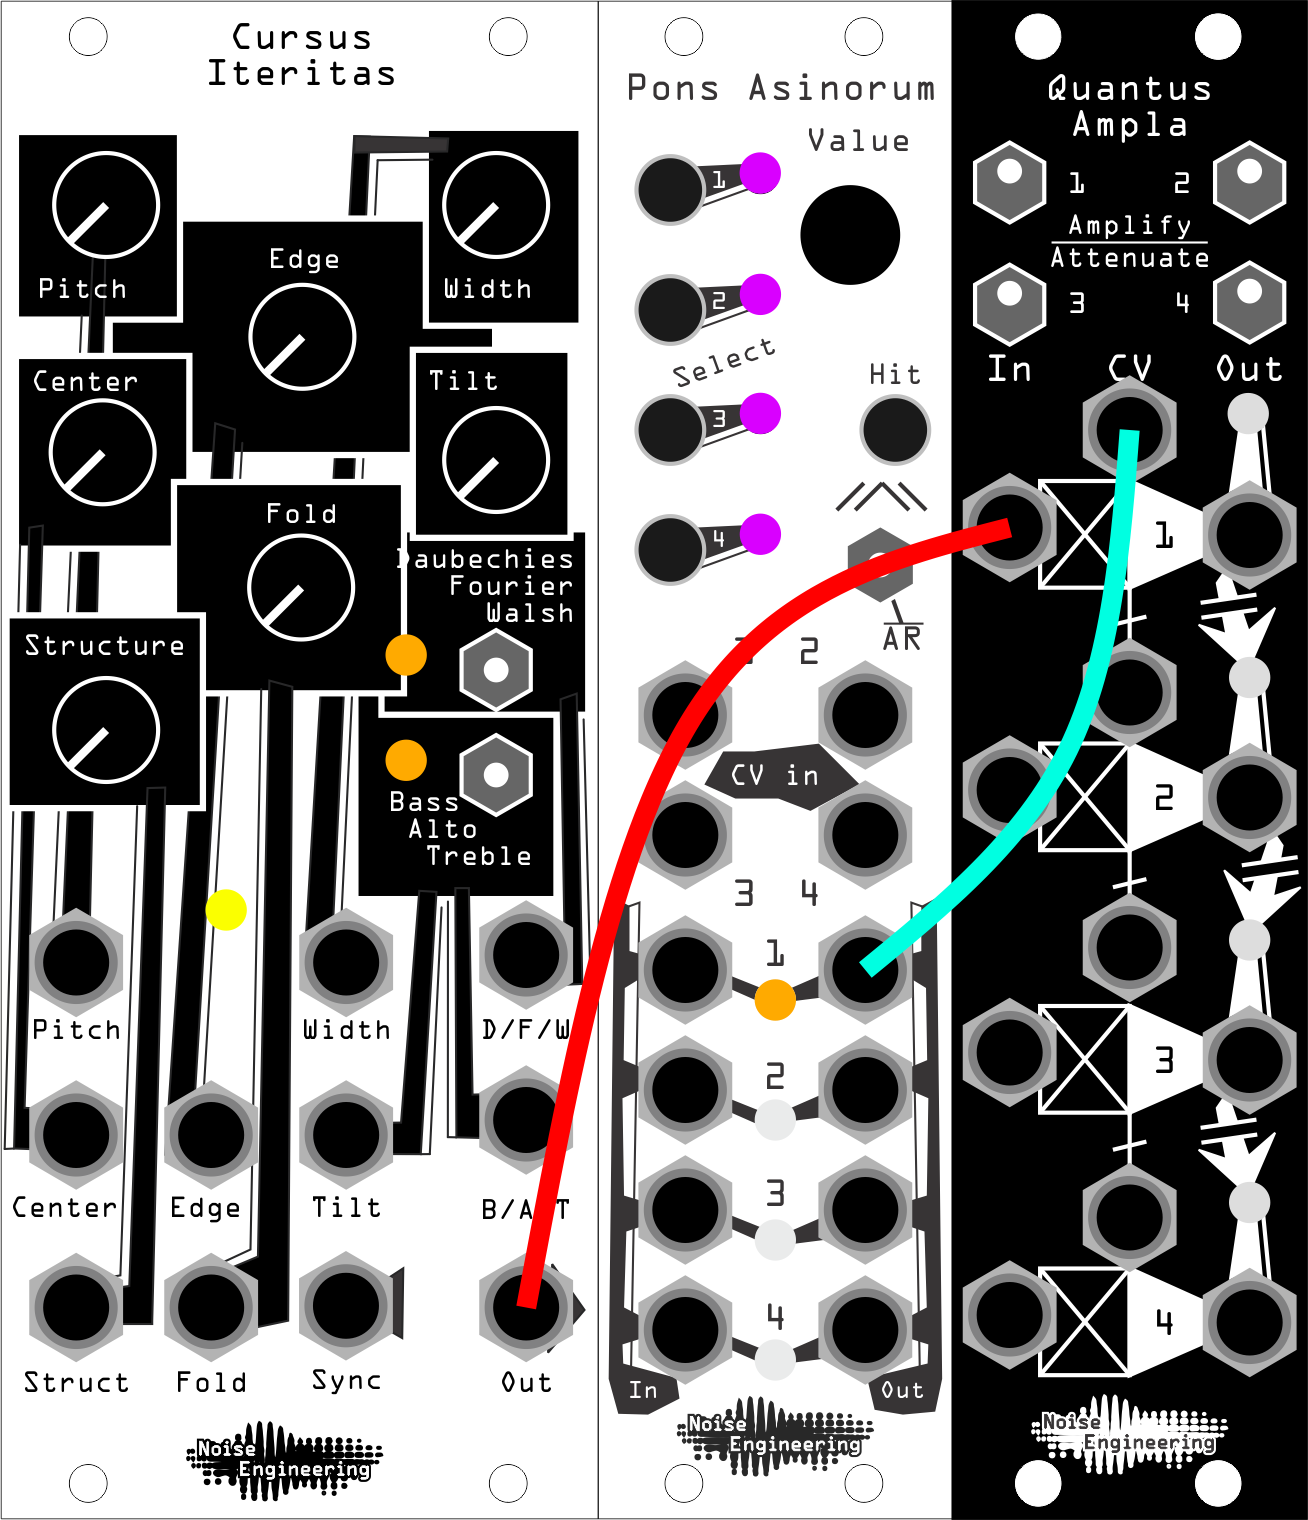
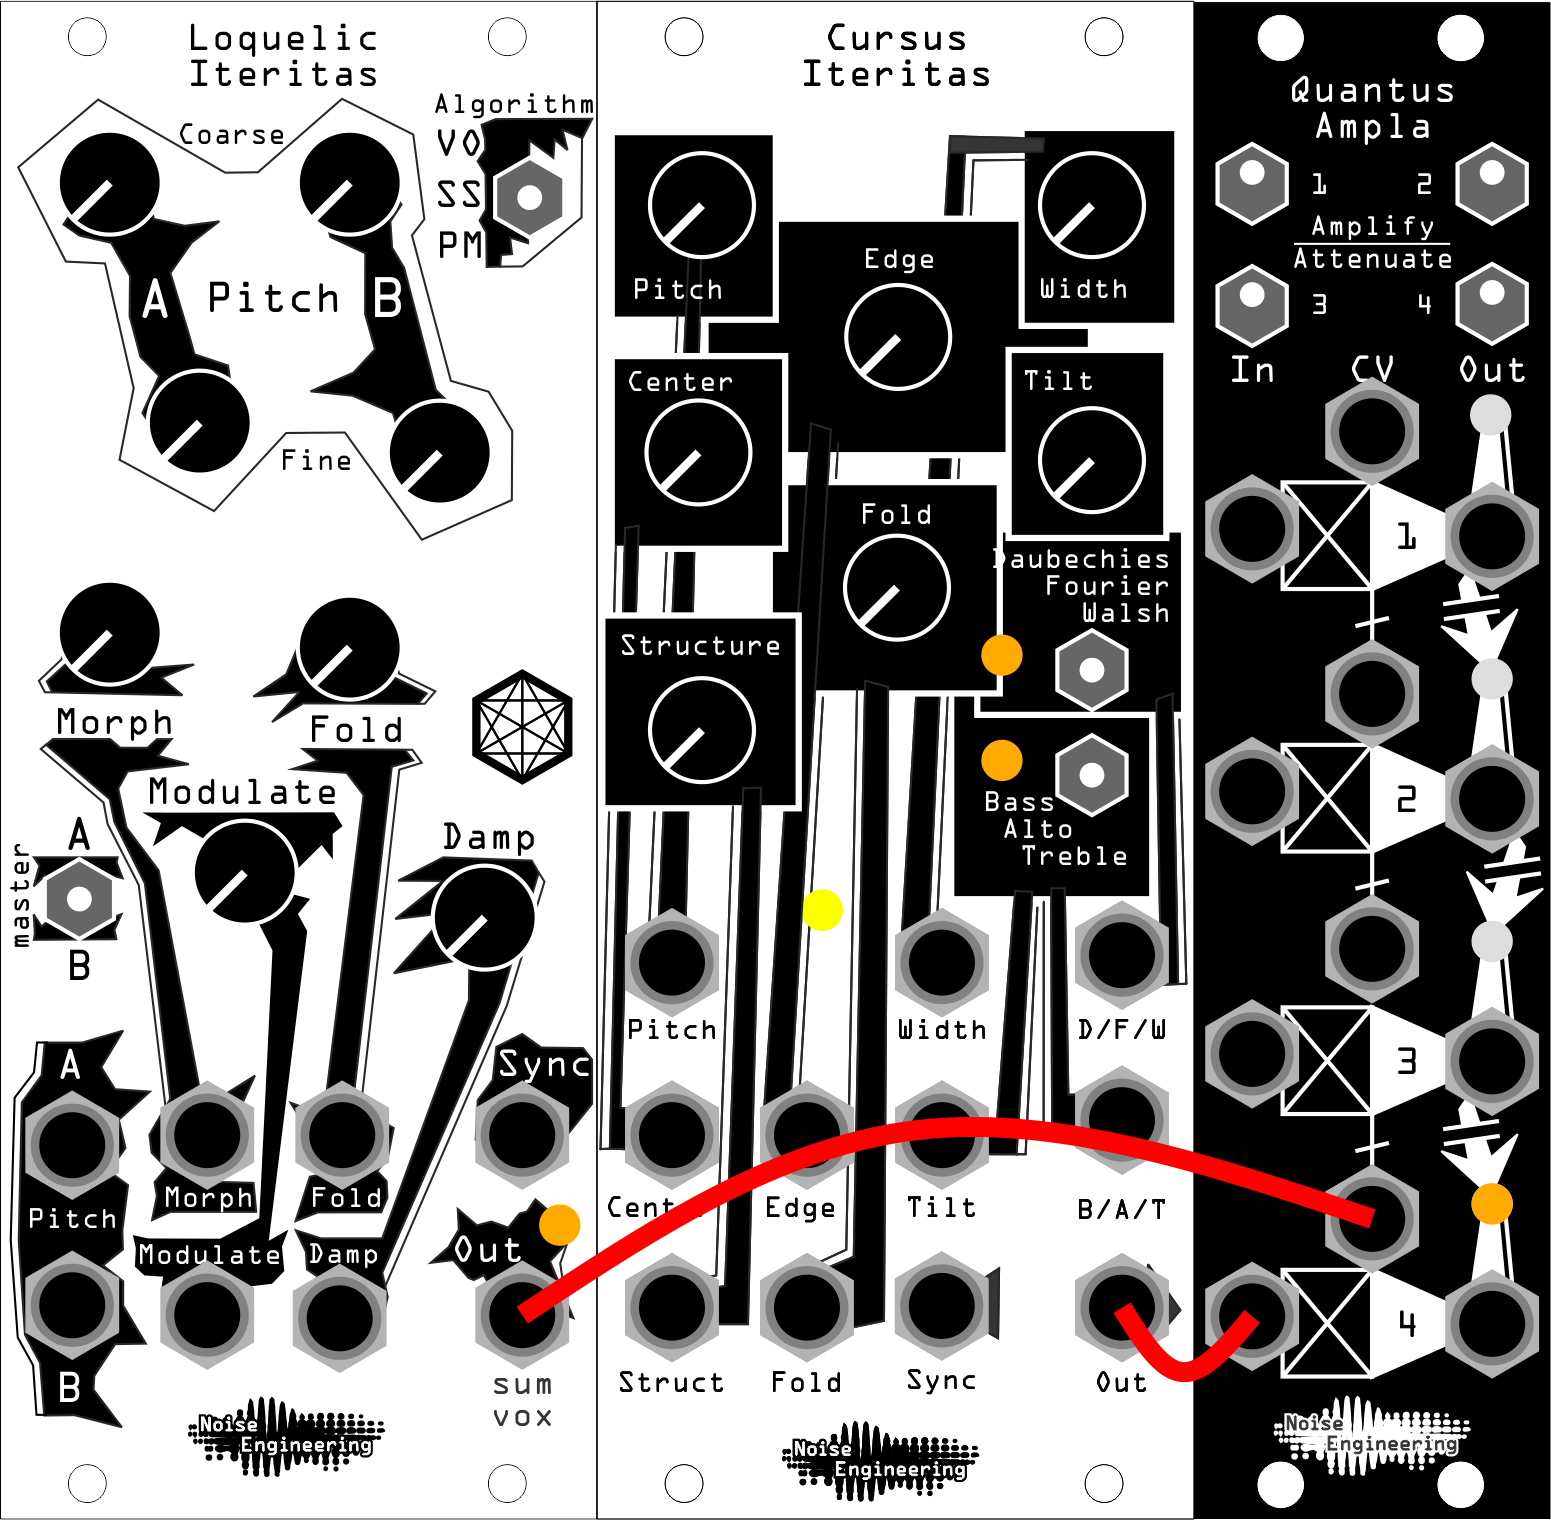
Patch an oscillator like Loquelic Iteritas to
In 1. Patch an envelope generator to theCVjack, then monitorOut 1. Set switch1to the upperAmplifyposition. The envelope now controls the volume level of the oscillator.
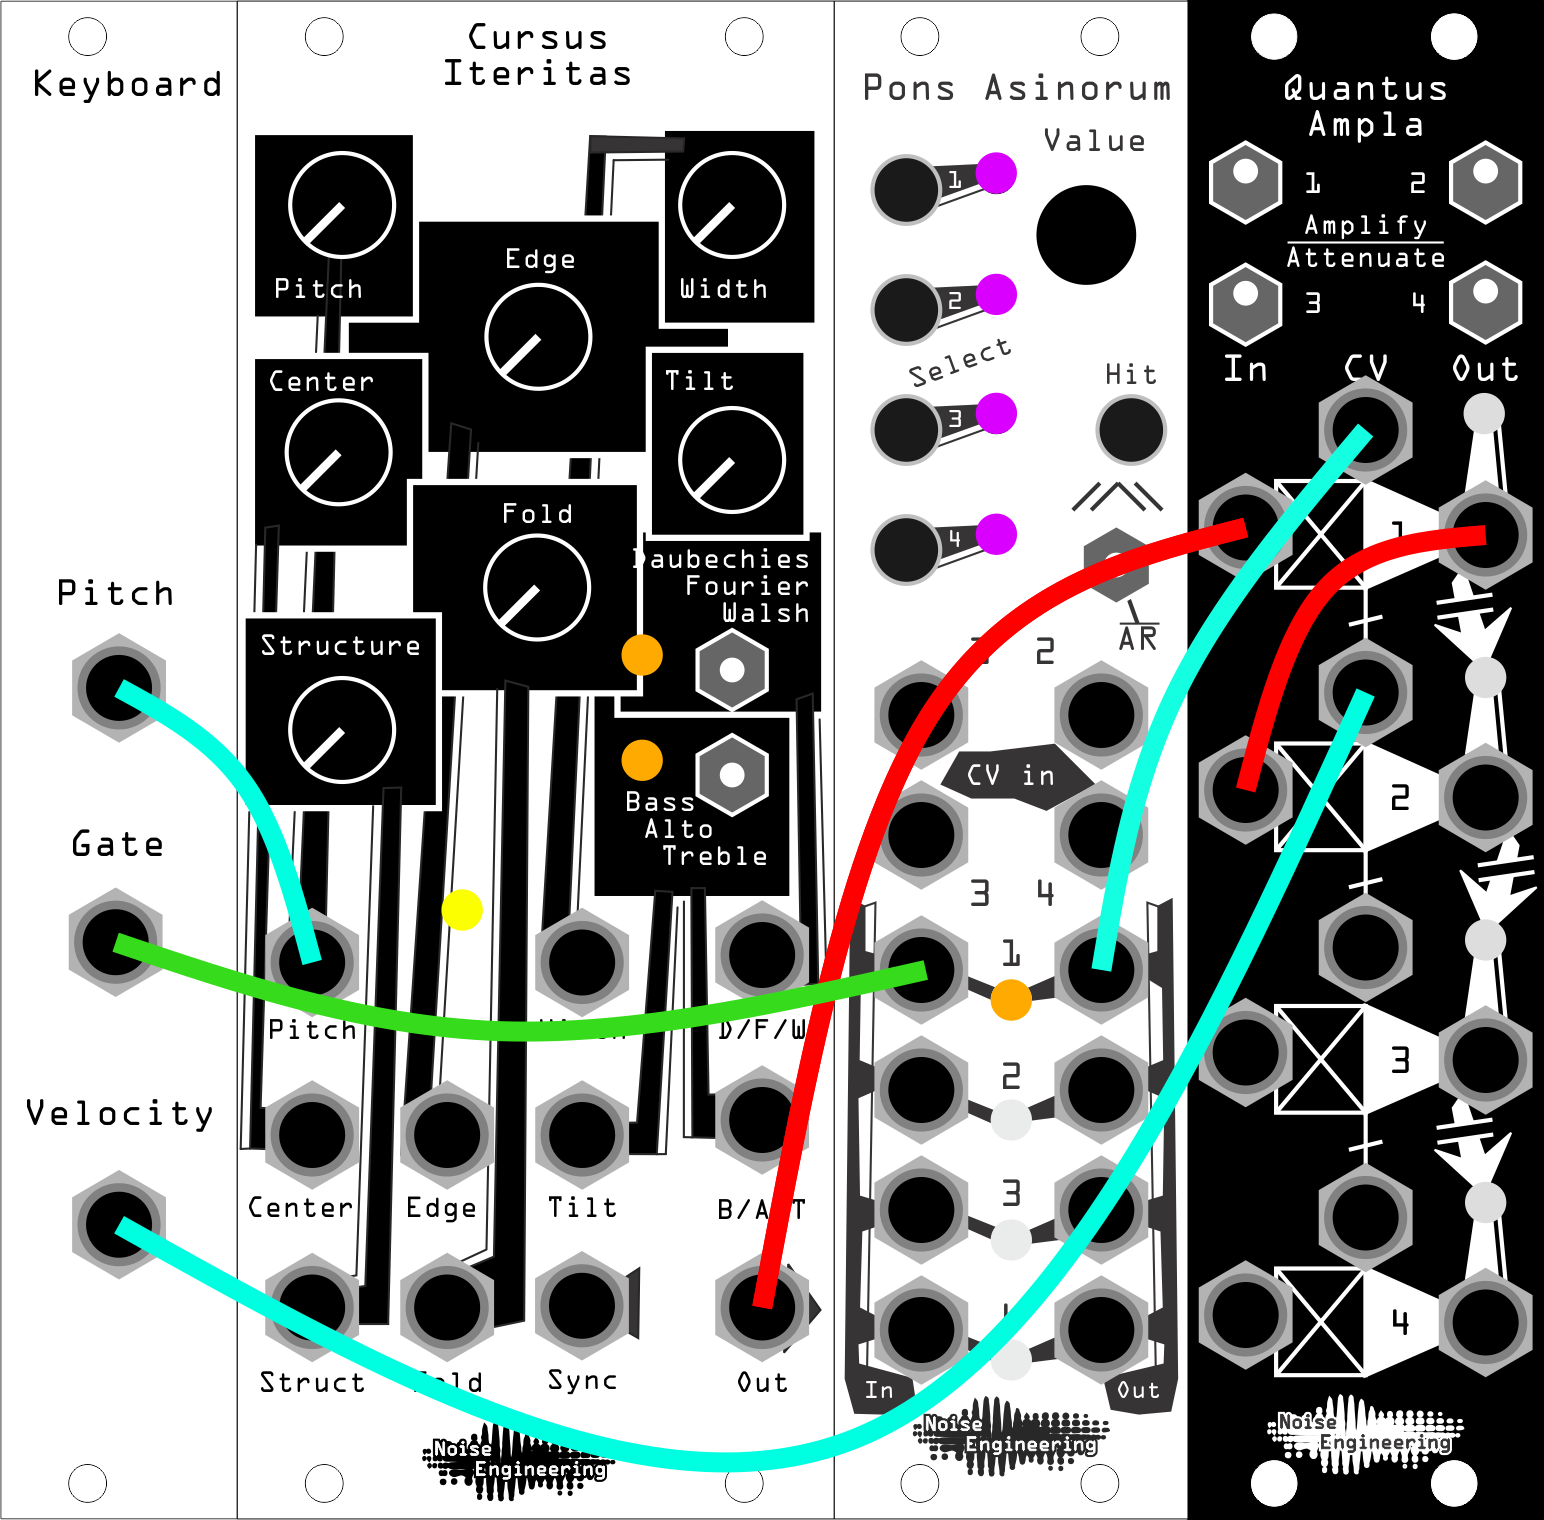
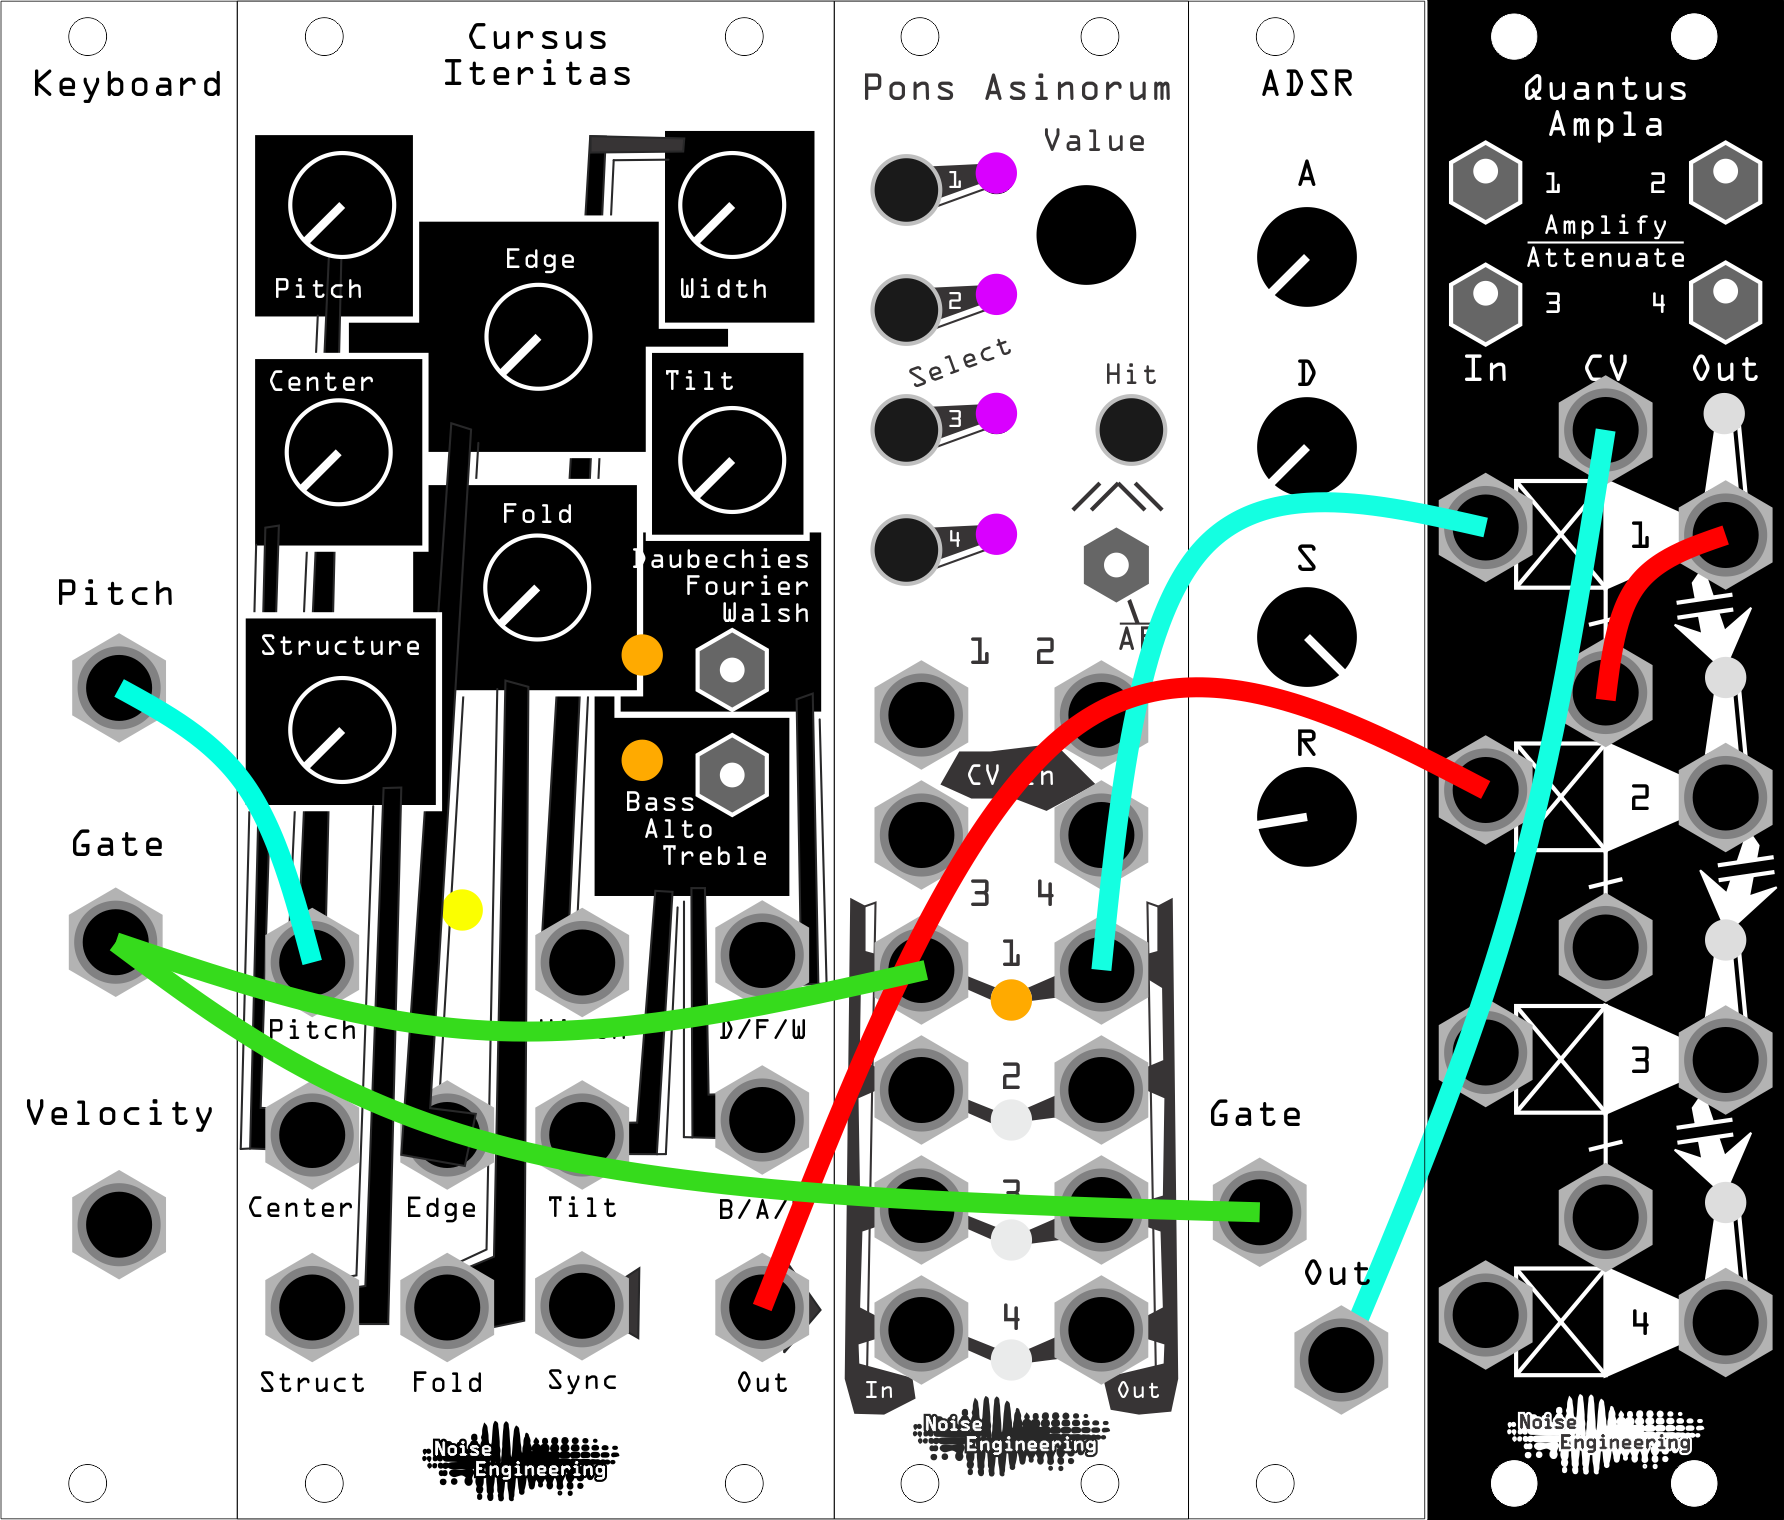
- Velocity
- Requirements: oscillator, envelope generator, and a keyboard/sequencer with velocity CV output
Patch an oscillator to
In 1and set the switch toAmplify. Patch your envelope generator toCV 1. PatchOut 1toIn 2. Patch your keyboard’s pitch CV to your oscillator, its gate out to your envelope generator, and its velocity CV toCV 2. MonitorOut 2. This allows the volume level of your voice to be controlled by the velocity CV, responding to how you play
- Piano envelope
- Requirements: oscillator, ASR/ADSR envelope, decay envelope, and a mult
A more dynamic envelope can be patched together with the help of a VCA and two envelope generators. This patch takes inspiration from the dynamic characteristics of a piano: when the gate is high, the note will be sustained, but its level will slowly decay. As soon as the gate goes low again, though, it will be cut short immediately. Set channels
1and2toAmplify. Patch your decay envelope to theInjack of channel1, and set its decay time to be very long. Set your ASR/ADSR envelope to have short attack and release time with sustain at maximum, and patch it toCV 1. Mult your gate to both the decay envelope and the ADSR/ASR envelope. PatchOut 1toCV 2, and patch your oscillator toIn 2. MonitorOut 2.
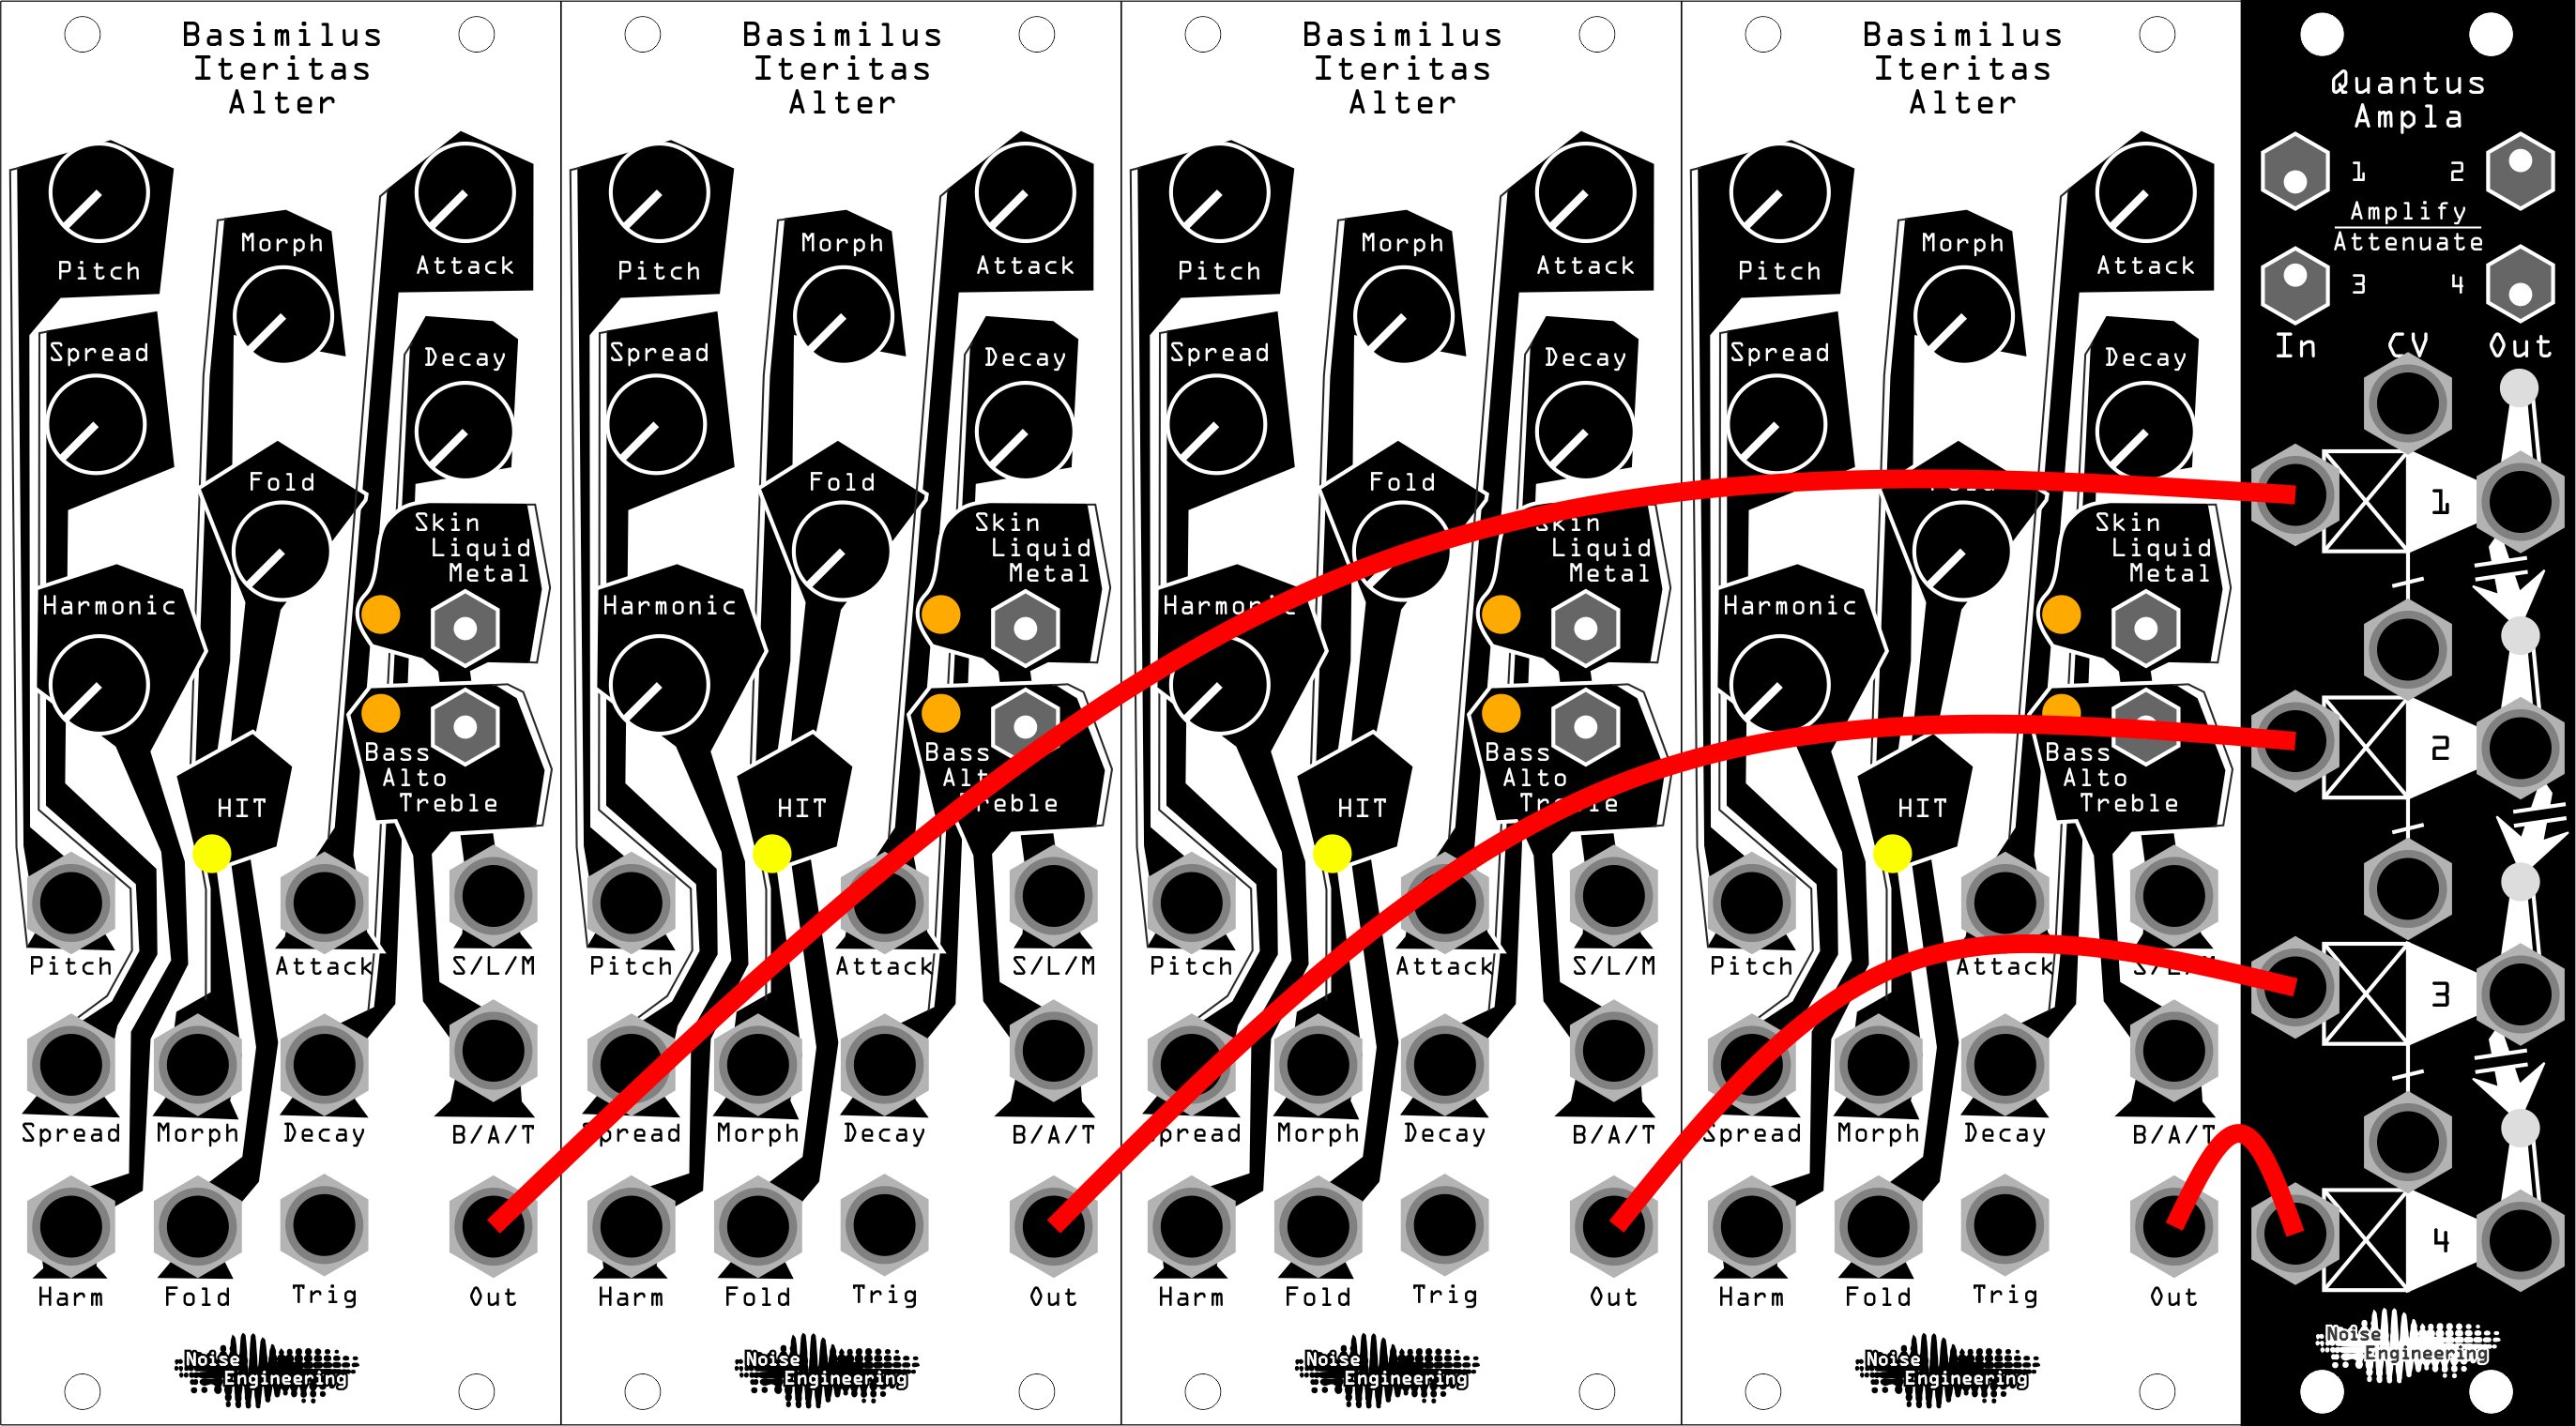
- Unity mixing
- Requirements: Up to four voices to mix
Set all channels to
Amplify. Patch your voices to theInjacks.Out 4will output a mix of all 4 channels. The switches for each channel can act as mutes.
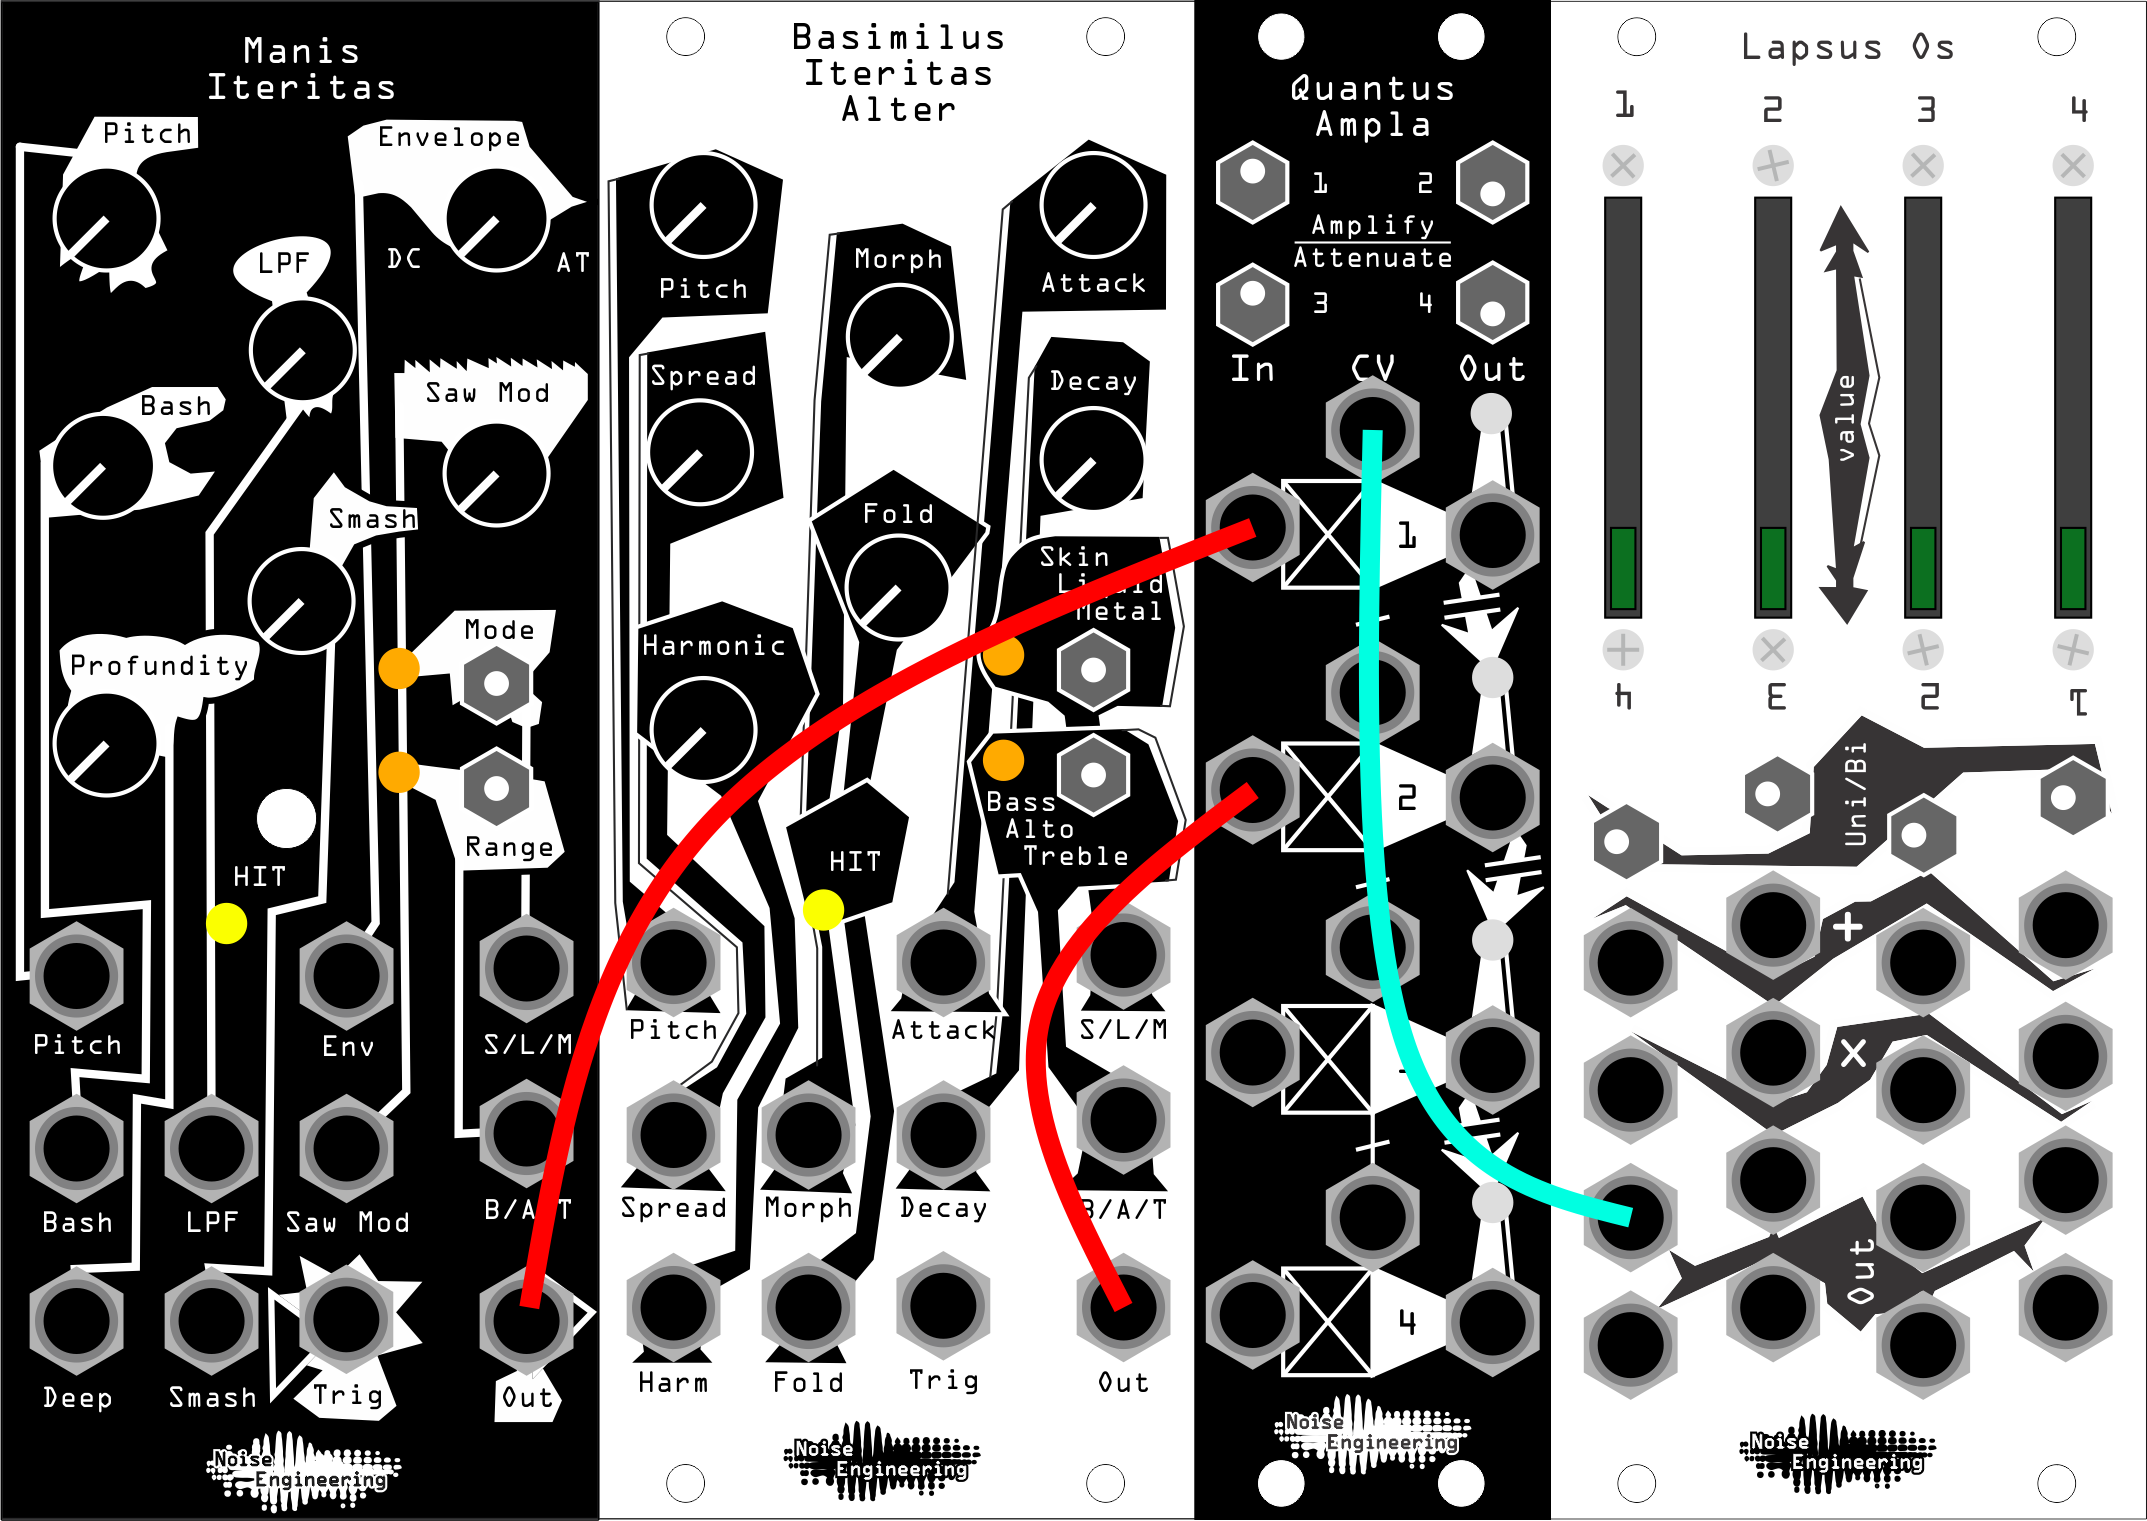
- Crossfading
- Requirements: 2 sounds to crossfade between and a CV controller like Lapsus Os
Set channel
1toAmplifyand channel2toAttenuate. Patch your sounds toIn 1and2, and your CV controller toCV 1. MonitorOut 2. Use your CV controller to fade between the two audio sources. Stereo crossfading is also possible: set channels3and4toAmplifyandAttenuate, and patch your L signals toIn 1and3and yourRsignals toIn 2and4.Out 2is the left output, andOut 4is the R output. QA’s CV inputs are circularly normalled, so your CV controller atCV 1will control crossfading for all channels.
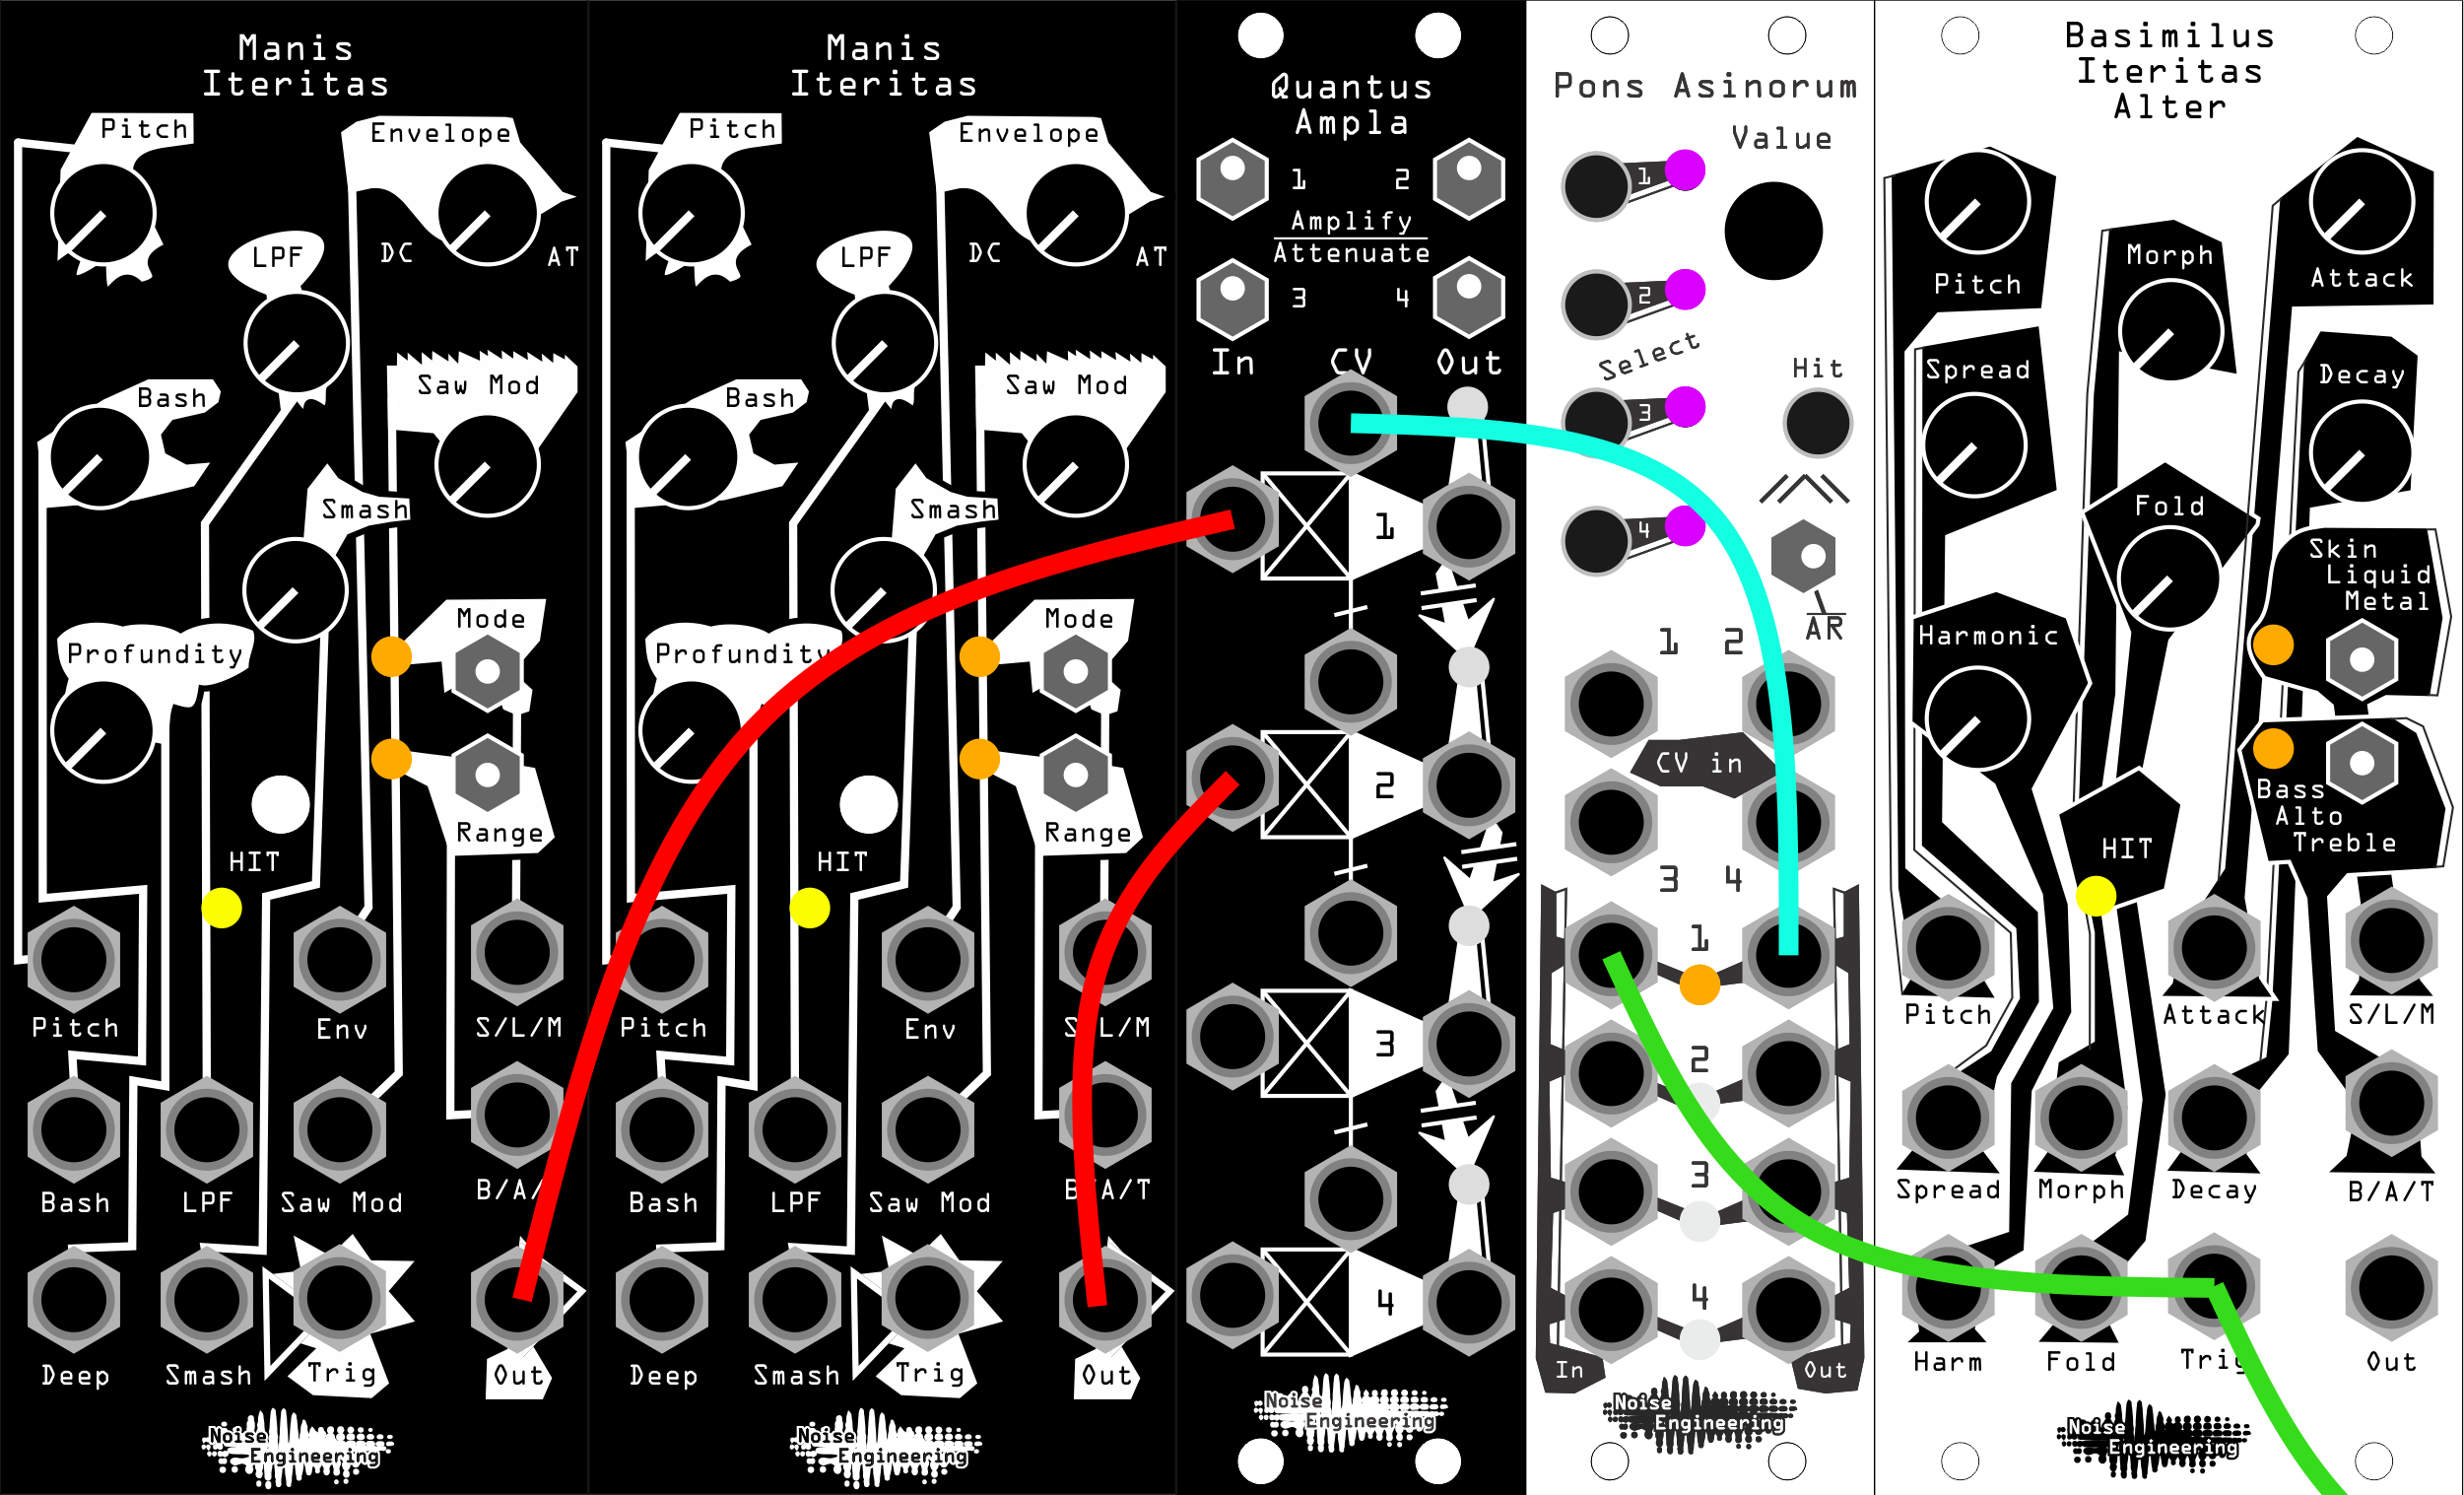
- Ducking
- Decay envelope, sound(s) to duck, and a mult
Patch a decay envelope to the CV jack of channel
1of QA, and set the switch to the lowerAttenuatesetting. Patch a sound source toIn 1, and monitorOut 1. Mult a trigger to the decay envelope and to a kick drum. The audio through the VCA will now duck each time the kick is triggered. Multiple audio sources can be ducked at the same time with minimal patching: QA’s CV inputs are circularly normaled, so a single envelope patched to a single CV input will duck up to 4 channels if they’re left unpatched. The outputs can also be mixed together: QA’s outputs mix down, so simply patch to the lowest output you want in your mix.
- Amplitude Modulation
- Requirements: two oscillators
Patch one oscillator to
In 1, and the other toCV 1. This will modulate the level of the oscillator atIn 1fast enough that it changes its timbre instead of sounding like a change in volume.
- Half-wave rectification
- DC offset and a signal to rectify (like an oscillator or LFO)
Half-wave rectification removes any part of a signal below 0v. This can be useful for creating unusual CV shapes, or changing how an oscillator sounds. Set channel
1toAmplify. Patch a +5v DC offset to theIn 1jack, and patch the signal to be rectified into theCV 1jack. The rectified signal will be output atOut 1.

- Compressor
- Requirements: dynamic audio source (like a drum loop), envelope follower, attenuator, and mult
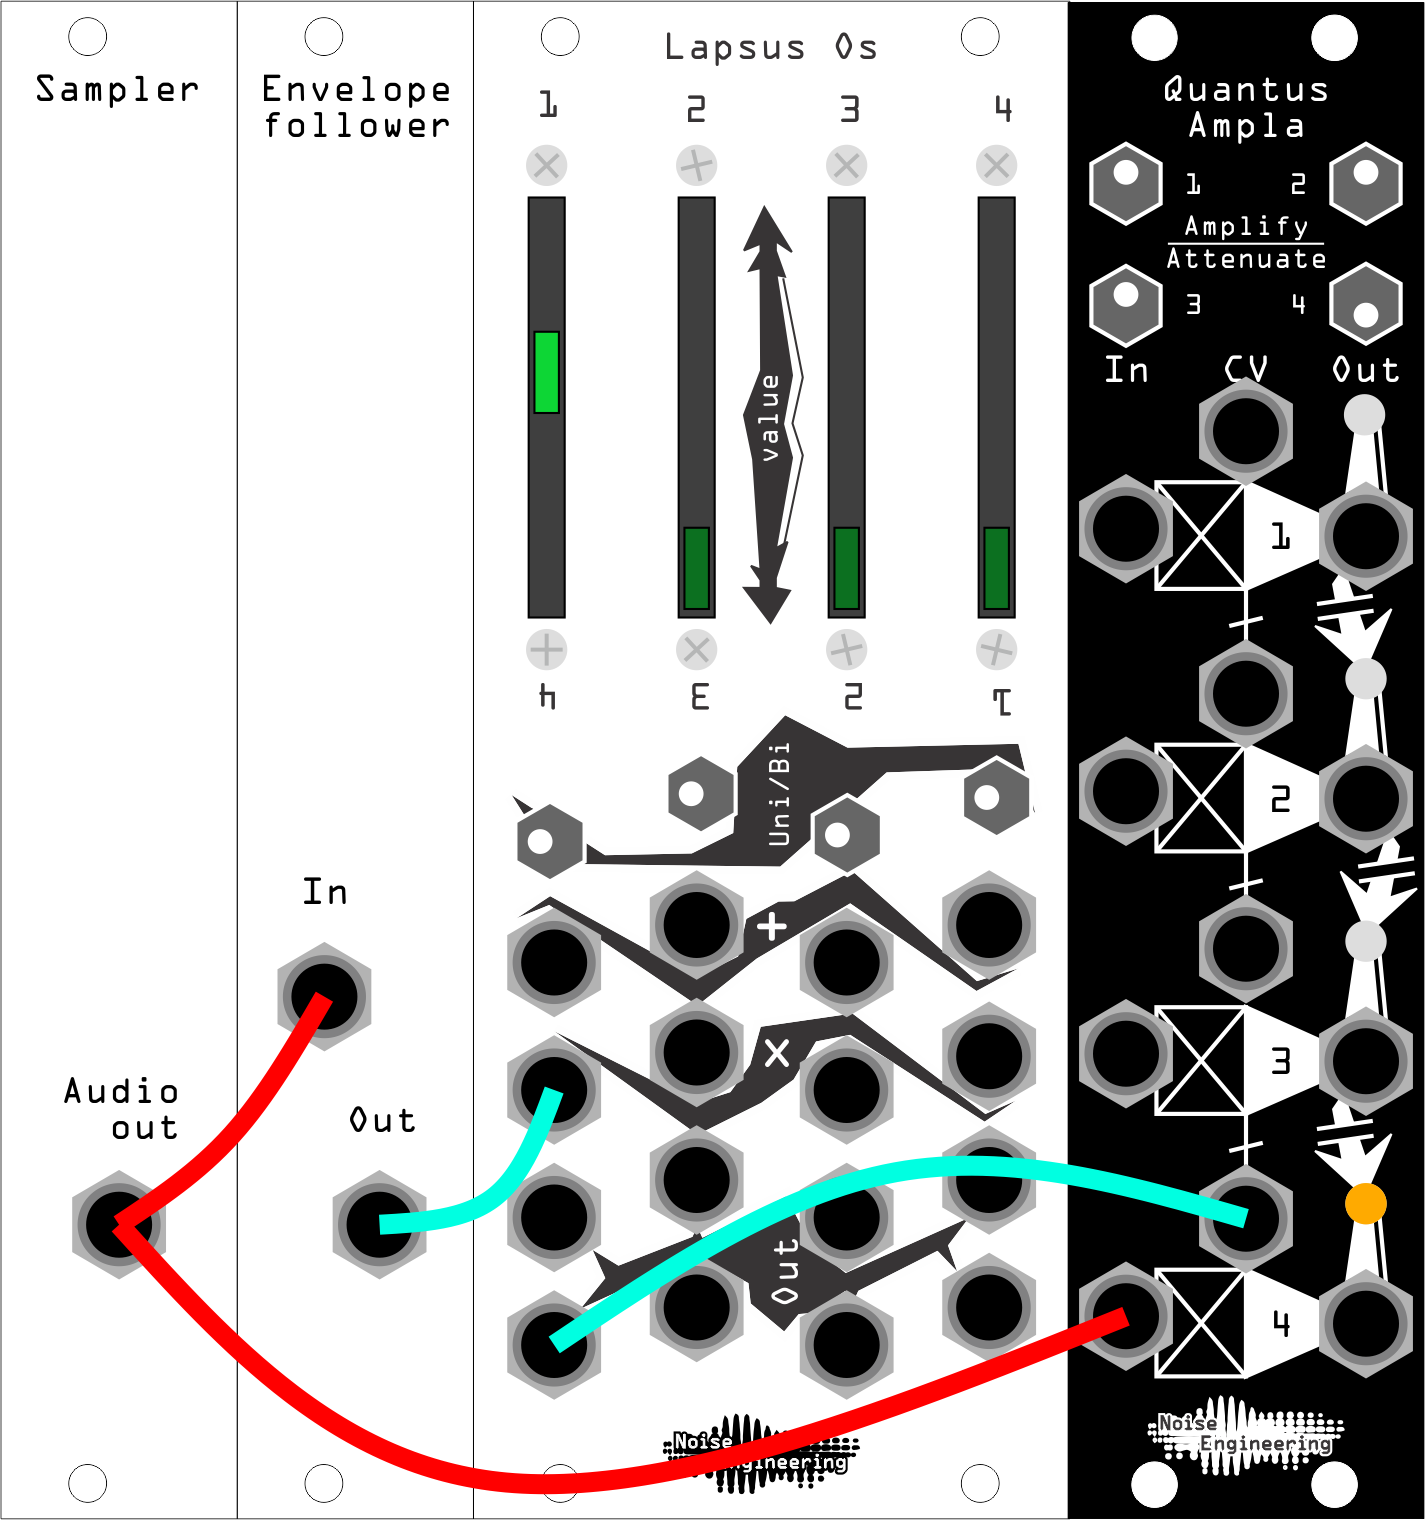
Mult your audio to your envelope follower and to
In 1. Set channel1toAttenuate. Patch the output of the envelope follower through your attenuator, then toCV 1. MonitorOut 1. The attenuator controls the amount of compression.
Design notes#
Quantus Ampla is ancient by Noise Engineering standards. It's been in the works since the dawn of time but has always been pretty low priority. Last year, faced with the pandemic, looming parts issues, and all the problems we were (are) having getting modules out, we dusted off the design and decided maybe this was our year!
We started working on it and were a little unsatisfied with a few things. Kris spent a lot of hours at the bench banging her head against things, pulling Stephen in for two-person measurements, consults, and general head scratchery. In the end, we opted to swap the op amps we used; a lot of hot air later, this solved the problems we were having beautifully.
We were good to go with it, or so we thought, but then everything was just constantly busy. We wanted to get the plugins out, and that's been a lot of work! And then there's just getting things built which is...daunting these days. So we still sat on it for a bit.
Fast forward a few months and we agreed it was just time. We dusted the poor thing off once again, and as Kris was writing copy, she said what the hell, why is this AC coupled? Is there a reason we'd want that? Much arguing later, she went back to the bench and modded the crap out of the last-built hardware. It was a struggle given where half the parts were (we tend to pack those parts in). Some plastic may have been harmed/melted in the making of the DC-coupled version that you now hold.
Fortunately, the mods were pretty easy and took only a day of work and test and we were back on track for launch. We were cranky but it was a better product for it, and isn't that why we do this?
Warranty#
We will repair or replace (at our discretion) any product that we manufactured for one year after initial purchase as long as we are in business and are able to get the parts to do so. This warranty does not apply to normal wear and tear, including art/panel wear, or any products that have been modified, abused, or misused. Our warranty is limited to manufacturing defects.
Warranty repairs/replacements are free. Repairs due to normal wear, user modification, or other damage are charged at an affordable rate. Customers are responsible for the cost of shipping to Noise Engineering technicians for repair.
All returns must be coordinated through Noise Engineering; returns without a Return Authorization will be refused and returned to sender.
For immediate issues with new modules, please contact your dealer for a replacement. Otherwise, please contact us if you think one of your modules needs a repair.