Morbus Legio Manual#
Gentle to harsh noise generator and distortion processor. It’s Morbus time.
Screen reader accessible documentation
Overview#
Morbus Legio is a unique combination of processor and noise generator. If you want to create wide noise that can be CV controlled and spread across the stereo field, Morbus is the perfect oscillator for you: with three CV-able parameters that affect how noise is generated, plus a wavefolder and a chorus, a huge palette of noise is available at your fingertips. Or, use Morbus to process an external signal: soft clipping, wavefolding, FWR distortion, and chorus can all be applied to an external signal, and the internal noise oscillator can be mixed with the output or bypassed. Create lofi effects with low-frequency noise and some saturation, or unleash noisy, distorted chaos with extreme settings.
- Type: Noise generator and distortion processor
- Size: 6 HP
- Depth: 1.5 inches
- Power: 2x5 Eurorack
- +12 V:
140mA - -12 V:
22mA
Etymology#
Morbus -- from Latin: "sickness"
Legio -- from Latin: "legion, army"
"Lots of sickness"
Color code#
On boot, the Legio's LEDs will shine with this color pattern to indicate that it is running the current Morbus Legio firmware:

Power#
To power your Noise Engineering module, turn off your case. Plug one end of your ribbon cable into your power board so that the red stripe on the ribbon cable is aligned to the side that says -12 V and each pin on the power header is plugged into the connector on the ribbon. Make sure no pins are overhanging the connector! If they are, unplug it and realign.
Line up the red stripe on the ribbon cable so that it matches the white stripe and/or -12 V indication on the board and plug in the connector.
Screw your module into your case before powering on the module. You risk bumping the module's PCB against something metallic and damaging it if it's not properly secured when powered on.
You should be good to go if you followed these instructions. Now go make some noise!
Noise Engineering modules are reverse protected. If you accidentally installed it with the red stripe up, simply remove the power and place it correctly.
A final note. Some modules have other headers -- they may have a different number of pins or may say "not power". In general, unless a manual tells you otherwise, do not connect those to power.
Input & output voltages#
Morbus Legio’s CV-modulation inputs expect signals from 0 V to +5 V. The Frequency input’s range is -2 V to +5 V. The Mute input responds to a rising edge around +1.6 V. The audio inputs are AC coupled and respond to any Eurorack audio signals. The audio output can reach up to 16 V peak-to-peak.
Interface#
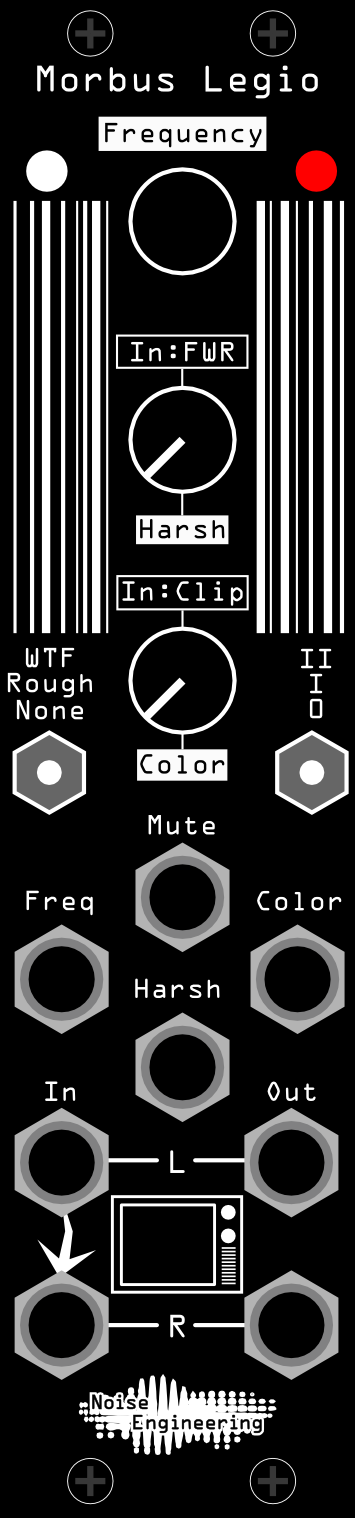
- Frequency
- Changes the frequency of the generated noise. Tapping the encoder toggles the noise oscillator on or off.
- Harsh (In: FWR)
- Changes the sample rate of the noise. If an external signal is present, this increases the amount of full-wave rectification distortion applied to the input.
- Color (In: Clip)
- Changes the color and width of the noise oscillator. If an external signal is present, this increases the amount of soft clipping applied to the input.
- WTF/Rough/None
- Wavefolder control:
Noneis no folding,Roughis some, andWTFis lots. Applied to both the input and the noise oscillator. - 0/I/II
- Activates a vintage-inspired chorus.
0is no chorus,Iis a slow chorus, andIIis a faster chorus. Applied to both the input and the noise oscillator. - Mute
- The noise oscillator and the external input are muted when a high gate is present. Run a square-wave oscillator in for glitchy effects!
- In L/In R
- Audio input, for processing and mixing with noise. The L jack is normaled to the R jack if R is left unpatched.
- Out L/R
- Main audio outputs.
Patch tutorial#
Patch the outputs to your mixer. Start with Harsh and Color at minimum and both switches down. Turn the Frequency encoder to change the pitch of the noise.
Experiment with the Harsh and Color parameters to change the flavor of noise. Use the WTF switch to add some distortion, and the I/II settings to add some chorus.
Reset controls to the initial position, tap the Frequency encoder to bypass the noise oscillator, and patch an external signal (we’re big fans of using a saw or sine wave, or an instrumental sample) to the In L jack (and In R if your signal is stereo). Experiment with the parameters in the same way to see how they affect the noise.
Tap the Frequency encoder again to mix the noise oscillator in with the external signal. Turn the Frequency all the way down to add some sparse, lofi artifacts to your signal, or turn Frequency up to add in some harsh noise.
Firmware swapping#
Use our firmware swap app to change your platform module's firmware at any time.
To get started:
- Turn off the power to your case and unscrew the module.
- Remove the power connector on the back of the module.
- Plug a micro USB connector into the port on the pack of the module, and the other end into your computer.
- Follow the instructions in the firmware swap app.
Design notes#
We’d had a lofty concept of noise oscillator for a while but no real cohesive plan for it. The Legio platform gave us a great home for it but we never really sat down and planned it out. Fast forward to the Sinc Legio firmware we released a couple of months before Morbus. Sinc was a bit of a throwback, with a foundation based on our Sinc Iter module that we discontinued years ago. We don’t use that processor anymore (SI was on the dreaded XMOS for those of you following along closely) so Sinc Legio was a complete rewrite, not a port… and in doing so, we changed it quite a bit. The original Sinc Iter had a very cool Perlin noise mode that we liked for lots of applications, but we took it out of Sinc Legio… but then Stephen thought that there may be something more fun to do with it. He wrote some code to temp it out with something similar to Sinc Iter's noise, but using multi-octave lattice noise and a variable interpolation scheme. He and Markus got it up and running pretty fast: we started that week expecting to not release a module in April, and finished the week slotting it in that month because we knew we were onto something. A bit more refinement (if you can use that word for a noise generator), and half the team was saying it was their favorite thing we’ve ever made.
Warranty#
We will repair or replace (at our discretion) any product that we manufactured for one year after initial purchase as long as we are able to get the parts to do so. This warranty does not apply to normal wear and tear, including art/panel wear, or any products that have been modified, abused, or misused. Our warranty is limited to manufacturing defects.
Warranty repairs/replacements are free. Repairs due to normal wear, user modification, or other damage are charged at an affordable rate. Customers are responsible for the cost of shipping to Noise Engineering technicians for repair.
All returns must be coordinated through Noise Engineering; returns without a Return Authorization will be refused and returned to sender.
For immediate issues with new modules, please contact your dealer for a replacement. Otherwise, please contact us if you think one of your modules needs a repair.
Special thanks#
- Jared Leto