Marimba Legio#
Resonant bar modelled as a bank of tuned modal resonators
Overview#
Marimba Legio is a physical modeling firmware based around a bank of resonators. Three resonator types -- Tube, Metal, or Wood -- offer different timbres, and can be played either with the internal exciter as a synth voice, or with external audio input -- or both!
- Type: Modal resonator bank
- Size: 6 HP
- Depth: 1.5 inches
- Power: 2x5 Eurorack
- +12 V:
140mA - -12 V:
22mA
Etymology#
Marimba-- of Bantu origin: “Many Xylophones”
Legio -- from Latin: “legion, army”
“Lots and lots of xylophones”
Color code#
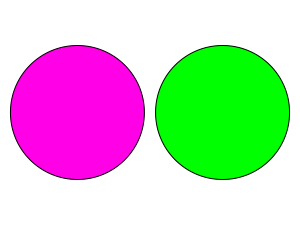
On boot, the Legio's LEDs will shine with this color pattern to indicate that it is running the current Marimba firmware:
Power#
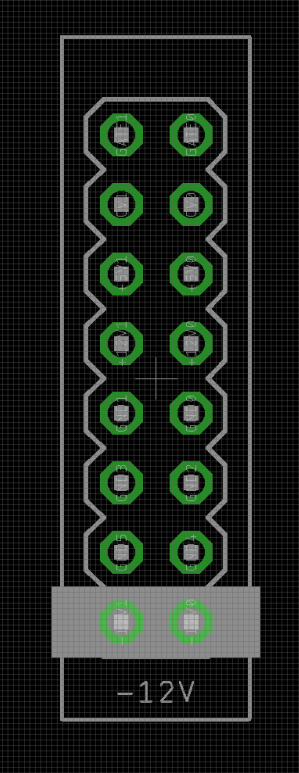
To power your Noise Engineering module, turn off your case. Plug one end of your ribbon cable into your power board so that the red stripe on the ribbon cable is aligned to the side that says -12 V and each pin on the power header is plugged into the connector on the ribbon. Make sure no pins are overhanging the connector! If they are, unplug it and realign.
Line up the red stripe on the ribbon cable so that it matches the white stripe and/or -12 V indication on the board and plug in the connector.
Screw your module into your case before powering on the module. You risk bumping the module's PCB against something metallic and damaging it if it's not properly secured when powered on.
You should be good to go if you followed these instructions. Now go make some noise!
Noise Engineering modules are reverse protected. If you accidentally installed it with the red stripe up, simply remove the power and place it correctly.
A final note. Some modules have other headers -- they may have a different number of pins or may say "not power". In general, unless a manual tells you otherwise, do not connect those to power.
Input & output voltages#
Legio’s CV-modulation inputs expect signals from 0v to +5v.
The Pitch input’s range is -2v to +5v.
The Hit input responds to a rising edge around +1.6v.
The audio inputs are AC coupled and respond to any Eurorack audio signals.
The audio output can reach up to 16v peak-to-peak.
Interface#
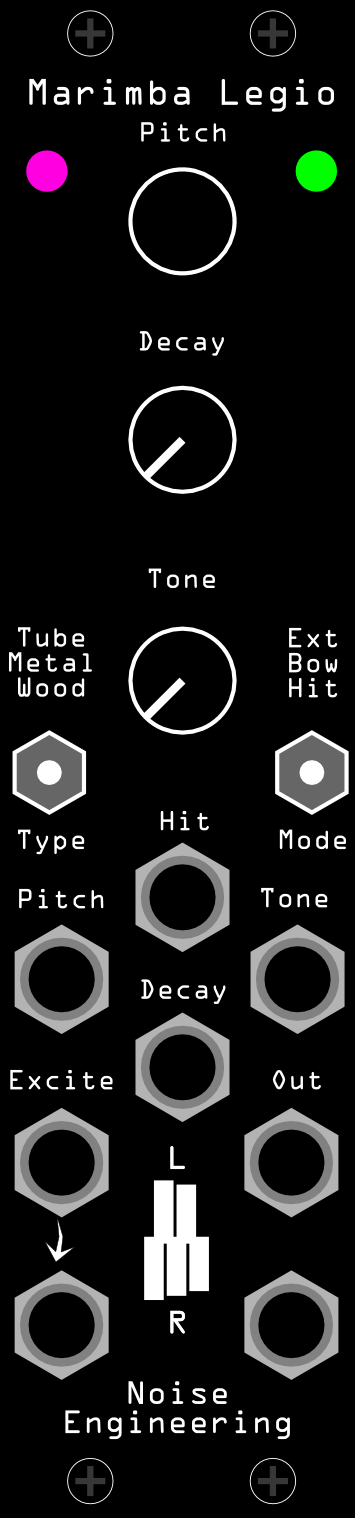
- Pitch (encoder+CV input)
- Sets the pitch of the voice. Turn for fine tuning, press and turn for coarse tuning.
- Decay (potentiometer+CV input)
- Sets the amount of time the resonator rings out.
- Tone (potentiometer+CV input)
- Sets the tone of the strike from soft and round to hard and bright.
- Type (switch)
- Sets the resonator type.
- Mode (switch)
- Sets the excitation mode.
- Ext: Audio strikes the resonator.
- Bow: Audio bows the resonator.
- Hit: External audio is passed through, bypassing the resonator.
- Hit (trigger input)
- Trigger input for the synth voice.
- Excite L/R
- Audio input. The L jack is normaled to the R jack if R is left unpatched.
- Out L/Out R
- Audio outputs.
Patch tutorial#
Patch a pitch CV sequence to the Pitch input, and a trigger sequence to the Hit input.
Set Decay and Tone to noon as a starting point, or dial them to taste.
Explore the different Type settings. Different materials are more excitable and resonant in different frequency ranges, so try a wide range of octaves for each mode to hear where each excels.
Unpatch your sequence signals and patch any audio sources into the Excite inputs. Explore the top two Mode settings to hear the difference between bowing and striking the resonator body.
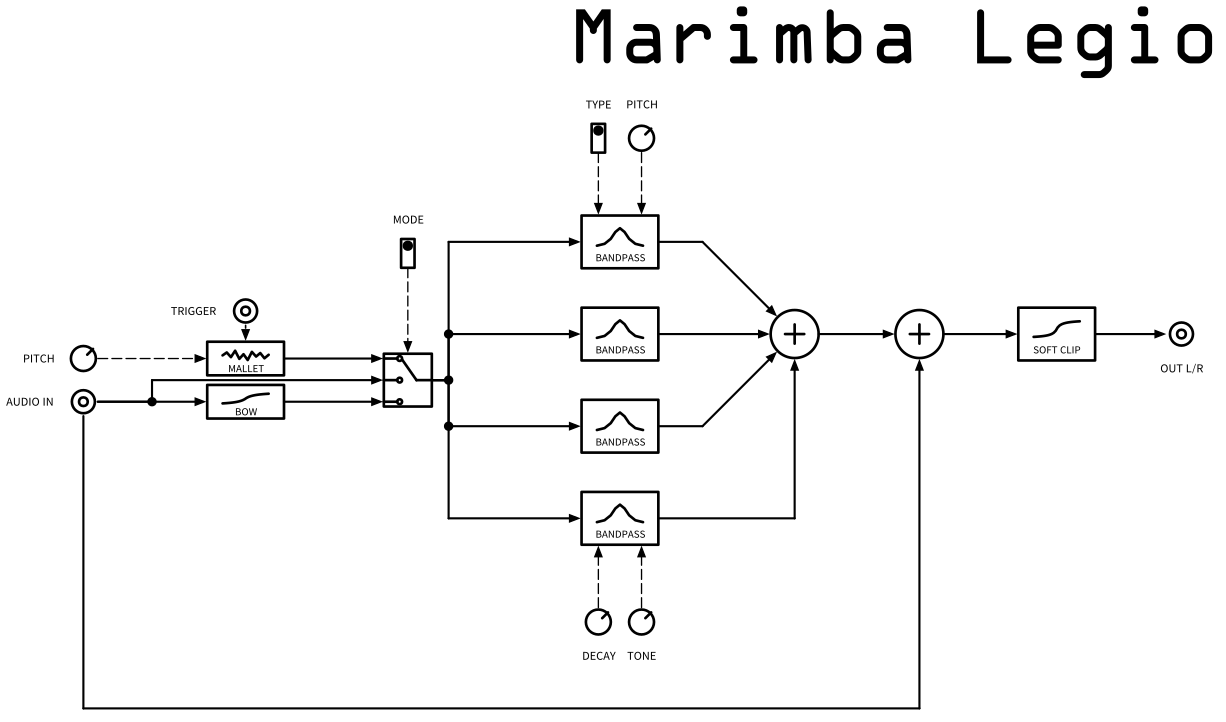
Signal flow#
Warranty#
We will repair or replace (at our discretion) any product that we manufactured for one year after initial purchase as long as we are able to get the parts to do so. This warranty does not apply to normal wear and tear, including art/panel wear, or any products that have been modified, abused, or misused. Our warranty is limited to manufacturing defects.
Warranty repairs/replacements are free. Repairs due to normal wear, user modification, or other damage are charged at an affordable rate. Customers are responsible for the cost of shipping to Noise Engineering technicians for repair.
All returns must be coordinated through Noise Engineering; returns without a Return Authorization will be refused and returned to sender.
For immediate issues with new modules, please contact your dealer for a replacement. Otherwise, please contact us if you think one of your modules needs a repair.
Design Notes#
Marimba was one of the last firmware ideas we came up with for this launch.
In May, 2026, Stephen and Kris got to see the Harry Partch Ensemble perform at REDCAT, here in Los Angeles. Partch composed in microtones and designed instruments for his own works. Among them are several marimbas (diamond marimba, marimba eroica, bass marimba, and bamboo marimba). Watching the performers with these instruments was absolutely mind boggling.
So on the way home, Kris said, so...hear me out. Marimba Alia?
But marimbas are reasonably simple instruments (if not simple to play), and as with other firmwares, the extra controls that Alia would have given didn't have a good use. And Marimba Legio was born.
Special thanks#
- Enthusiastic Electrons
- Everett Dolgner
- Frequency Divide
- itsMasterIll
- Ozon
- starthief
- Harry Partch and the Harry Partch Ensemble