Librae Legio Manual#
Compressor, expander, limiter, saturator, and more: put Librae at the end of your chain and listen to the magic.
Screen reader accessible documentation
Overview#
Librae Legio is a dynamics processor designed to take a whole patch to the next level. Compression, expansion, limiting, noise gating, and two styles of gentle distortion: Librae is the perfect tool to bring your mix together. And while it can do extreme limiting and really squash your sounds together, we developed it with transparency in mind – whether you want to hard-limit a techno mix or gently bring the sounds in an ambient patch together, Librae is the end-of-chain dynamics processor you’ve been looking for. Not only is Librae Legio a fantastic mixing tool, it’s also a platform: if you feel the need to change up your system, the firmware on your Legio can be changed to a completely different module at will via our Customer Portal.
- Type: Stereo dynamics processor/platform
- Size: 6 HP
- Depth: 1.5 inches
- Power: 2x5 Eurorack
- +12 V:
140mA - -12 V:
22mA
Etymology#
Librae -- from Latin: “balance”
Legio -- from Latin: "legion, army"
"Lots of balance"
Color code#
On boot, the Legio's LEDs will shine with this color pattern to indicate that it is running the current Librae Legio firmware:

Power#
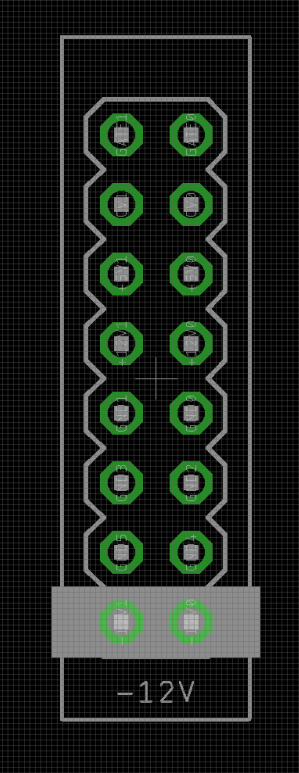
To power your Noise Engineering module, turn off your case. Plug one end of your ribbon cable into your power board so that the red stripe on the ribbon cable is aligned to the side that says -12 V and each pin on the power header is plugged into the connector on the ribbon. Make sure no pins are overhanging the connector! If they are, unplug it and realign.
Line up the red stripe on the ribbon cable so that it matches the white stripe and/or -12 V indication on the board and plug in the connector.
Screw your module into your case before powering on the module. You risk bumping the module's PCB against something metallic and damaging it if it's not properly secured when powered on.
You should be good to go if you followed these instructions. Now go make some noise!
Noise Engineering modules are reverse protected. If you accidentally installed it with the red stripe up, simply remove the power and place it correctly.
A final note. Some modules have other headers -- they may have a different number of pins or may say "not power". In general, unless a manual tells you otherwise, do not connect those to power.
Input & output voltages#
Librae Legio’s CV-modulation inputs expect signals from 0 V to +5 V.
The Color input’s range is -2 V to +5 V.
The FSU input responds to a rising edge around +1.6 V.
The audio inputs are AC coupled and respond to any Eurorack audio signals.
The audio output can reach up to 16 V peak-to-peak.
Interface#

- Color
- Turn to the left to add in zero-crossing distortion, or to the right to add in saturation. Tap the encoder to reset to no distortion.
- Ceiling
- Increases the level of the signal into the dynamics processing, creating more aggressive limiting.
- Room
- Bipolar control: to the right, Librae Legio compresses the signal. To the left, it expands.
- Tilt
- Filters the input to the dynamics processor sidechain, changing the response of compression/expansion.
-
High: Increases response to higher frequency signals, decreases sensitivity to lower frequency signals
-
Off: No filtering
-
Low: Increases response to lower frequency signals, decreases sensitivity to higher frequency signals
- Cut: Max/Some/None
-
Controls a noise gate after the dynamics processor.
-
Max: Aggressive noise gating.
-
Some: Moderate noise gating.
-
None: Noise gate is bypassed.
- FSU
- A high gate at this jack will increase all compression, gain, and distortion past maximum.
- In L/In R
- Audio input. The L jack is normaled to the R jack if R is left unpatched.
- Out L/Out R
- Main audio outputs.
Patch tutorial#
Patch the master bus of your patch to the L In and R In jacks (or if your patch is mono, just the L In). Monitor the L Out and R Out jacks. Start with Ceiling and Room at 12:00, Tilt in the Off position, Cut in the None position, and tap the encoder to set Color to the bypassed position. Experiment with the Room control to change the type and amount of dynamics processing, and use the Ceiling control to create a balance of volume and dynamics. The Tilt control changes how the compressor responds to your patch, and can have a big effect on the overall sound. Try introducing some Color by turning the encoder left or right. With heavy processing, noise in your signal may be accentuated: try different Cut settings to reduce audible noise. If you’re feeling adventurous, patch some gate signals into FSU to really make things wild.
Firmware swapping#
Use our firmware swap app to change your platform module's firmware at any time.
To get started:
- Turn off the power to your case and unscrew the module.
- Remove the power connector on the back of the module.
- Plug a micro USB connector into the port on the pack of the module, and the other end into your computer.
- Follow the instructions in the firmware swap app.
Processing and compression curves#
Librae’s design premise is a fully-featured master bus dynamics processor suitable for Eurorack on the Legio hardware platform.
When conceptualizing Librae, we chatted about a variety of concepts before landing on our final feature requirements:
-
A low-level expander to reduce the noise floor because Eurorack is very noisy
-
A transparent hard limiter to control our peak signal levels as well as to reduce overall dynamics.
-
An adjustable compressor for both more subtle dynamic control than the limiter and for using compression/expansion as an effect.
-
Some interesting nonlinearities as found in some popular studio mastering gear.
After we decided on our feature list, the challenge became figuring out how to map all of those features to three knobs and two switches.
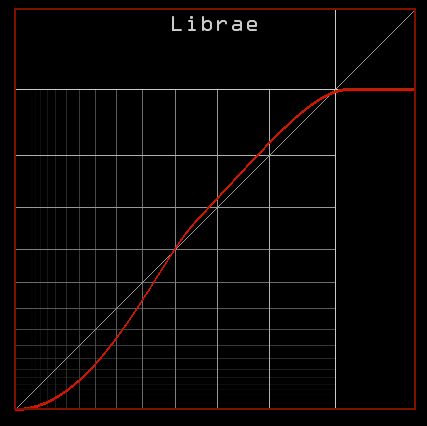
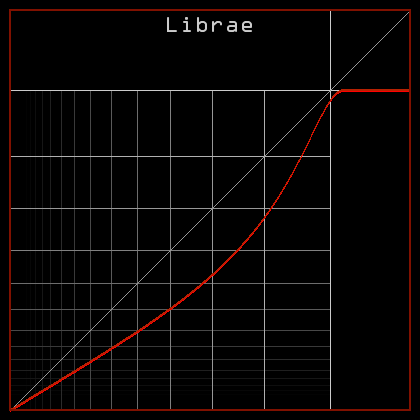
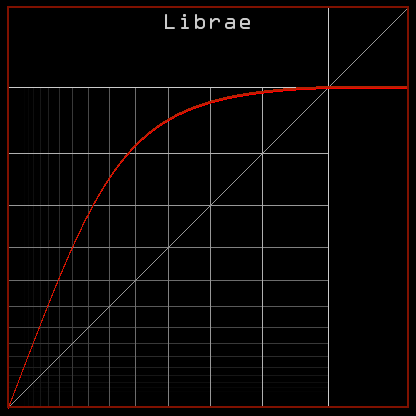
The design core of Librae is the development of a family of static curves that give a tremendous amount of variety but that are parameterized by a very small number of variables.
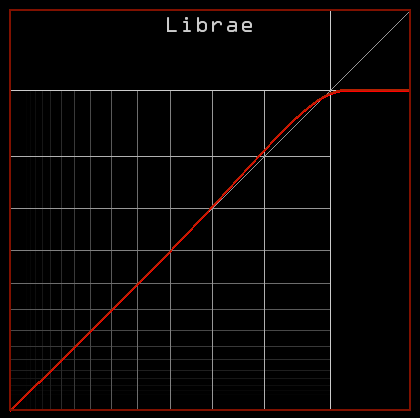
The expander curve (Floor) is a simple expander set up to make quiet signals quieter and keep loud signals at the same level – the goal here is simply to reduce the apparent noise floor. Aggressive gain on any eurorack system makes the relatively high noise floor very obvious, and this switch helps keep it under control. The expansion curve is a simple curve that matches slope at the start point of the expansion and trends toward a curve with slope zero at zero signal level.
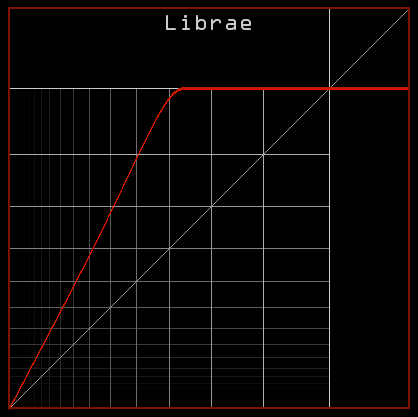
The limiter curve (Ceiling) is fixed and we use only input gain to adjust the amount of limiting. It is a compromise curve that tries to maximize the smoothness around the limiting threshold while minimizing the amount of gain given by the curve itself. This allows for a transparent but rigid hard limiter.
The most complicated curve is Room: to the left it is an expansion curve, and to the right is a compression curve. Both zones have a single breakpoint with an extremely soft knee, and both are designed to be extremely smooth.
Probably the most difficult engineering in Librae was the envelope extraction. We developed a custom envelope extractor that synthesizes its result from a few different perspectives based on uncertainty. Librae also uses a generalized version of a zero crossing limiter to focus gain changes around periods of the waveform where they are least audible.
Warranty#
We will repair or replace (at our discretion) any product that we manufactured for one year after initial purchase as long as we are able to get the parts to do so. This warranty does not apply to normal wear and tear, including art/panel wear, or any products that have been modified, abused, or misused. Our warranty is limited to manufacturing defects.
Warranty repairs/replacements are free. Repairs due to normal wear, user modification, or other damage are charged at an affordable rate. Customers are responsible for the cost of shipping to Noise Engineering technicians for repair.
All returns must be coordinated through Noise Engineering; returns without a Return Authorization will be refused and returned to sender.
For immediate issues with new modules, please contact your dealer for a replacement. Otherwise, please contact us if you think one of your modules needs a repair.