AT Legio#
Stereo chiptune oscillator inspired by Noise Engineering’s first module
Overview#
AT Legio is a stereo oscillator based on the algorithms of Ataraxic Translatron, the first module Noise Engineering ever made. Inspired by the Atari VCS chip, AT uses a linear-feedback shift register to create chiptune-esque tones ranging from simple and square to harmonically complex and noisy.
The Legio version takes things further with the addition of a second modulating oscillator, a stereo chorus, and a stereo audio input for ring modulation, dynamics mapping, or external mixing.
- Type: Stereo chiptune oscillator
- Size: 6 HP
- Depth: 6 HP
- Power: ?
- +12 V:
140mA - -12 V:
22mA
Etymology#
AT -- from historically abbreviated Latin: “of an oscillator from a different time” Legio -- from Latin: “legion, army”
“Lots of oscillator”
Color code#
On boot, the Legio's LEDs will shine with this color pattern to indicate that it is running the current AT Legio firmware:

Power#
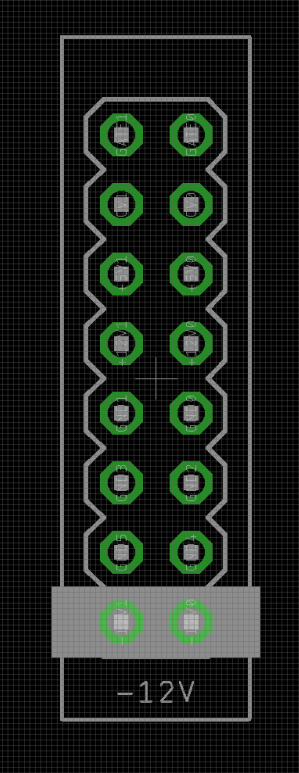
To power your Noise Engineering module, turn off your case. Plug one end of your ribbon cable into your power board so that the red stripe on the ribbon cable is aligned to the side that says -12 V and each pin on the power header is plugged into the connector on the ribbon. Make sure no pins are overhanging the connector! If they are, unplug it and realign.
Line up the red stripe on the ribbon cable so that it matches the white stripe and/or -12 V indication on the board and plug in the connector.
Screw your module into your case before powering on the module. You risk bumping the module's PCB against something metallic and damaging it if it's not properly secured when powered on.
You should be good to go if you followed these instructions. Now go make some noise!
Noise Engineering modules are reverse protected. If you accidentally installed it with the red stripe up, simply remove the power and place it correctly.
A final note. Some modules have other headers -- they may have a different number of pins or may say "not power". In general, unless a manual tells you otherwise, do not connect those to power.
Input & output voltages#
AT Legio’s CV-modulation inputs expect signals from 0v to +5v.
The Pitch input’s range is -2v to +5v.
The Sync input responds to a rising edge around +1.6v.
The audio inputs are AC coupled and respond to any Eurorack audio signals.
The audio output can reach up to 16v peak-to-peak.
Interface#
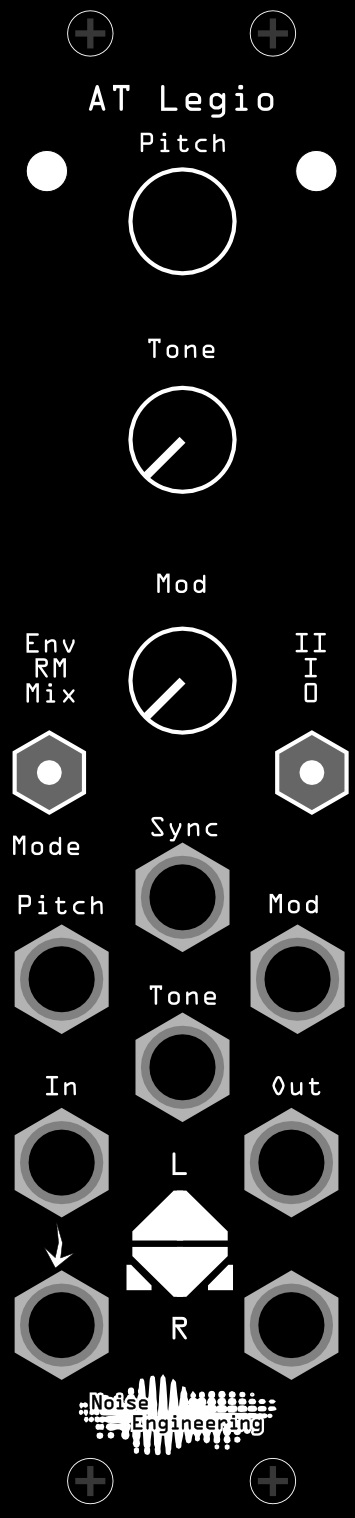
- Pitch (encoder+CV input)
- Sets the pitch of the oscillator. Turn for fine tuning, press and turn for coarse tuning.
- Tone (potentiometer+CV input)
- Selects between oscillator shapes for the carrier oscillator.
- Mod (potentiometer+CV input)
- A second oscillator that modulates the first. This parameter changes the shape and octave of the second oscillator.
- Env/RM/Mix
- Sets the behavior of the audio inputs.
- Env: an envelope follower is applied to the input, and the dynamics are applied to the oscillator output.
- RM: Ring modulation from the input is applied to the oscillator.
- Mix: The audio input is mixed with the oscillator.
Note
Env and RM modes require an external input to produce audio, and the oscillator will be silent with no input. Use Mix mode for standalone oscillator operation.
- 0/I/II
- Activates the vintage-inspired chorus. 0 is off, I is some, II is lots.
- Sync
- Hard-sync input.
- In L/In R
- Audio inputs. The L jack is normaled to the R jack if R is left unpatched.
- Out L/Out R
- Audio outputs.
Patch tutorial#
To start, patch the output jacks to your mixer, set both switches to the bottom position, and set Tone and Mod to minimum. Try different Tone settings, then adjust Mod to hear how they interact.
AT Legio plays well with other oscillators. Mult an external oscillator to the Sync and In L jacks and adjust the frequency of both oscillators to experiment with hard sync.
Set the left switch to the middle RM position, and patch an oscillator to the In L jack. Adjust frequencies for a new dimension of tone generation. For even more fun, try patching two different oscillators to the left and right inputs for stereo ring modulation!
Set the left switch to the top Env position, and patch in a percussive voice like a kick drum. The dynamics of AT will copy the dynamics of the input.
Try patching a pitch sequence to the Pitch input and the outputs to envelope-controlled VCAs for a simple and versatile synth voice. Flip the right switch to I or II to add some stereo width with the chorus.
Warranty#
We will repair or replace (at our discretion) any product that we manufactured for one year after initial purchase as long as we are able to get the parts to do so. This warranty does not apply to normal wear and tear, including art/panel wear, or any products that have been modified, abused, or misused. Our warranty is limited to manufacturing defects.
Warranty repairs/replacements are free. Repairs due to normal wear, user modification, or other damage are charged at an affordable rate. Customers are responsible for the cost of shipping to Noise Engineering technicians for repair.
All returns must be coordinated through Noise Engineering; returns without a Return Authorization will be refused and returned to sender.
For immediate issues with new modules, please contact your dealer for a replacement. Otherwise, please contact us if you think one of your modules needs a repair.
Design Notes#
A while ago Stephen and Kris were looking for an Ataraxic Translatron in the house, and after much searching, Kris said, "Can we just make one on Legio please?" It was something we'd talked about tangentially (Patrick had asked for this over the years too), but hadn't really thought about what we would do with the added controls that Legio afforded. A very quick brainstorm from Stephen and 3 hours later, we had the first pass up and running.
Special thanks#
- Enthusiastic Electrons
- Everett Dolgner
- Frequency Divide
- itsMasterIll
- Ozon
- starthief